googleads

Friday 28 December 2012

Awesome Crochet Alligator

Crocheted Aligator Playground in São Paulo by Olek playgrounds crochet Brasil

Crocheted Jacaré is the latest work from Brooklyn-based artist Olek, who traveled to Brasil for the 2012 SESC Arts Show in order to encase a massive playground shaped like an alligator in her trademark crochet covering. With the help of several colleagues Olek covered the reptilian playscape in North Carolinian acrylic yarn and Brazilian ribbons over a period of several weeks. The SESC show runs through July 29th and you can see much more of Olek’s work on her website. All images courtesy Lost Art. (via designboom)

Crocheted Aligator Playground in São Paulo by Olek playgrounds crochet Brasil

Crocheted Aligator Playground in São Paulo by Olek playgrounds crochet Brasil

Crocheted Aligator Playground in São Paulo by Olek playgrounds crochet Brasil

Click here to see more photographs of this jaw dropping work.

Thursday 27 December 2012

Teal Starburst Retro Style Granny Square Crochet Blanket & Blanket Pattern.


Teal Starburst Retro Style Granny Square Crochet Blanket Pattern PDF
Here is a really pretty teal granny square blanket, afghan, throw. It has been constructed with 49 little flower granny motif squares and has been bordered multiple times to give a good colour contrast and finished look.
 
Retro Vintage Style Teal Flower Granny Square Crochet Blanket Afghan Sublime
Teal Starburst Retro Style Granny Square Crochet Blanket Pattern PDF

Wednesday 26 December 2012

Colorful Squares Throw Crochet Pattern - Red Heart

Colorful Squares Throw

Think of all the amazing color combinations you can use for this bright and cheerful throw! Join the motifs as you go to make assembly a breeze.

Size: Throw measures 53” (134.5 cm) wide x 58” (147.5 cm) long.

Gauge/Tension:

GAUGE: One Square measures about 5½ x 5½” (14 x 14 cm). CHECK YOUR GAUGE. Use any size needles to obtain the gauge.

Download printable instructions from Red Heart Click Here.

Saturday 22 December 2012

Granny Stripes Blanket & Tutti Frutti Blanket


For the past few days I’ve been busy working on a new granny stripes blanket. I started out with the notion that it would be a relatively small blanket and thus a quick project. I’m working on a smaller hook than I usually would but the blanket is quite time intensive. It’s also turned out to be much bigger than I had originally intended.

stripe3

I’m hoping for brighter weather tomorrow then I can get some good photographs to show you. The above blanket was my ‘fine’ granny stripes blanket. Here you will notice the cluster are double and not triple dc’s.

TF2

Tutti Frutti Crochet Blanket

As I’m busy crocheting my stripey blanket I’m planning what to start on next. I have decided to make a new Tutti Frutti blanket in a more random colour scheme. I had been thinking about this when a lady called Melissa contacted me via Etsy to say she was desperate to get a copy of the pattern. Serendipity maybe!

You can get the Tutti Frutti pattern here. 

Or to visit my Etsy store click here.

tuttifrutti2

Wednesday 19 December 2012

Harlequin Colourful Granny Square Retro Style Blanket

I just got this blanket finished yesterday. I was trying to use up lots of colours that I wouldn’t necessarily use in a granny square blanket. However, after my initial reservations, I think it came together quite well. The colours are actually really cheerful and happy and worked well together.

IMG_1591

IMG_1588-001

IMG_1587-001

Anyway maybe it should have been called serendipity but I decided it reminded me of a harlequin. As I said last week I had a bit of a scarf moment and here are two more that I made before I got it out of my system.IMG_1571

IMG_1567

All of these items are available in my Etsy store Click here.

Tuesday 18 December 2012

Quadra Crochet Rug Pattern - Berroco


Skill Level: Easy
Quadra
Whip up a textured crocheted rug to match your decor. Weekend comes in weathered shades that will blend with any color scheme.
Finished Measurements
Approximately 23” x 27½”
Materials
1 Hank each Berroco Weekend (100 grs), #5907 Mouse (A), #5932 Cocoa (C) and #5941 Sea Glass (D) and 2 hanks #5906 Raisin (B)
Crochet hook, size 5.00 mm (H-8) OR SIZE TO OBTAIN GAUGE
Gauge
16 sc’s = 4”; 12 rows = 4” in sc worked TBL
TO SAVE TIME, TAKE TIME TO CHECK GAUGE
Note
There will be 4 ch-2 spaces in each rnd - these are the 4 corners.
Mat
With crochet hook, using A, ch 22.
Rnd 1: Sc in 2nd ch from hook and in each ch to 1 ch before end, work (1 sc, ch 2, 1 sc, ch 2, 1 sc) all in last ch, working along the other side of foundation ch, work 1 sc in each ch to end, work (ch 2, 1 sc, ch 2,) all in last ch, join with a sl st in first sc.
Rnd 2: Ch 1, * sc TBL in each sc to next ch-2 space, (1 sc, ch 2,1 sc) all in ch-2 space, sc in next sc, (1 sc, ch 2, 1 sc) all in next ch-2 space, rep from * once more, join with a sl st in beg sc. Rep Rnd 2 ten times more, having 2 more sc’s between corners on short and long edges. Change to B and rep Rnd 2 twelve times. Change to C and rep Rnd 2 eight times. Change to D and rep Rnd 2 once. Change to C and rep Rnd 2 four times. Change to B and rep Rnd 2 six times. Change to A. Rep Rnd 2, working through both loops instead of TBL four times. Working from left to right, work around entire mat in Reverse Sc. Join with a sl st in beg sc. Fasten off.
For more great pattern visit Berroco here.


Sunday 16 December 2012

Tympany Pom Pom Hat Berroco Knitting


Tympany

Skill Level: Easy
Project Type: Hats/Scarves/Gloves
tympany.pdf
Tympany is an earflap hat with mitered squares and a pompon finish.
One size
Size
Approximately 21” around x 7 1/2” high (not including earflaps)
Materials
1 Ball each Berroco Sox Metallic (100 grs), #1364 Kiwi (A) and #1366 Mangosteen (B)
16” Length circular knitting needle, size 2 (2.75 mm) OR SIZE TO OBTAIN GAUGE
1 Set (5) double pointed knitting needles, size 2 (2.75 mm)
Crochet hook, size 4.00 mm (F)
Tapestry needle
1 St marker
Clover Art.No 3124 Pom Pom Maker (optional)
Gauge
30 sts = 4”; 40 rnds = 4” in St st
TO SAVE TIME, TAKE TIME TO CHECK GAUGE
Bottom Band
Square 1: With dpn’s, using B, cast on 72 sts. Divide sts onto 4 needles (18 sts per needle) and join, being careful not to twist sts. Mark for beg of rnd and carry marker up. Knit 1 rnd.
Dec Rnd: * K2 tog, k to last 2 sts on needle, SSK, rep from * 3 times more – 64 sts. Knit 1 rnd. Rep Dec Rnd every other rnd until 8 sts remain. Break off yarn leaving an 8” long end. Thread end into tapestry needle and draw through all sts on needles. Pull up tightly and secure.
Note: Squares should be joined in a straight line with Square 8 joining the line into a ring.
Squares 2-7: With RS facing, using dpn’s and B, pick up and k18 sts along one edge of previous square, then cast on 54 sts – 72 sts. Complete same as Square 1.
Square 8: With RS facing, using dpn’s and B, pick up and k18 sts along one edge of previous square, cast on 18 sts, pick up and k18 sts along one edge of Square 1, then cast on 18 sts – 72 sts. Complete same as Square 1.
Crown: With RS facing, using circular needle and A, pick up and k144 sts along one edge of band (pick up 18 sts along edge of each square). Mark for beg of rnd and carry marker up. Work even in St st (k EVERY rnd) until piece measures 7” from lower edge of band.
Shape Top: Dec Rnd 1: * K2 tog, rep from * around – 72 sts. Knit 2 rnds. Divide sts onto 4 dpn’s, keeping marker at beg of rnd.
Dec Rnd 2: Rep Dec Rnd 1 – 36 sts. Knit 1 rnd.
Dec Rnd 3: Rep Dec Rnd 1 – 18 sts. Break off yarn leaving an 8” long end. Thread end into tapestry needle and draw through all sts on needles. Pull up tightly and secure.
Finishing
Place marker between 2 square of band for center back of hat.
Right Earflap: With RS facing, using circular needle and A, skip first 13 sts of square to the left of marker, pick up and k5 sts in remaining sts of first square, 18 sts across next square, then 5 sts in first 5 sts of next square – 28 sts. Work even in Garter St for 1”, end on WS.
Dec Row: K2, k2 tog, k to end. Rep this dec EVERY row 19 times more, end on WS – 8 sts. Bind off.
Left Earflap: With RS facing, using circular needle and A, skip first 2 square to the right of marker, then skip 5 sts of the next square. Pick up and k5 sts in the 5 sts of that square, 18 sts across next square, then 5 sts in first 5 sts of next square – 28 sts. Complete same as right earflap.
Edging: With RS facing, using crochet hook and 2 strands of A held tog, work in sc around entire lower edge of hat and earflaps, join with a sl st in first sc. Fasten off.
Ties (Make 2): Cut two 30” long strands of A and one 30” long strand of B. Put strands tog and fold in half. Insert crochet hook in lower edge of earflap from RS and pull loop through. Insert ends of strands through loop and pull up tightly fastening strands to earflap. Braid strands tog and knot at end leaving 2” free for tassel.
Pom Pom: Using both colors make 1 pom pom with the largest size pom pom maker following the instructions on the package.


Saturday 15 December 2012

Poncho & Cap II - Free Vintage Crochet


PATONS TOTEM, DOUBLE KNIT or
BARONESS BRI-NYLON

Poncho
Main Color: 11 balls
1st Contrast: 6 balls
2nd Contrast: 8 balls

Cap
Main Color: 2 balls
1st Contrast: 1 ball
2nd Contrast: 1 ball

Poncho
Length at shortest point (excluding fringe): 17 ins.

HOOK—Milwards "Disc" 4 M/M (No. 8)

TENSION—1 motif measures 3½ inches square. Check your tension.

Milwards Tapestry Needle for sewing seams.

Milwards "Disc" Crochet Hook 5 M/M (No. 6) for fringe.

ABBREVIATIONS—M. = Main Color. C.1 = 1st Contrast. C.2 = 2nd Contrast. "Picot" = 4 ch., sl.st. back into last tr. worked.

MOTIF "A"

Using 4 M/M (No. 8) Hook and M., make 6 chain, join with a sl.st. to form ring.

1st round—3 ch., (2 tr., "Picot", 2 tr.) in ring, (1 ch., 3 tr., "Picot", 2 tr.) 3 times in ring, 1 ch., sl.st. in 3rd ch. at beg. of round.

Break off M.

2nd round—Using C.1, 1 ch., * (4 tr., "Picot", 3 tr.) in Picot, 1 d.c. in 1 ch. sp., rep. from * 3 times, sl.st. in first tr. at beg. of round. Fasten off.

3rd round—Join C.2 in last d.c. of previous round, 4 ch., 2 d.tr. in same d.c., * 1 ch., (3 tr., 3 ch., 3 tr.) in Picot, 1 ch., 3 d.tr. in d.c., rep. from * twice, 1 ch., (3 tr., 3 ch., 3 tr.) in Picot, 1 ch., sl.st. in 4th ch. at beg. of round. Fasten off.

MOTIF "B".

Work as given for Motif A, using C.2 for foundation ch. and 1st round, C.1 for 2nd round and M. for 3rd round.

PONCHO

Make 36 Motifs "A" and 36 Motifs "B".

Using a flat seam, join motifs as shown in diagram. Sew end AB to side CD, matching A to C and B to D.

NECK EDGING

With right side facing, using 4 M/M (No. 8) Hook and M., join yarn in one corner of inside edge and work 14 h.tr. along side of each motif to end.

2nd round—Miss first h.tr., 1 h.tr. in each h.tr. to within 1 h.tr. of next corner, miss 2 h.tr., 1 h.tr. in each h.tr. to last h.tr., miss last h.tr.

Rep. 2nd round 8 times. Miss next h.tr., join with a sl.st. in next h.tr. Fasten off.

LOWER EDGING

With right side facing, using 4 M/M (No. 8) Hook and M., work 14 h.tr. along side of each motif around lower edge, working 5 h.tr. in corners.

2nd round—1 h.tr. in each h.tr. to end, working 4 h.tr. in 1 h.tr. at corners, join with a sl.st. in next h.tr. Fasten off.

FRINGE

Wind M. and C.2 round a piece of cardboard 4½ ins. wide and cut along one side. With wrong side facing using 5 M/M (No. 6) Hook and 2 strands each M. and C.2, fold yarn in half and draw loop through a h.tr. at lower edge, pull ends through loop and tighten.

Rep. in alt. h.tr. around lower edge.

CAP—Make 3 Motifs "A" and 3 Motifs "B".

Using a flat seam, join motifs to form a ring, alternating Colors.

Wednesday 12 December 2012

Cosy Time - Ripple Hat and Cowl Set


Heat up your cold weather wardrobe with this stylish Ripple Hat and Cowl Set. Shown in Bernat Satin and Satin Sparkle.

Heat up your cold weather wardrobe with this stylish Ripple Hat and Cowl Set. Shown in Bernat Satin and Satin Sparkle.

Skill Level
Easy

MEASUREMENTS
Hat: One size to fit average Woman's head.
Long Cowl: Approx 12" [30.5 cm] wide x 60" [152.5 cm] around.
Short Cowl: Approx 11" [28 cm] wide x 28" [71 cm] around.

MATERIALS
VERSION 1 - Hat, Long Cowl
Bernat® Satin™ (100 g/3.5 oz; 182 m/200 yds)
Main Color (MC) Rouge (04531) 1 3 ball(s)
Color A Sandstone (04009) 1 1 ball
Color B Lagoon (04742) 1 1 ball


VERSION 2
- Hat, Short Cowl
Bernat® Satin Sparkle™ (80 g / 2.8 oz; 146 m/160 yds)
Main Color (MC) Sapphire (53110) 1 1 ball
Color A Diamond (53005) 1 1 ball
Color B Platinum (53045) 1 1 ball
Size 5 mm (U.S. H or 8) crochet hook or size needed to obtain gauge.

GAUGE
13 sc and 14 rows = 4" [10 cm].
ABBREVIATIONS
www.bernat.com/abbreviations
Approx = Approximately
Beg = Beginning
Ch(s) = Chain(s)
Dc = Double crochet
Dec = Decrease
Hdc = Half double crochet
Hdcbp = Yoh and draw up a loop around post of next stitch at back of work, inserting hook from right to left. Yoh and draw through all loops on hook
Hdcfp = Yoh and draw up a loop around post of next stitch at front of work inserting hook from right to left. Yoh and draw through all loops on hook
Pat = Pattern
Rep = Repeat
Rnd(s) = Round(s)
RS = Right side
Sc = Single crochet
Sc2tog = Draw up a loop in each of next 2 stitches. Yoh and draw through all 3 loops on hook
Sl st = Slip stitch
Tog = Together
WS = Wrong side
Yoh = Yarn over h

To get the full pattern click here to visit Bernat

Sunday 9 December 2012

Knit a work of art from a free pattern - Victoria and Albert Museum


'Conrad', knitted gloves, Freddie Robins, 2005 (click image for larger version)

'Conrad' gloves by Freddie Robins

'Conrad', knitted gloves, Freddie Robins, 2005 (click image for larger version)

Freddie Robins's subversive knitting includes a series of gloves where pairs join, single gloves have ten fingers or each finger sprouts a new glove.

'Conrad' is a character from the 19th century book of cautionary tales, Struwwelpeter, by Dr Heinrich Hoffmann. Conrad's mother warns Conrad that if he continues to suck his thumbs the scissor-man will come and cut them off. He ignores her warnings and 'Snip!
Snap! Snip!' he loses his thumbs. .

Materials

50g (2-ounce skein) 4-ply wool
Small amount of red mohair
Pair of 2 3/4 mm needles (No.12 / US 1)
Large darning needle, for sewing up
Wire brush, for brushing up mohair

Tension (Gauge)

32 sts. to 10 cms. (4 ins.) approx.

Abbreviations

cms. = centimeters
ins. = inches
k. = knit
p. = purl
st. = stitch
sts. = stitches
st.st. = stocking stitch (1 row k., 1 row p.)
tog. = together
inc. = increase
dec. = decrease


Click here to visit the V&A and get the full pattern.

Saturday 8 December 2012

Free Crochet Pattern - Sugar'n Cream - Crochet Stocking


This bright and fun crochet stocking looks even better filled with Christmas goodies!

This bright and fun crochet stocking looks even better filled with Christmas goodies!

Skill Level

MEASUREMENTS
Approx 15 ins [38 cm] long from cuff to heel.

MATERIALS
Lily® Sugar’n Cream
(2.5 oz/70.9 g; 120 yds/109 m)
Main Color (MC) (00095 Red) 1 ball
Contrast A (01740 Hot Pink) 1 ball
Contrast B (00084 Sage Green) 1 ball
Contrast C (01712 Hot Green) 1 ball
Contrast D (00001 White) 1 ball

Size 5 mm (U.S. H or 8) crochet hook or size needed to obtain gauge. 8 ins [20.5 cm] of satin ribbon 5⁄8 inch [.5 cm] wide for loop.

GAUGE
13 sc and 14 rows = 4 ins [10 cm].

INSTRUCTIONS
Stripe Pattern

With A, work 2 rnds.
With D, work 1 rnd.
With B, work 1 rnd.
With C, work 2 rnds.
With D, work 1 rnd.
With MC, work 1 rnd.
These 8 rnds form Stripe Pat.

Cuff: With MC, ch 11.
1st row: (RS). 1 sc in 2nd ch from hook. 1 sc in each ch to end of ch. Turn. 10 sc.
2nd row: Ch 1. Working in back loops only, 1 sc in each sc across. Turn
Rep last row until work, when slightly stretched measures 14 ins [35.5 cm], ending on a WS row. Fasten off. Sew foundation edge and top edge tog.
Leg: Join A with sl st to side edge of Cuff. Ch 1. Work 46 sc evenly around side edge of Cuff. Join with sl st to first sc.
Next rnd: Ch 1. 1 sc in each sc around.
Join D with sl st to first sc.
First 2 rnds of Stripe Pat are complete.
Cont in Stripe Pat, rep last rnd until work from bottom of Cuff measures approx 9 ins [23 cm], ending with 1 rnd of MC.
Shape heel: 1st row: (RS). With MC, ch 1. 1 sc in each of next 23 sc. Turn.
Leave rem 23 sc unworked for instep.
2nd to 5th rows: Ch 1. 1 sc in each sc to end of row. Turn.
6th row: Ch 1. 1 sc in first sc. Draw up a loop in each of next 2 sc. Yoh and draw through all loops on hook – sc2tog made. 1 sc in each of next 6 dc. Draw up a loop in each of next 5 sc. Yoh and draw through all loops on hook – sc5tog made. 1 sc in each of next 6 sc. Sc2tog. 1 sc in last sc. Turn. 17 sts.
7th row: Ch 1. Sc2tog. 1 sc in each of next 5 sts. Draw up a loop in each of next 3 sts. Yoh and draw through all loops on hook - sc3tog made. 1 sc in each of next 4 sts. Sc2tog. 1 sc in last st. Turn. 13 sts.
8th row: Ch 1. 1 sc in first st. Sc2tog. 1 sc in each of next 2 sc. Sc3tog. 1 sc in each of next 2 sc. Sc2tog. 1 sc in last st. Turn. 9 sts.
9th row: Ch 1. 1 sc in first sc. Sc2tog. Sc3tog. Sc2tog. 1 sc in last sc. Turn. 5 sts.
10th row: Ch 1. Sc5tog. Fasten off.
Edging: With RS facing, join A with sl st at side of heel at same sp as first sc of heel.
Work 37 sc evenly along side edge of heel.
Join with sl st in same sp as last sc of heel.
Fasten off.
Beg working Stripe Pat and proceed as follows:
Shape instep: 1st rnd: (RS). Join D with sl st in next unworked sc from instep. Ch 1. 1 sc in each of next 23 sc of instep. 1 sc in each of next 37 sc along heel edge. Join B with sl st to top of first sc. 60 sc.
2nd rnd: With B, ch 1. 1 sc in each of next 23 sc. Sc3tog. 1 sc in each of next 31 sc. Sc3tog. Join C with sl st to first sc. 56 sts.
3rd rnd: With C, ch 1. 1 sc in each of next 23 sts. Sc3tog. 1 sc in each of next 27 sc. Sc3tog. Join with sl st to first sc. 52 sts.
4th rnd: Ch 1. 1 sc in each of next 23 sts. Sc3tog. 1 sc in each of next 23 sc. Sc3tog. Join D with sl st to first sc. 48 sts.
5th rnd: With D, ch 1. 1 sc in each of next 23 sc. Sc3tog. 1 sc in each of next 19 sc. Sc3tog. Join MC with sl st to first sc. 44 sts.
6th rnd: With MC, ch 1. 1 sc in each st around. Join A with sl st to first sc.
Keeping cont of Stripe Pat, rep last rnd until work from Heel measures 6 ins [15 cm].
Shape toe: 1st rnd: Keeping cont of Stripe Pat, ch 1. 1 sc in next sc. (Sc2tog. 1 sc in each of next 3 sc) 8 times. Sc2tog. 1 sc in last sc. Join with sl st to first sc. 35 sts.
2nd rnd: Ch 1. 1 sc in each st around. Join with sl st to first sc.
3rd rnd: Ch 1. 1 sc in first sc. (Sc2tog. 1 sc in each of next 2 sc) 7 times. (Sc2tog. 1 sc in next sc) twice. Join with sl st to first sc. 26 sts.
4th rnd: As 2nd rnd.
5th rnd: Ch 1. 1 sc in first sc. (Sc2tog. 1 sc in next sc) 7 times. (Sc2tog) twice. Join with sl st to first sc. 17 sts.
6th rnd: As 2nd rnd.
7th rnd: Ch 1. 1 sc in first sc. (Sc2tog) 8 times. Join with sl st to first sc. 9 sts.
Fasten off leaving a long end. Weave end tightly through rem sts and fasten securely for toe end.
Loop: Fold Satin ribbon in half and sew to top edge of Stocking.

This pattern can be completed with one of the following Lily yarns:

Lily Sugar'n Cream

Easy

Lily: Download Free Pattern Details - Sugar'n Cream - Crochet Stocking

Friday 7 December 2012

BBC Radio 4 Christmas Appeal - St.Martin in the Fields.

Charity - Preserving our future

The BBC Radio 4 St Martin-in-the-Fields Christmas Appeal 2012 has begun, raising money for homeless and vulnerable people across the UK.

Donate to the Appeal


Donate online now


You can also donate by calling 0800 082 82 84 begin_of_the_skype_highlighting 0800 082 82 84 end_of_the_skype_highlighting.

For 85 years, the BBC and St Martin-in-the-Fields have asked listeners at Christmas time to help people in poverty in all parts of the United Kingdom.

Today, the Appeal supports the work of The Connection at St Martin-in-the-Fields, which provides vital services to thousands of homeless people every year, and the Vicar’s Relief Fund, which makes over 2000 crisis grants each year to people in extreme financial difficulty.

We raise money throughout the year. In these difficult times more people than ever are coming to us for help. You can support the Appeal by donating online, by post or over the phone (see below for details). Your donation is greatly appreciated as we know it really will change people’s lives.

If you prefer to donate by cheque, please make your cheque payable to the “St Martin-in-the-Fields Christmas Appeal” and post it to us at Trafalgar Square, London WC2N 4JJ. If you are a UK taxpayer and would like the Christmas Appeal to reclaim the tax you have paid on your donation through the Gift Aid scheme, you can download our Gift Aid declaration. Just print it, fill it in and send it to us with your cheque.

If you are a regular supporter of the Christmas Appeal – or you would like to be – you may want to consider setting up a standing order. You can download a Standing Order Form by clicking here.

We have teamed up with Bmycharity, an online sponsorship website to make it easier for our supporters to help to raise money for the Christmas Appeal. Whether you want to sing carols, sleep out or do a skydive, you can get your friends and family to sponsor you. Bmycharity don’t charge commission or a monthly subscription fee, so even more of the money raised goes to people in need. Click on the link to set up your own sponsorship page for the Christmas Appeal.

Our Charities Manager Craig Norman would be happy to discuss annual or corporate donations and legacies. For further information telephone 020 7766 1125 or email craig.norman@smitf.org.

Read the terms and conditions for giving by text message.

Thursday 6 December 2012

Bird Ornament Crochet Pattern - Red Heart


Bird Ornament

Project Number:
LW2281

Designed By:
Nancy Anderson

Skill Level:

  • Intermediate

Category:

  • Crochet

Project Type:

  • Seasonal

Supplies:

RED HEART® “Holiday”: 1 ball each 6060 Green/Green A, 140 White/Silver B, and 9090 Red/Red C.

RED HEART® “Super Saver®”: 1 Skein 320 Cornmeal D.

Crochet Hook: 4mm [US G-6].
Split-ring stitch marker, yarn needle, polyester fiberfill, 2 buttons for eyes, sewing thread and needle.

Size:

Ornament is 7” tall.

Gauge/Tension:

GAUGE: 20 sc = 4”; 20 rows = 4”. CHECK YOUR GAUGE. Use any size hook to obtain the gauge.

Bird Ornament Crochet Pattern - Red Heart

Monday 3 December 2012

Satin Sparkle - Big Fringe Crochet Triangle Scarf


Look fabulous with this versatile scarf in Bernat Satin Sparkle!

Look fabulous with this versatile scarf in Bernat Satin Sparkle!

Skill Level
Easy

View Printer Friendly PDF

MEASUREMENTS
Approx 42" [106.5 cm] wide x 19" [48 cm] deep (excluding fringe).
MATERIALS
Bernat® Satin Sparkle (80 g/2.8 oz: 146 m/160 yds)
53045 (Platinum) 4 balls
Size 5 mm (U.S. H or 8) crochet hook or size needed to obtain gauge.
GAUGE
13 sc and 14 rows = 4" [10 cm].
ABBREVIATIONS
www.bernat.com/abbreviations
INSTRUCTIONS
Note: Ch 3 at beg of row counts as dc throughout.
Ch 4.
1st row: 2 dc in 4th ch from hook. Turn.
2nd row: Ch 3. 2 dc in first dc. Ch 1. Miss next dc. 3 dc in top of ch 3. Turn.
3rd row: Ch 3. 2 dc in first dc. Ch 1. Miss next 2 dc. 3 dc in next ch-1 sp. Ch 1. Miss next 2 dc. 3 dc in top of ch 3. Turn.
4th row: Ch 3. 2 dc in first dc. Ch 1. Miss next 2 dc. (3 dc in next ch-1 sp. Ch 1) twice. Miss next 2 dc. 3 dc in top of ch 3. Turn.
5th row: Ch 3. 2 dc in first dc. Ch 1. Miss next 2 dc. *3 dc in next ch-1 sp. Ch 1. Miss next 3 dc. Rep from * to last ch-1 sp. 3 dc in last ch-1 sp. Ch 1. Miss next 2 dc. 3 dc in top of ch 3. Turn.
Rep last row until top edge measures approx 42" [106.5 cm] wide.
Fasten off.
Fringe
Cut lengths of yarn 36" [91.5 cm] long. Taking 2 strands tog, fold in half and knot into fringe evenly across 2 shorter sides of Shawl. Trim fringe evenly.

Bernat: Pattern Detail - Satin Sparkle - Big Fringe Triangle Scarf (c)

Sunday 2 December 2012

Hot Water Bottle Knitting Pattern - goodtoknow


Knitted-hot-water-bottle[1]

Keep warm and cosy this Christmas with this knitted hot water bottle cover. It's sparkly finish and ribbon trim make it a smart and practical craft project for the winter.


Knitted hot water bottle cover measurements:

Size: To fit an average hot water bottle, approximately 33x20cm (13x8in)

Materials you'll need:
  • Rowan felted tweed aran yarn: 150g dusty (A)
  • Rowan shimmer yarn: 50g silver (B)
  • 1 pair of 5mm (US8:UK6) needles (A)
  • 1 pair of 5.5mm (US0:UK5) needles (B)
  • 30cm (12in) length silver lamé ribbon 7-10mm (3⁄8-1⁄2in) wide
Tension:

18 stiches x 20 rows measure 4in (10cm) square over pattern using 5.5mm needle

Knitting pattern abbreviations:

Alt = alternate
Beg = beginning
CM = centimetres
MM = millimetres
Cont = continue
Dec = decrease
Foll = following
K = knit
K2tog = knit two stitches together: if these are the very last in the row, then work together through back of loops
M1 = make one stitch: pick up horizontal loop between the needles and work into the back of it
P = purl
Rep = repeat
Rem = remaining
St(s)= stitch(es)
Stocking-stitch = knit on the right side, purl on the wrong side

Special knitting pattern abbreviations:

CR2L Place one stitch on cable needle and leave at front of work, p1, then k1 from cable needle.
CR2R Place one stitch on cable needle and leave at back of work, k1, then p1 from cable needle.
C8F Slip 4 stitches on to cable needle and leave at front of work, k4, then k4 from cable needle.
C8B Slip 4 stitches on to cable needle and leave at back of work, k4, then k4 from cable needle

Click here to get the free pattern.

Saturday 1 December 2012

Poinsettia - Free Crochet Pattern


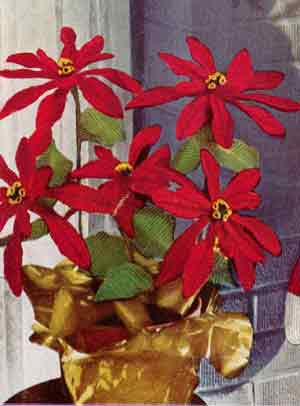
From Vintagecrochet.com

These flowers may be made with any of AMERICAN THREAD COMPANY products listed below:

Material
Quantity
Size of Needle

“GEM”
CROCHET COTTON
Article 35
, SIZE 30
7 balls Bright Red
3 balls Hunter Green
1 ball Yellow

steel 10
steel 12

or

“PURITAN”
CROCHET COTTON
Article 40

4 balls Red
2 balls Kelly Green
1 ball Yellow

steel 10

or

“DE LUXE”
CROCHET COTTON
Article 346

4 balls Red
2 balls Kelly Green
1 ball Yellow

steel 10

5 – 15-inch lengths of heavy wire
16 yds. medium wire
Green crepe paper

Flowers and leaves are worked with a double strand of thread if "GEM" Crochet Cotton is used and a single strand if "PURITAN" or "DE LUXE" Crochet Cotton are used unless otherwise stated.

HALF LARGE PETAL: With Red and No. 10 hook ch 3, s c in 2nd st from hook, 1 s c in next st of ch, ch 1 to turn all rows.

2nd to 8th Rows. 1 s c in each s c.

9th Row. Working in s c increase 1 st at the beginning of row. Work 2 rows even.

12th Row. Increase 1 st at end of row. Work 5 rows even. 18th Row. Decrease 1 st at end of row (to decrease: * insert hook in next st, pull loop through, repeat from * once, thread over and work off all loops at one time). Work 1 row even.

20th Row. Increase 1 st at end of row. Work 1 row even. Repeat the last 2 rows once.

24th Row. Same as 20th row.

25th Row. Same as 9th row.

26th Row. Same as 18th row. Work 1 row even.

28th Row. Same as 12th row.

29th Row. Same as 9th row. Work 7 rows even.

37th Row. Decrease 1 st at beginning of row.

38th Row. Same as 12th row. Work 3 rows even.

42nd Row. Same as 18th row. Work 1 row even.

44th Row. Same as 18th row. Work 3 rows even.

48th Row. Same as 18th row. Work 2 rows even.

51st Row. Same as 37th row.

52nd Row. Same as 18th row. Work 1 row even.

54th Row. Same as 18th row. Work 1 row even.

56th Row. Decrease 1 st, cut thread.

Work 11 more sections in same manner.

HALF MEDIUM PETAL: Work same as half petal for the first 25 rows. Work 5 rows even.

31st Row. Decrease 1 st at the beginning of row. Work 1 row even. Repeat last 2 rows twice. Work 2 more rows even.

39th Row. Same as 31st row. Work 1 row even.

41st & 42nd Rows. Decrease 1 st in each row, cut thread. Work 7 more sections in same manner.

HALF SMALL PETAL: Work same as half large petal for the first 24 rows.

25th Row. Decrease 1 st at beginning of row. Work 1 row even. Repeat last 2 rows once.

Work one more row even .

30th Row. Decrease 1 st at end of row.

31st Row. Same as 25th row.

32nd Row. Decrease 1 st, cut thread.

Work 5 more sections in same manner.

Place the straight edge of 2 halves together. Working through both sections and over a medium wire leaving about a 3 inch length, attach Red in 1st row, then work 1 s c in each remaining row, cut thread. All size petals are joined in same manner.

LEAF: With Green ch 2, 2 s c in 2nd st from hook, ch 1, turn.

2nd, 3rd & 4th Rows. 1 s c in each s c, ch 1 to turn all rows.

5th Row. 1 s c in next s c, 2 s c in next s c.

6th Row. 1 s c in each of the next 2 s c, 2 s c in next s c, then work 1 row even.

8th Row. Working in s c increase 1 s c at beginning and end of row.

9th Row. Work even. Repeat the last 2 rows once.

Next 4 Rows. Increase 1 s c at beginning and end of each row, then work 1 row even.

Next 3 Rows. Increase 1 s c at beginning and end of each row, then work 1 row even.

Next 4 Rows. Increase 1 s c at beginning and end of each row (30 s c in last row).

25th Row. Decrease 1 s c at beginning of row, 1 s c in each remaining s c, working 2 s c in last s c.

26th Row. Decrease 1 s c at end of row.

27th Row. Decrease 1 s c at beginning and end of row.

28th Row. Decrease 1 s c at beginning of row.

29th Row. Decrease 1 s c at end of row.

30th Row. Same as 25th row, then work 1 row even.

32nd Row. Increase 1 s c at end of row, then work 1 row even.

34th Row. Increase 1 s c at end of row.

35th Row. Increase 1 s c at beginning and end of row, then work 1 row even.

37th Row. Decrease 1 s c at beginning of row.

38th Row. 1 s c in each of the next 24 s c, decrease in next 2 s c (25 s c) .

39th Row. Same as 25th row.

40th Row. Sl st in each of the next 2 s c, 1 s c in each of the next 21 s c, decrease in next 2 s c.

41st Row. Decrease in 1st 2 s c, 1 s c in each of the next 17 s c, decrease in next 2 s c.

42nd & 43rd Rows. Decrease 1 s c at beginning and end of each row, then work 1 row even.

45th Row. Decrease 1 s c at beginning and end of row, then work 1 row even.

Repeat the last 2 rows once.

Next 3 Rows. Decrease 1 s c at beginning and end of each row, then work 1 row even.

Next Row. Same as 45th row, then work 1 row even.

Next Row. Decrease 1 s c at beginning of row.

Next Row. Skip 1 s c, s c in next s c, cut thread.

Attach thread at lower edge of leaf and working over an 18 inch length of medium wire work a row of s c all around leaf leaving about a 4 inch length of wire free on each side at lower edge. Work 2 leaves for each flower.

CENTER: With Green (using a single strand of thread and No. 12 hook if Article 35 is used) ch 2, 2 s c in 2nd st from hook, ch 1 to turn all rows.

2nd Row. 2 s c in each s c.

3rd Row. 1 s c in each s c.

4th Row. Increase 1 s c at the beginning and end of row. Repeat the last 2 rows 3 times, cut thread leaving a length. Sew sides together. Attach Yellow in joining of last row, * ch 3, s c in next s c, repeat from * all around, cut thread. Work 4 more centers in same manner. With Red using a double strand of thread cut a length about 6 inches long, knot one end and insert in each center. Sew the base of the 5 centers together and attach to medium wire. Attach centers to top of a 15 inch length of heavy wire for stem. Place the petals (row of s c on wrong side) around the center, first the small, next the medium and then the large, twisting the free lengths of wire at end of petals around wire of stem. Thread a needle with Red and sew bases of petals together to hold firmly.

Cover stem with a ½ inch strip of Green crepe paper and attach 1st leaf about 2 ½ inches below flower and 2nd leaf about 1 ½ inches from 1st leaf.

Poinsettia Free Crochet Patterns

Friday 30 November 2012

Jack Frost Vintage Free Crochet Pattern


Materials Required:

AMERICAN THREAD COMPANY “STAR” RUG YARN, Article 44 or
“DAWN” KNITTING WORSTED, Article Wll or W 41
1 skein White will make 2 Jack Frosts and
“STAR” PEARL COTTON, Article 90, size 5, 1 ball Black.

Steel crochet hook No.8.

Directions are given for rug yarn. Wool directions are given in brackets.

BODY: Wind White over 4 inch cardboard 66 (76) times, tie with an 8 inch length of yarn at one end for top of head. Tie securely about 1 ¼ inches from top of head for neck. Tie 1 ¼ inches from neck for waist. Divide remaining yarn in half for legs and tie each section ¼ inch from each end, cut and trim for feet.

ARMS: Wind White over 4 inch cardboard 22 (24) times, tie ¼ inch from each end for hands, insert through center of body and tie at each side for shoulders. Cut and trim ends for hands. With Black, embroider eyes, nose, mouth and buttons as illustrated.

HAT: With Black, ch 2, 6 s c in 2nd st from hook, join in 1st s c.

2nd Row. Ch 1 and work 2 s c in each s c (12 s c), join.

3rd Row. Working in s c, increase in every other s c, join. 4th Row. Increase in every 3rd s c, join.

5th Row. Increase in every 4th s c, join, (30 s c).

6th Row. Working in back loop of st, 1 s c in each s c, join.

7th to 17th Rows. Working through both loops of sts and joining each row, work 1 s c in each s c.

18th Row. Working through front loop of st, work 1 s c in each s c, join.

19th Row. Working through both loops, work in s c increasing 1 s c in every 6th s c, join.

20th Row. Increase in every 7th s c, join.

21st Row. Increase in every 8th s c, join.

22nd Row. Work 1 s c in each s c, cut yarn.

Draw yarn at top of head through center of hat and tie as illustrated.

Sew hat to head. If desired brush hat with glue and sprinkle with artificial snow.

For more free vintage crochet patterns click here -

Jack Frost Free Crochet Patterns at Vintagecrochet.com

Thursday 29 November 2012

Snowy Day Hat - Crochet Today


 Snowy Day Hat
Submitted by erin on Mon, 2009-12-07 14:27 Comments Print 
You’ll stand out on the slopes or on the streets with this warm and colorful cap.
By Lauren Osborne YARN
RED HEART Designer Sport, 3oz/85g skeins, each approx 279yd/255m (acrylic)
1 skein each:
• #3921 Crimson (A)
• #3515 Lagoon (B)
• #3301 Latte (C) CROCHET HOOK
• Size H/8 (5mm) crochet hook or any size to obtain correct gauge NOTIONS
• Yarn needle This pattern preview is provided so that readers can see the patterns and check that they have the necessary supplies. The pattern for this project appears in our Jan/Feb 10 issue, available in hard copy only. Buy the issue and supplies for the pattern here. To get just the issue with the pattern, subscribe now or call 800-865-7240