googleads

Sunday 28 September 2014

Flower Crochet Granny Square Tutorial

Flower Granny Square

This is a pattern for a basic flower granny square and can be made to either a 5” square or a 6” square. There are numerous variations on this flower square and I will document them at a later date.

With appropriate yarn and recommended hook ch 5 join with a sl st to form a loop.

Rnd 1:Ch 2 to count as first dc then work a further 11 dc into the loop, join with a sl st (12 sts)

191-9195_IMG

Rnd 2: Next ch 2, to count as 1st dc and work 2 dc into spaces between each dc in previous rnd. Join with sl st (24 sts)

192-9203_IMG

Rnd 3: ch 2 , to count as 1st dc and work 2 dc into same space, work 3 dc into every 2nd dc space. Join with sl st. (36 sts)

192-9206_IMG
191-9198_IMG

Note: Darn ends in as you go.

Rnd 4: Join contrasting colour and ch 2 to count as 1st dc work 2 dc into 1st space, *sk 3 sts, work another 3 dc into next space, sk 3 sts, work 3 dc into next space ch 2 and work another 3 dc into same space (forming a corner)*, **rep until rnd is complete.

Fasten off for a 5” square or complete another rnd for a 6” square


191-9200_IMG
195-9581_IMG

Here my flowers made into an afghan blanket.

This pattern is offered and made available for personal use only. If you wish to reproduce this in any way please contact me or make sure that reference is made to the original author’s blog http://www.goodtimesithinkso.blogspot.com/ Thank you Crochet Conversion Chart US/UK International Yarn Weight Conversion Chart

Saturday 27 September 2014

Firenza by DROPS Design–Crochet Shawl Pattern

Source - garnstudio.com click here. 

"A firework of colours!"

Crochet DROPS shawl with granny squares in ”Muskat”.

Materials

DROPS 136-12
DROPS design: Pattern no R-617
Yarn group B
---------------------------------------------------------
Measurements:
Width: approx. 150 cm
Length mid back: approx. 80 cm
Materials: DROPS MUSKAT from Garnstudio
100 g colour no 12, red
100 g colour no 21, rust
100 g colour no 34, pink
100 g colour no 39, heather
100 g colour no 40, coral
100 g colour no 41, bordeaux
100 g colour no 49, dark orange
100 g colour no 51, warm yellow
100 g colour no 79, wine
DROPS CROCHET HOOK SIZE 4 mm - or size needed to get 1 square to measure 9.5 x 9.5 cm.

NOTE: This pattern is written in British English. All measurements in charts are in cm. For conversion from cm to inch - click here. There are different terms for crocheting in British and American English. If this pattern includes crochet, click for "crochet terms" here. For this pattern in American English, please click here.
CROCHET TIP:
Fasten the threads after every colour change as follows: Let the thread from previous round be worked in the piece a bit before cutting it off and fastening it (work with the new colour around the previous colour).
COLOUR COMBINATIONS:
SQUARE A - work 7 pieces:
ROUND 1: warm yellow
ROUND 2: bordeaux
ROUND 3: rust
ROUND 4: dark orange
ROUND 5: coral
SQUARE B - work 3 pieces:
ROUND 1: rust
ROUND 2: coral
ROUND 3: dark orange
ROUND 4: rust
ROUND 5: heather
SQUARE C - work 8 pieces:
ROUND 1: coral
ROUND 2: red
ROUND 3: bordeaux
ROUND 4: wine
ROUND 5: heather
SQUARE D - work 3 pieces:
ROUND 1: bordeaux
ROUND 2: red
ROUND 3: coral
ROUND 4: warm yellow
ROUND 5: dark orange
SQUARE E - work 7 pieces:
ROUND 1: bordeaux
ROUND 2: red
ROUND 3: pink
ROUND 4: heather
ROUND 5: wine
SQUARE F - work 8 pieces:
ROUND 1: wine
ROUND 2: pink
ROUND 3: coral
ROUND 4: heather
ROUND 5: red
SQUARE G - work 8 pieces:
ROUND 1: warm yellow
ROUND 2: dark orange
ROUND 3: rust
ROUND 4: heather
ROUND 5: pink
SQUARE H - work 8 pieces:
ROUND 1: bordeaux
ROUND 2: red
ROUND 3: dark orange
ROUND 4: wine
ROUND 5: rust
SQUARE I - work 3 pieces:
ROUND 1: rust
ROUND 2: coral
ROUND 3: dark orange
ROUND 4: rust
ROUND 5: bordeaux
---------------------------------------------------------
SHAWL:
The shawl consist of 55 granny squares that are worked tog. There are 9 different colour combinations - see explanation above.
GRANNY SQUARE:
Crochet 3 ch on hook size 4 mm with Muskat (work with colour from round 1) and form a ring with 1 sl st in first ch.
ROUND 1: 3 ch (= 1 tr), work 7 tr in ch-ring and finish with 1 sl st in 3rd ch from beg of round = 8 tr. Turn piece.
ROUND 2: Switch colour and READ CROCHET TIP. Work 3 ch (= 1 tr) + 1 tr in first tr from previous round, then work 2 tr in every tr the entire round, finish with 1 sl st in 3rd ch from beg of round = 16 tr. Turn piece.
ROUND 3: Switch colour. Work 3 ch + 1 tr in first tr from previous round, * 1 tr in next tr, 2 tr in next tr *, repeat from *-* a total of 7 times and finish with 1 tr in last tr and 1 sl st in 3rd ch from beg of round = 24 tr. Turn piece.
ROUND 4: Switch colour. Work 7 ch (= 1 tr + 4 ch), 1 tr in same tr, * 1 tr in each of the next 5 tr, 1 tr + 4 ch + 1 tr in next tr *, repeat from *-* a total of 3 times and finish with 1 tr in each of the last 5 tr on round and 1 sl st in 3rd ch from beg of round. Turn piece.
ROUND 5: Switch colour. Work 3 ch (= 1 tr), 1 tr in each of the next 6 tr, * 3 tr + 3 ch + 3 tr in ch-loop, 1 tr in each of the next 7 tr *, repeat from *-* a total of 3 times and finish with 3 tr + 3 ch + 3 tr in last ch-loop and 1 sl st in 3rd ch from beg of round.
ASSEMBLY:
See diagram X.1 on how to place the squares. The diagonals towards the left (seen when shawl is flat in front of you) are worked tog with coral and the diagonals towards the right are worked tog with red. Place 2 and 2 squares on top of each other WS against WS, and work them tog as follows (also see diagram X.2): Work 1 dc in ch-loop in the corner on 1st square, 2 ch, 1 dc in ch-loop in the corner on 2nd square, 4 ch, skip 3 tr on 1st square, 1 dc before next tr on 1st square, 2 ch, skip 3 tr on 2nd square, 1 dc before next tr on 2nd square, 4 ch, skip 3 tr on 1st square, 1 dc in next tr on 1st square, 2 ch, skip 3 tr on 2nd square, 1 dc in next tr on 2nd square, 4 ch, skip 3 tr on 1st square, 1 dc before next tr on 1st square, 2 ch, skip 3 tr on 2nd square, 1 dc before next tr on 2nd square, 4 ch, 1 dc in ch-loop on 1st square, 2 ch, 1 dc in ch-loop on 2nd square.
Continue to work squares tog like this. NOTE: Make sure that the transitions between every square are pretty when the squares are worked tog alongside.
CROCHET EDGE:
Beg from RS at the top of left corner (seen when shawl is flat in front of you) and work on hook size 4 mm with rust as follows: 1 dc in first st, * 4 ch, skip approx. 2 cm, 1 dc in next st *, repeat from *-* around the entire shawl and finish with 4 ch and 1 sl st in dc from beg of round.
When 1 round has been worked around the entire shawl, work along the 2 diagonal sides on the shawl as follows: * 4 ch, 1 dc in dc from previous round *, repeat from *-* and finish with 1 dc in the right upper corner on shawl.

Diagram


=
dc


=
ch


Wednesday 24 September 2014

Ripple Afghan & Pillow Free Vintage Crochet Pattern


bernhard45_4612

Source - freevintagecrochet.com

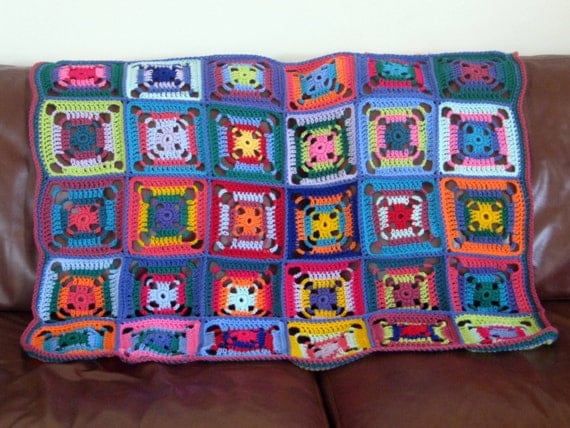
Approximate Size 50 inches by 72 inches

"Boye" Crochet Hook, Size 3 (F).

GAUGE: 9 sts = 2 inches

DIRECTIONS FOR AFGHAN
Row 1—With K, ch 304. Work 1 sc in 2nd ch from hook, sc in next ch, skip next ch, * sc in each of next 10 chs, 3 sc in next ch, sc in each of next 10 chs, skip next 2 chs; rpt from * 12 times, at end of last rpt skip only 1 ch then work 1 sc in each of last 2 chs, fasten off. Row 2—Turn, always work­ing in back loop of sts, with K, work 1 sc in each of first 2 sc, skip next sc, * sc in each of next 10 sc, 3 sc in next sc (point), sc in each of next 10 sc, skip next 2 sc; rpt from * 12 times, at end of last rpt skip only 1 sc then work 1 sc in each of last 2 sc, fasten off. Rpt row 2 for pattern using colors as follows: 2 rows each of J, I, H, G, F, E; * 1 row each of A, B, C, D; 2 rows each of Black, K, J, I, H, G, F, E; rpt from * twice. † Work 4 rows each of K, J, I, H, G, F then 2 rows of E; rpt from † 3 times. Work 2 rows each of K, J, I, H, G, F, E; ** 1 row each of A, B, C, D; 2 rows each of Black, K, J, I, H, G, F, E; rpt from ** twice at end of last rpt omit 2 rows of E.

DIRECTIONS FOR PILLOW
With A, ch 389, sc in 2nd ch from hook and in each of next 5 chs, 3 sc in next ch, sc in each of 6 chs, * skip 2 chs, sc in each of 6 chs, 3 sc in next ch, sc in each of 6 chs; rpt from * across, join (with sl st) in first sc, fasten off. Rnd 2—Turn, always work in back loop of sts, with B loop on hook, skip joined st and next sc, * sc in each of next 6 sc, 3 sc in next sc (Point), sc in each of next 6 sc, skip next 2 sc; rpt from * around, join in back loop of first sc, fasten off. Rpt rnd 2 for pattern using colors as follows: 1 rnd each of C, D; 2 rnds each of Black, K, J, I, H, G, F, E; 1 rnd each of A, B, C, D; 2 rnds each of Black, K, J, I, H, G, F, E; 1 rnd each of A, B, C, D; 2 rnds each of Black, K, J, I, H, G.

CENTER—With G, ch 4, join into ring, work 8 sc in ring, work a loop st in next st as follows: insert hook in next st, wind yarn 3 times around end of left forefinger, insert hook under loops on finger, with middle finger of right hand hold down all loops now on hook, free left fore­finger, yo and thru all but last loop on hook, yo and thru last 2 loops on hook (loop st made), work a loop st in each of next 7 sts; 2 sc in each of 8 loop sts; a loop st in each of 16 sts; 2 sc in each of 16 loop sts; work 32 loop sts, fasten off. With H, * sc in each of 3 sts, 2 sc in next st; rpt from * around (40 sts) ; work 40 loop sts; † sc in each of 4 sts, 2 sc in next st; rpt from † 7 times; work 48 loop sts, fasten off. With I, ** sc in each of 5 sts, 2 sc in next st; rpt from ** around (56 sts). Work 56 loop sts, fasten off. Work another Center only use colors B, C, D.

FINISHING—With double yarn, catch each of 26 points together and draw to a 3 inch opening. Insert suitable pillow form and draw opposite points together in same way. Sew Centers over openings.

Wednesday 17 September 2014

Halloween Crochet Bunting

Happy Halloween Bunting Crochet

173-7381_IMG

173-7380_IMG

Happy Halloween Bunting – Crochet Pattern.

Materials.

20-25g Bight Orange DK - MC

10g Black DK - CC

Scrap Black material

5mm & 6mm hook, darning needle, fabric glue

Here my bunting is made up of 11 different happy pumpkins and measures approx 8ft. You can use more or less crocheted pumpkins depending on the size required.

halloween_pumpkin_emoticons

Stitches: This sc & double SC throughout – US dc & double dc, sl st.

Pumpkin Pattern:

Using 5mm hook - chain 3, sl st, join circle.

Row 1: ch 1 sc x 5 into the circle, sl st

Row 2: ch 1, dbsc x 12, sl st

Row 3: ch 1, *dbsc 1, sc 1,* rep to end, sl st

Row 4: ch 1, sc into all stitches to end, sl st

Row 5: ch 1, *dbsc 1, sc 1,* rep to end, sl st

Row 6: ch 1 sc into all stitches to end, sl st, break yarn off and join in CC

Row 7: ch 1 sc into all stitches to end sl st, break yarn.

Sew all ends in as you go along.

Make the desired amount of pumpkins. Then block if required. Next choose the type of faces for your pumpkins, mine are happy but you could make scary ones. Cut the scrap fabric to make faces and then glue to the pumpkins. Leave overnight to dry completely.

Using 6mm hook

Here I used chunky black wool but you can double up (2 strands) DK wool.

Row 1: *chain 20 sts, join 1st pumpkin by doing 3 sc sts into three spaces at the top of your pumpkin’, repeat this until final stitch and chain once more.

Row 2: Turn and sc into 2nd stitch and right across. Break yarn off and sew in all ends.

173-7371_IMG

This pattern is offered and made available for personal use only. If you wish to reproduce this in any way please contact me or make sure that reference is made to the original author’s blog http://www.goodtimesithinkso.blogspot.com/

Thank you

Saturday 13 September 2014

How to Crochet A Circular Rag Rug

Circular Crochet Rag Rug – Instructions

Circular Crochet Rag Rug Tutorial

This pattern is for a circular rag rug to illustrate the process of crocheting a rag rug in the round. Once you understand this concept you can then choose a variety of patterns to work with - ovals, squares, rectangles or even a hexagon.
A rag rug crochets up fairly quickly but the time consuming aspect is in the preparation. You will need to gather a variety of fabrics to cut and turn into your yarn. Think about the properties of any particular fabric you choose - is it stretchy, flexible, coarse, closely woven. Is it likely to fray? Although most fabrics do initially shed some fibres some materials are worse than others.
You will need a fairly large hook I always use 10mm but anything between 10mm and 15mm would be suitable. I find a 15mm hook a tad unwieldy in the hand.
Your next job is going to be to cut the yarn into strips with as few joins as possible. To avoid too many knots cut in a zigzag style from side to side or cut from out edge in a spiral manner to the centre. The fabric should be approximately 2cms wide or 1”. This measurement is not cast in stone and there will be slight variations in the width which is a natural property of any handmade crocheted rag rug. Roll the yarn into balls. It is difficult to estimate the amount of fabric required but I always find it is more than you might initially anticipate. If you prepare approx 5 different colours/patterns to begin with you should then be able to estimate how much more is required to complete the project.
If you are not used to using your hands intensively you may end up with aching hands during the cutting up stage - I think in my eagerness I even ended up with a blister or two. It is worth preparing the yarn in advance as it can become frustrating to have to stop crocheting to do more cutting up. It will also take a while to get used to working with such a large hook and fabric as it it is a very different experience to crocheting with yarn.
As you become more familiar with the process you will learn to assess which fabrics work best for you and your design. You will also learn when you need to make additional increases etc to stop the rug curling. The structure of a crocheted rag rug is synergistic each separate stitch is dependant upon all other stitches and the properties of the fabrics used.

1. Chain 3


2. Join the ring with a sl st, ch 1 and then sc x 5 into the ring, join the circle with a sl st.


3. ch 1, (It may be useful at this stage to start marking the beginning of your round with a safety pin). sc x2 into each st,then join with a sl st.


4. ch 1, *sc twice into next st, sc 1 in next st* ** rep to end, join with sl st.


5. ch 1, *sc twice into next st, sc 1 in next st* ** rep to end, join with sl st.


6. Now begin working in the round (no more ch at beg of row and no more sl st) *sc twice into next st, sc 1 in next st* ** rep to end.


7. Continue to use pin to mark your rounds. 1 sc into each st.


8. 1 sc into next 3 st, sc x2 into next st and every 4th st to end of round.


9. 1 sc into next 4 st, sc x2 into next st and every 5th st to end of round.


10. Complete 1 round 1 sc in each st to end.
11. sc x 2 into 1 st, sc for next 3 st, sc next st and every 4th st to end of round.
12. Complete 1 round 1 sc in each st to end.
13. sc x 2 into 1 st, sc for next 3 st, sc next st and every 4th st to end of round.
14. Complete 1 round 1 sc in each st to end.
Continue with these rounds (13 & 14) until work measures required diameter.
At this point my rug measures 19” diameter.


You can keep going here for as long as you like – but be warned they can become difficult to work with after a 4-5ft diameter.


Here is one of my earlier rugs and this reached approx 6ft.
Note: If your rug begins to wrinkle you are increasing too often – reduce amount of increase for 1 round. If your rug begins to curl upwards, like a bowl you are not increasing enough.

Happy Rug Making.

Friday 12 September 2014

Rhubarb & Custard Cowl Poncho Crochet Pattern


179-7958_IMG
This is my pattern for a crochet ‘dickey’ or cowl and is in response to a competition I held in October.
The cowl is worked in the round and is a fairly quick project. I have used double stranded worsted wool which means it’s exceptionally warm and very practical.

Note:
This pattern is written in US terminology please refer to my Crochet Conversion Chart to change to UK

Use two balls of yarn and crochet simultaneously with both colours/strands at the same time. Join all rounds with a slip stitch.

Materials:
Caledon Hills Worsted Wool 881 Goldenrod 1 skein
Caledon Hills Worsted Wool 865 Sweet Pea 1 skein
7mm Hook or US K 10.5 hook
Darning/tapestry needle
Pattern.
Ch 56 join with a sl st
Rnd 1-3 Ch 2 dc all around, join with sl st
Rnd 4 (Inc Rnd) ch 2, *work 2 dc into 1st st, work 1 dc into next st*,** repeat al the way around (84 sts)
Next round begins the wavy ripple pattern.
Rnd 5-6 Ch 2, work 1 dc into next three sts, *work x2 dc into next two sts, work 1 dc into next four sts, decrease two sts by working 2dctog twice, work 1 dc into next four sts*, ** rep to end, join with sl st
Rnd 7-8 Change to double stranded Goldenrod and work same pattern as rows 5-6
Fasten yarn off after sl st.
Rejoin Goldenrod yarn at neck edge.
Rnd 9 – ch 1 work a complete rnd in sc
Rnd 10 – ch 1 work a complete round in hdc, fasten off.
To finish sew all ends in.
179-7959_IMG
179-7957_IMG

Thursday 11 September 2014

Quadra Crochet Rug–Crochet Pattern

Quadra Crochet Rug Pattern - Berroco


Skill Level: Easy
Quadra
Whip up a textured crocheted rug to match your decor. Weekend comes in weathered shades that will blend with any color scheme.

Finished Measurements
Approximately 23” x 27½”
Materials
1 Hank each Berroco Weekend (100 grs), #5907 Mouse (A), #5932 Cocoa (C) and #5941 Sea Glass (D) and 2 hanks #5906 Raisin (B)
Crochet hook, size 5.00 mm (H-8) OR SIZE TO OBTAIN GAUGE
Gauge
16 sc’s = 4”; 12 rows = 4” in sc worked TBL
TO SAVE TIME, TAKE TIME TO CHECK GAUGE
Note
There will be 4 ch-2 spaces in each rnd - these are the 4 corners.
Mat
With crochet hook, using A, ch 22.
Rnd 1: Sc in 2nd ch from hook and in each ch to 1 ch before end, work (1 sc, ch 2, 1 sc, ch 2, 1 sc) all in last ch, working along the other side of foundation ch, work 1 sc in each ch to end, work (ch 2, 1 sc, ch 2,) all in last ch, join with a sl st in first sc.
Rnd 2: Ch 1, * sc TBL in each sc to next ch-2 space, (1 sc, ch 2,1 sc) all in ch-2 space, sc in next sc, (1 sc, ch 2, 1 sc) all in next ch-2 space, rep from * once more, join with a sl st in beg sc. Rep Rnd 2 ten times more, having 2 more sc’s between corners on short and long edges. Change to B and rep Rnd 2 twelve times. Change to C and rep Rnd 2 eight times. Change to D and rep Rnd 2 once. Change to C and rep Rnd 2 four times. Change to B and rep Rnd 2 six times. Change to A. Rep Rnd 2, working through both loops instead of TBL four times. Working from left to right, work around entire mat in Reverse Sc. Join with a sl st in beg sc. Fasten off.

For more great pattern visit Berroco here.

Monday 8 September 2014

Sunburst Granny Square Crochet Afghan Blanket

Here are some photographs of a blanket I’ve just completed. It’s the first blanket I’ve made for the sake of it for a while. I’ve been so busy making custom request blankets I’ve not had time. I really like the colours, but then again I would!

IMG_2792

IMG_2788

IMG_2782

IMG_2784

IMG_2790

Sunday 7 September 2014

Campus Unisex Scarf

Campus Unisex Scarf–Free Crochet Pattern


Materials: 6.5mm hook, 150g various colours of DK yarn. I used 7 different colours –pale green, apple green, pale blue, bright blue, turquoise, red & orange.
Measurements: 7” x 74” approx.
Skill Level: easy
Pattern:
Chain 175 sts or to desired length.
Work 24 rows changing colour for every row. All rows ch 1 and work sc into all sts to end, turn, change colour and repeat.


This pattern is offered and made available for personal use only. If you wish to reproduce this in any way please contact me or make sure that reference is made to the original author’s blog www.thesunroomuk.blogspot.com Thank you