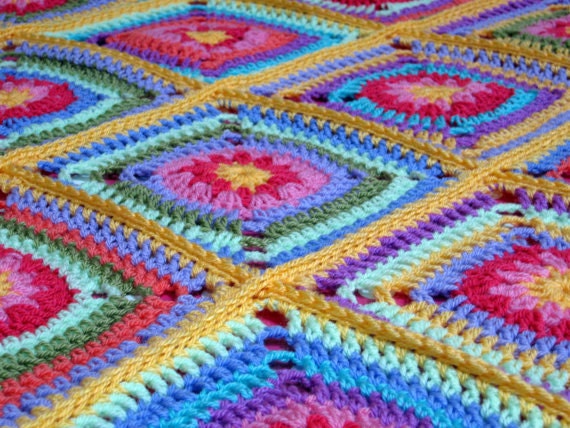
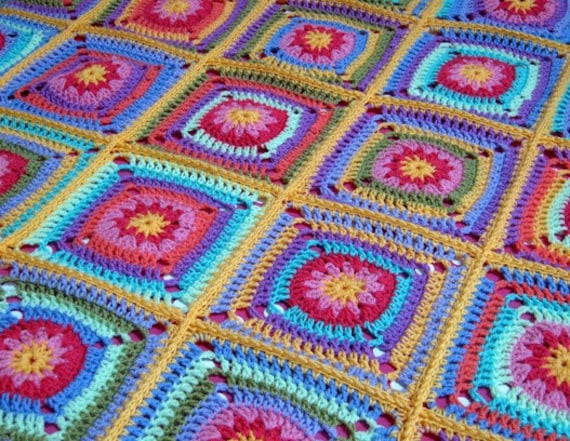
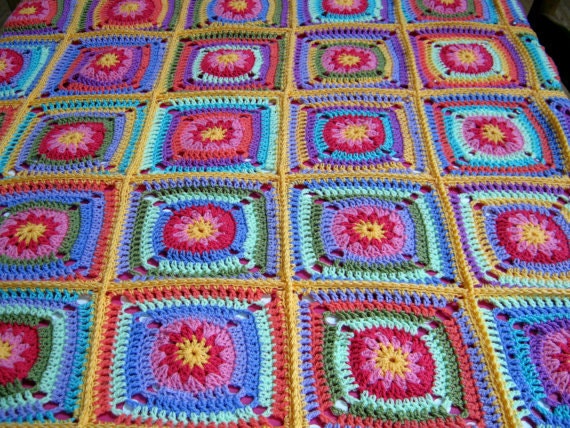
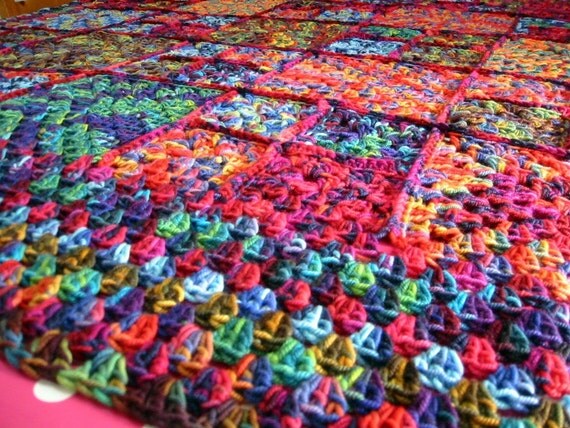
Here’s a photographic story of the making of Lucy’s blanket. Completed this week and now available to order in my Etsy store. Available in 3 sizes 50” x50”, 55” x 55” and 60” x 60”


Here’s a photographic story of the making of Lucy’s blanket. Completed this week and now available to order in my Etsy store. Available in 3 sizes 50” x50”, 55” x 55” and 60” x 60”

It’s so nice when clients email me to le me know their blanket has arrived safely. It’s also a delight when people take the time to express their gratitude.
The blanket is very beautiful and Ella loves it! It is so nice and soft too. I am delighted with both the end result and the process of customizing the blanket for Ella with you.
Thank You!!!
This blanket is now available to order in my Etsy store here.
I have recently been asked how to crochet granny squares together and
so an impromptu tutorial. The concept seems much more difficult than the
actual process is. The important things to remember are.
Lay your squares out exactly as the pattern states or as you wish them to
be crocheted together.
Always keep your squares right side facing.
I always work from right to left.
I always crochet together all horizontal rows first and then vertical rows
second.
I always work from the bottom right hand corner and row progressing up
the way, 1 row at a time.
Abbreviations used:
ch – chain
sp – space
sc – single crochet USA, dc –UK
1. Lay out all your granny squares in the exact order that you
want to crochet them together.

2. Make sure that all squares are right side up.
3. Take the first 2 squares from the right hand side of your
arrangement. Place one on top of the other but with both right
sides on the outside.

4. Fasten the yarn in the corner chain tying both squares
together.
5. Hook your yarn and pull through both squares. Chain 1 and
hold the squares in one hand with the backs together. Insert
your hook into the same stitch again. Hook your yarn again and
pull through making 1 single crochet.
6. Continue crocheting the squares together using sc across the
edges of both granny squares into the corner chain at the left.
7. Now get the next 2 granny squares that need to be crocheted
together, again with right sides facing out the way.

8. Work the exact same process as the first 2 squares to be
crocheted together. Insert hook into corner ch of the squares and
begin to work in sc all across.
9. Be sure to leave tails of yarn long enough for ends to be sewn
in.
10. Once you have completed your vertical rows lay the squares
out and then fold in the opposite horizontal direction and begin
the same process again. Always working from the right side to the
left.

11. Crochet across until you reach the corner of the first square,
here you crochet through both corner ch spaces and again into
the next squares ch space. Then proceed to work in sc across the
square.


This pattern is offered and made available for personal use only. If you wish to reproduce this in any way please contact me or make sure that reference is made to the original author’s blog http://www.thesunroomuk.blogspot.com/ Thank you
Crochet Conversion Chart US/UK
International Yarn Weight Conversion Chart
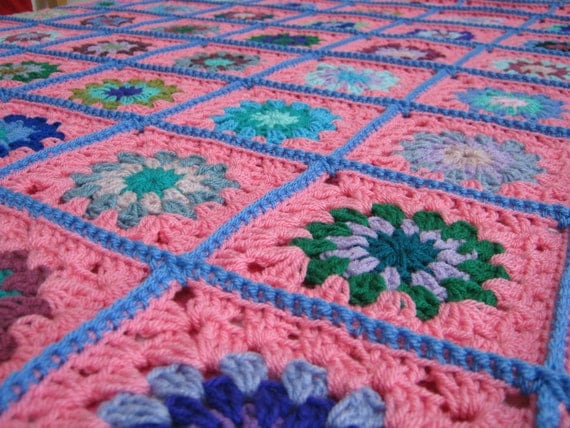
Here is a photo of the handsome and beautiful Bloomsbury on the new granny square blanket I completed yesterday.


Skill Level: Easy
Materials: 5.5mm hook, tapestry needle, 200g assorted DK yarn – black, green, pink, orange, purple & blue
Notes: Bi sided cushion cover for a 16” square cushion insert.
Measurements: 17” x 17”
Ch 50
work 43 rows of HDC in following colour sequence.
Blue x 2, Pink x 3, Orange x1, Purple x1, green x3, Pink x 1, Blue x3, Pink x2, Green x1, Orange x1, Green x1, Pink x2, Purple x2, Green x2, Blue x2, Pink x1, Orange x1, Purple x1, Green x1, Blue x1, Orange x2, Pinkx3, purple x2, pink x1, orange x1, green x2.
To Finish:
Darn all ends in. Sew or crochet (sc) front and back together on 3 sides. Insert cushion and make ties to shut to 4th edge.
This pattern is offered and made available for personal use only. If you wish to reproduce this in any way please contact me or make sure that reference is made to the original author’s blog http://www.thesunroomuk.blogspot.com
Thank you Crochet Conversion Chart US/UK International Yarn Weight Conversion Chart
I hope you enjoy using this pattern and if you are looking for other free patterns please visit Crochet Pattern Central

Whether you decide on Version I's rainbow stripes or Version II's cool blue hues, this crocheted afghan is the perfect way to brighten up a room. Shown in Bernat Softee Chunky.
MEASUREMENTS
Approx 45" x 60" [114.5 x 152.5 cm], excluding fringe.
GAUGE
6 sc and 7 rows = 4"
MATERIALS
Bernat® Softee® Chunky™ (100 g/3.5 oz; 99 m/108 yds)

Version I
Contrast A Teal (28203) 1 ball
Contrast B Linen (28021) 1 ball
Contrast C Seagreen (28219) 1 ball
Contrast D Faded Denim (28114) 1 ball
Contrast E Grass (28223) 1 ball
Contrast F Clay (28041) 1 ball
Contrast G Glowing Gold (28607) 1 ball
Contrast H Beetroot (28440) 1 ball
Contrast I Grape (28332) 1 ball
Contrast J Royal Purple (28334) 1 ball
Contrast K Natural (28008) 1 ball
Contrast L Pumpkin (28630) 1 ball
Version II
Contrast A Faded Denim (28114) 4 balls
Contrast B Seagreen (28219 ) 4 balls
Contrast C Natural (28008 ) 4 balls
Size U.S. M/13 (9mm) crochet hook or size needed to obtain gauge.
ABBREVIATIONS
www.bernat.com/abbreviations
Approx = Approximately
Beg = Beginning
Ch = Chain(s)
Cont = Continue(ity)
Hdc = Half double crochet
Pat = Pattern
Rem = Remain(ing)
Rep = Repeat
RS = Right side
Sc = Single crochet
Sl st = Slip stitch
St(s) = Stitch(es)
Tog = Together
Tr = Treble crochet
INSTRUCTIONS
Notes: Afghan is worked sideways.
Always start each row with RS facing.
Leave 7" [18 cm] yarn tails at beg and end of each row. These tails will be worked into fringe.
Ch 2 at beg of row counts as hdc.
VERSION I
Stripe Pat
With A, work 1 row.
With B, work 1 row.
With C, work 1 row.
With D, work 1 row.
With E, work 1 row.
With F, work 1 row.
With G, work 1 row.
With H, work 1 row.
With I, work 1 row.
With J, work 1 row.
With K, work 1 row.
With L, work 1 row.
These 12 rows form Stripe Pat.
**With A, ch 91, leaving a 7" [18 cm] tail at beg.
1st row: (RS). 1 sc in 2nd ch from hook. 1 sc in each ch to end of chain. Fasten off, leaving a 7" [18 cm] tail. 90 sc.
2nd row: (RS). Join B with sl st to first sc, leaving a 7" [18 cm] tail. Ch 2 (counts as hdc). Working in back loops only, 1 hdc in each sc to end of row. Fasten off, leaving a 7" [18 cm] tail.
3rd row: (RS). Join C with sl st to top of ch 2, leaving a 7" [18 cm] tail. Ch 2.Working in back loops only, 1 hdc in each of next 3 hdc. 1 tr in rem front loop of next st 2 rows below. *1 hdc in each of next 4 hdc. 1 tr in rem front loop of next st 2 rows below. Rep from * to end of row. Fasten off, leaving a 7" [18 cm] tail.**
4th row: (RS). Join D with sl st to top of ch 2, leaving a 7" [18 cm] tail. Ch 1 (does not count as st). 1 tr in rem front loop of first st 2 rows below. Working in back loops only, 1 hdc in each of next 4 sts. *1 tr in rem front loop of next st 2 rows below. 1 hdc in each of next 4 sts. Rep from * to end of row. Fasten off, leaving a 7" [18 cm] tail.
5th row: (RS). Join E with sl st to first tr, leaving a 7" [18 cm] tail. Ch 2. *1 tr in rem front loop of next st 2 rows below.Working in back loops only, 1 hdc in each of next 4 sts. Rep from * to last 4 sts. 1 tr in rem front loop of next st 2 rows below. 1 hdc in each of last 3 hdc. Fasten off, leaving a 7" [18 cm] tail.
6th row: (RS). Join F with sl st to top of ch 2, leaving a 7" [18 cm] tail. Ch 2.Working in back loops only, 1 hdc in next tr. *1 tr in rem front loop of next st 2 rows below. 1 hdc in each of next 4 sts. Rep from * to last 3 sts. 1 tr in rem front loop of next st 2 rows below. 1 hdc in each of last 2 hdc. Fasten off, leaving a 7" [18 cm] tail.
7th row: (RS). Join G with sl st to top of ch 2, leaving a 7" [18 cm] tail. Ch 2 (counts as hdc). Working in back loops only, 1 hdc in each of next 2 sts. *1 tr in rem front loop of next st 2 rows below. 1 hdc in each of next 4 sts. Rep from * to last 2 sts. 1 tr in rem front loop of next st 2 rows below. 1 hdc in last hdc. Fasten off, leaving a 7" [18 cm] tail.
First 7 rows of Stripe Pat are complete.
Keeping cont of Stripe Pat, rep 3rd to 7th rows until work from beg measures 45" [114.5 cm].
Fringe: Cut yarn 14" [35.5 cm] long. Take 2 strands of appropriate color tog, fold in half and knot into fringe, taking yarn tails from Stripe Pat into fringe across ends of Afghan. Trim fringe evenly.
VERSION II
Stripe Pat
With A, work 1 row.
With B, work 1 row.
With C, work 1 row.
These 3 rows form Stripe Pat.
Work from ** to ** as given for Version I.
4th row: With A, as 4th row of Version I.
5th row: With B, as 5th row of Version I.
6th row: With C, as 6th row of Version I.
7th row: With A, as 7th row of Version I.
First 7 rows of Stripe Pat are complete.
Keeping cont of Stripe Pat, rep 3rd to 7th rows until work from beg measures 45" [114.5 cm].
Fringe: Work as for Version I.