Written by: Stephan Duneier
 You should know, I am neither a knitter nor acrocheter. How I came to be attempting to set a world record for the largest crocheted granny square is probably more interesting than the task itself.
Each year, I set some odd resolutions for myself. Once, it was to read 50 books in the year. In another, it was to hike every trail in Santa Barbara, even though I'd never hiked in my life. 2012 was a particularly ambitious year. I set about to learn 12 new things and do 12 charitable things that didn't involve writing a check. I called it 12 for 2012.
Wedged between learning how to use jumping stilts and drumming, was knitting, a skill suggested by my wife, Barbara. Initially, the goal was to knit a simple scarf using nothing more than the basic knit stitch. However, the result was a raggedy mess with dropped stitches and edges that expanded with the addition of every row.
What I had hoped would be a relaxing activity turned out to be one of the most frustrating to learn. I bought numerous knitting needles, including bulky wooden ones and fancy, thin metal ones connected by plastic coated wire. Unfortunately, none of it improved my stitching, or the experience itself. Regardless, completion of a project was required before I could claim that a skill had been learned, but with the scarf having become more a symbol of failure than success, I needed to come up with a new plan.

While resting under a massive eucalyptus tree, 2.6 miles up the Cold Spring Trail in the Santa Ynez Mountains, I had an epiphany. Inspired by Christo's wrapping of the islands off the coast of Florida when I was a kid, I set a new goal to serve as evidence of my ability to knit. I endeavored to wrap that 40-foot tall tree in knitted yarn.
For the next 82 days, I loaded up on Red Heart's Super Saver Yarn and repeated the same basic knit stitch thousands of times on airplanes, in hotel rooms, at the beach, in the hospital and even in board meetings. It didn't take long for me to realize that in order to achieve my goal in time for the second annual International Yarn Bombing Day, I would need to recruit the help of other knitters and crocheters.
I tapped into the power of Facebook, Instagram, Pinterest, Tumblr, Twitter, Ravelry and my resolution blog, 12for2012.com, on Wordpress. Out of sheer luck, the blog had begun attracting attention right around the same time, due to Wordpress’ featuring of my unicycling related posts on their homepage. In the weeks that followed, I forged friendships with knitters and crocheters around the world and contributions of every size, shape and color imaginable began showing up at my doorstep. When I expressed concern that I would fall short of sufficiently covering the tree, thereby disappointing those who had sent me contributions, something unexpected happened. The people who had said my resolutions and yarnbomb project had inspired them, inspired me right back. 
Their encouragement lit a fire under me, pushing me to redouble my efforts. This was no longer about me. It was now about all of us and it fell on my shoulders to make the yarnbomb something for which we could all be proud.

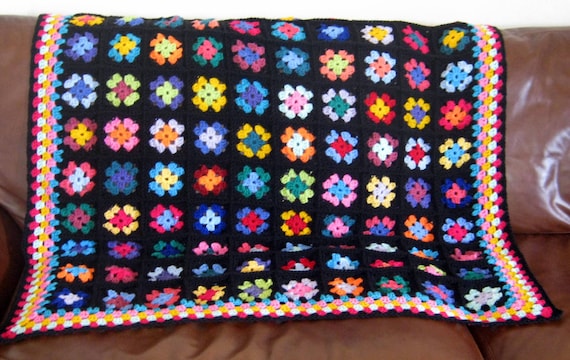
In June, on the eve of the second International Yarn Bombing Day, I packed 6 large camping backpacks with 400 square feet of yarn that I had sewn together into a collection of 52 sections, and headed off to the trailhead. My son, Jackson, a couple of friends and one total stranger showed up to help me lug it all up to the tree and install it. A rented 14-foot aluminum ladder, which 3 friends and I had hiked up the day before in 90+ degree heat, was hidden in the brush waiting for us. Under the cover of night, with the use of headlamps, a motley crew of seven volunteers, aged 16 to 65, and I installed a spectacular Seuss-like work of art in the middle of nowhere. Exhausted, at midnight we began our trek back down the mountain and dragged our dusty selves home.


Since not a single media outlet opted to cover the project, and it existed miles from civilization in a place accessible only by hiking 2.6 miles in and 2,500 feet up, it took time for people to discover it. Day after day, word of mouth spread and crowds grew larger. People who had never hiked were venturing out at the insistence of their friends and those who were familiar with the lower sections of the trail pushed themselves further than they'd ever gone, in order to see it.
Over the next nine days, I must have hiked to the tree a dozen times. I hadn't anticipated the emotional response it would evoke from those who viewed it. Magical, is the only way to describe it.
Although many begged me to keep it up longer, the ladder was costing me money every day and I needed to focus on learning how to play the drums in time for my upcoming recital. The yarnbomb was removed and shipped to Warm Up America, a charity in North Carolina. The knitting needles and remaining yarn were promptly returned to my wife, never to be used again, or so I thought.
About 6 months later, Paula Thomson, head of a non-profit in South Africa called Woza Moya contacted me to advise her on how to go about yarnbombing a similar tree on their property. Learning that my project had inspired an installation halfway around the world was, well, pretty cool.

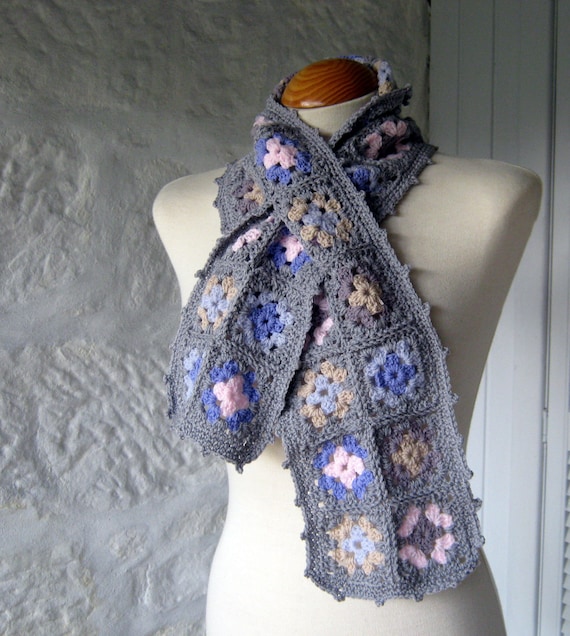
Early last summer, one of the contributors to my yarnbomb, Marcy Kraft, aka Crochet Grenade, requested help with a large project of her own, but she needed each contribution to be of a specific size, color and stitch. Oh, and she needed them to be crocheted which was a skill I had not yet learned. It was my turn to pay back the favor though and so I learned by watching her YouTube video. Very slowly I churned out 24 seven-inch squares according to her specifications. From there I was hooked. (No pun intended.)
I decided to try my hand at yarnbombing again. This time the target was a massive boulder, which sits one mile up the Saddlerock Trail. Marcy sent me every piece from her project plus a few more. Most of the original contributors sent me pieces again, as did a few others. Just over a month later I had crocheted dozens of squares exactly the same as those I'd made for Marcy's project. I experimented by swapping in multiple colors in a square, but didn't expand my repertoire much beyond that. I noticed that what was really slowing down my production was the casting on and those first few rotations of a new square.


While on a business trip in New York, it dawned on me that I could increase my productivity simply by making larger squares. I called around the city for yarn stores, but no one carried Red Heart's Super Saver Yarn except Michael's in Harlem. Lucky for me, they also happened to be the only store open until 10pm. As soon as I finished a business dinner, I walked 50 blocks up to Michael's and stocked up on as many bright Red Heart skeins as I could carry. I didn't know it at the time, but that was the beginning of my current project.
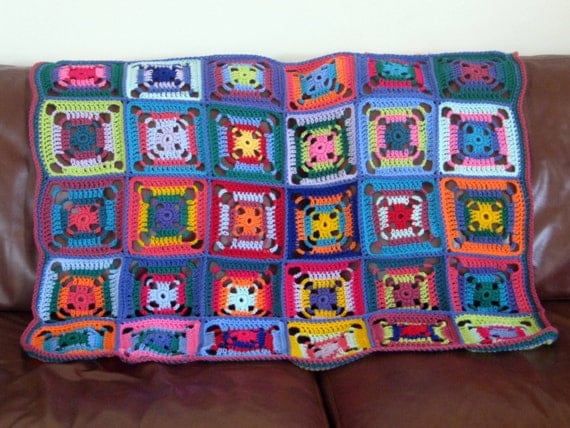
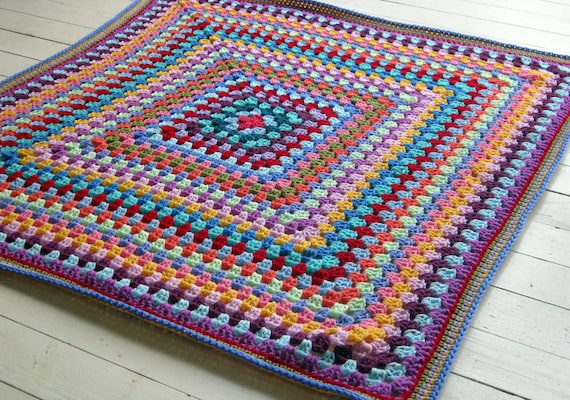
I crocheted just one square the rest of the trip, adding skein after skein. When I arrived home, I submitted an application to Guinness World Records to create a new category for the largest granny square, but it was rejected. They said it fell under the Largest Crocheted Blanket category and the current record was over 81 feet long. Not one to give up so easily, I appealed their decision, stating that a blanket could be created by literally dozens of people making small blankets simultaneously and then attaching them together. What I was proposing was a piece that only one person could work on at a time and as such, was a far different endeavor. They relented, but set a minimum size of 32' 9" square for a new category, Largest Crocheted Square. As insane as that randomly selected minimum might be, I now had a target.

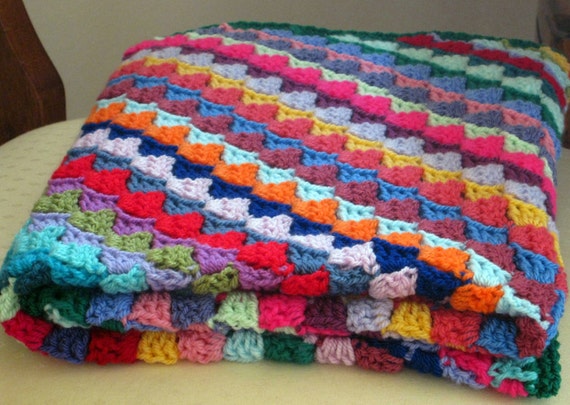
My square is currently 11 feet on each side, which sounds like I am a third of the way there, but it's not. You see, 11 feet squared is 121 square feet. Don't get me wrong, that's a big piece to work on. To provide some perspective, a jumbo skein of Red Heart's Super Saver Yarn is needed to add just 3 double crocheted rows. In the end, if I am to set the world record for largest crocheted square, it will need to be 1,089 square feet, or 9 times bigger than what I have created so far.
Thankfully, the people at Red Heart were kind enough to step in and offer to supply the yarn necessary for me to reach that goal. Toward that end, 60 jumbo skeins recently arrived at my house. With Red Heart's generous support, the words of encouragement from so many via Instagram (@yarnbombs), Facebook (www.facebook.com/yarnbombs) and Twitter (@yarnbombs), and of course the unwavering patience of my wife and kids, I hope to unveil the record setting piece as part of my third major yarnbomb installation Memorial Day weekend at Lizard's Mouth in the mountains of Santa Barbara.


Reblogged from 2010.

For the past couple of months I’ve been thinking about how to adapt the wonderful granny square for men. There are times when men and boys need to be comforted but I’ve been informed, the humble granny square just doesn’t cut the mustard, according to my youngest son. I’m fairly certain the most men in need of comfort or healing would not be the happy recipients of a prayer shawl etc.

So a couple of months ago I began to play with different ideas and decided the design should come down to either colour or texture or both. My first Grandad blanket, shown here, was made in bright colours but I still think it’s rather special and very adaptable to all manner needs and uses.


This pattern has been designed to be a more masculine version of the wonderful granny square. It’s ribbing and texture are lovely to behold and quite tactile. A very adaptable pattern for various applications blankets, throws, cushions covers, lap blankets etc.
The nature of the square means that it is quite dense and produces a thick and warm blanket.

Diagonal Hues
Designed by Diana Lynn Sippel
This afghan is easier than it looks! To get the dramatic diagonal rows, you simply start at one corner, increase stitches and change color each row until you reach the middle and then decrease each row until you reach the last corner.
Finished Size
About 43" x 46"
Materials
Gauge
4 sc = 1"
Instructions
Note: To change color, work until 2 lps of last st remain on hook. With new color, YO and draw through 2 lps on hook. Cut old color.
With black, ch 4.
Row 1 (right side): 3 dc in 4th ch from hook, changing to dk green in last dc {beg 3 skipped chs count as a dc on this and following rows}. Ch 4, turn.
Row 2: 3 dc in 4th ch from hook -- beg block made, in sp formed by beg 3 skipped chs work {sc, ch 3, 3 dc} changing to med green in last dc -- block made -- 2 blocks. Ch 4, turn.
Row 3: 3 dc in 4th ch from hook -- beg block made; in next ch-3 sp work {sc, ch 3, 3 dc} -- block made; in sp formed by beg
3 skipped chs work block, changing to lt green in last dc -- 3 blocks. Ch 4, turn.
Row 4: Beg block in 4th ch from hook, block in each ch-3 sp and in sp formed by beg 3 skipped chs, changing to black in last dc -- 4 blocks. Ch 4, turn.
Rows 5 through 48: Rep Row 4 in following color sequence, working 1 row of each color and having one additional block in each row until you have 48 blocks.
black
burgundy
rose
pink
black
dk green
med green
lt green
Row 49: In each of next 47 ch-3 sps work block; sc in sp formed by beg 3 skipped chs, changing to dk green -- 47 blocks. Ch 3, turn.
Row 50: In each of next 46 ch-3 sps work block; sc in sp formed by beg 3 skipped chs, changing to med green -- 46 blocks. Ch 3, turn.
Row 51: In each of next 45 ch-3 sps work block; sc in sp formed by beg 3 skipped chs, changing to lt green -- 45 blocks. Ch 3, turn.
Row 52: In each of next 44 ch-3 sps work block; sc in sp formed by beg 3 skipped chs, changing to black -- 44 blocks. Ch 3, turn.
Rows 53 through 95: Work in pattern in following color sequence, working one row of each color and having one less block on each row until one block remains.
black
burgundy
rose
pink
black
dk green
med green
lt green
At end of last row, do not ch 3.
Finish off and weave in all ends.
Border
Hold afghan with right side facing you and first block made in upper right-hand corner; join black in unused lp of beg ch of first block.
Rnd 1: Ch 1, 3 sc in same lp -- corner made; working across side of blocks, 3 sc in side of each color block of first 48 rows; on Row 48, 3 sc in 3rd ch of turning ch -- corner made; working across next side, 3 sc in side of each color block through Row 95; 3 sc in 3rd ch of turning ch-3 -- corner made; 3 sc in side of each color block through Row 48;
3 sc in 3rd dc of block -- corner made; 3 sc in side of each color block through first block; join in first sc.
Rnd 2: Ch 1, sc in same sc; 3 sc in next sc -- corner made; * sc in each sc to 2nd sc of next corner, 3 sc in 2nd sc -- corner made; rep from * twice more; sc in each sc to first sc; join in first sc. Finish off.
Rnd 3: With burgundy make slip knot on hook and join with an sc in first sc of any corner; ch 1, sc in next sc, ch 1, sc in next sc, ch 1, sk next sc; * † sc in next sc, ch 1, sk next sc †; rep from † to † to first sc of next corner; sc in next sc, ch 1, sc in next sc, ch 1, sc in next sc, ch 1, sk next sc; rep from * twice more, then rep from † to † to joining sc; join in joining sc. Finish off.
Rnd 4: With black make slip knot on hook and join with an sc in any ch-1 sp; ch 3; * sc in next ch-1 sp, ch 3; rep from * around; join in joining sc.
Finish off and weave in all ends.


Skill Level: Easy![]() Quadra
Quadra
Whip up a textured crocheted rug to match your decor. Weekend comes in weathered shades that will blend with any color scheme.

For more great pattern visit Berroco here.