googleads

Thursday 30 April 2015

Tumbling Blocks Blanket Throw Crochet Pattern

Tumbling Blocks Throw Free Crochet Pattern Red Heart

tumblingBlocks

Based on a classic quilt pattern, this stunning throw adds visual delight to any room. We’ve crocheted it using 15 colors for a scrap look.

Project Number:
LW3556

Designed By:
Katherine Eng

Skill Level:

  • Intermediate

Category:

  • Crochet

Project Type:

  • Throws / Afghans

Supplies:

RED HEART® With Love®: 2 skeins 1012 Black A, 1 skein each 1814 True Blue B, 1401 Pewter C, 1542 Aubergine D, 1601 Lettuce E, 1701 Hot Pink F, 1704 Bubblegum G, 1502 Iced Aqua H, 1909 Holly Berry I, 1201 Daffodil J, 1252 Mango K, 1538 Lilac L, 1308 Tan M, 1805 Bluebell N, and 1621 Evergreen O

Susan Bates® Crochet Hook: 6mm [US J-10]

Yarn needle

Size:

Throw measures 44” (112 cm) wide and 54” (137 cm) long

Gauge/Tension:

GAUGE: One diamond measures about 2 x 3” (5 x 7.5 cm). CHECK YOUR GAUGE. Use any size hook to obtain the gauge.

To download the printable instructions visit RedHeart by clicking here.

Wednesday 29 April 2015

Betty Vintage Style Retro Crochet Granny Square Blanket

Here’s a slightly larger version of my ‘Betty’ blanket just completed and dispatched on it’s way to Portland, Oregan, USA.

IMG_0207

Betty Blanket can be ordered here.

IMG_0204

IMG_0206

Retro Rainbow Baby Blanket Crochet Pattern

Retro Rainbow Baby Blanket–Free Crochet Pattern Bernat

Retro Rainbow Baby Blanket

This Retro Rainbow Baby Blanket is perfect for baby boys and girls alike. The bright rainbow motifs will look great in any nursery. This is an advanced crochet afghan pattern for ambitious crocheters to complete. Sheep(ish) by Vickie Howell yarn is used. It's a great pattern to make for any mother-to-be, including yourself! This crochet afghan measures approximately 42 inches by 48 inches when complete.

Crochet Hook: H/8 or 5 mm hook

Yarn Weight: (4) Medium Weight/Worsted Weight and Aran (16-20 stitches to 4 inches)

MATERIALS

  • Sheep(ish)™ by Vickie Howell (85 g/ 3 oz, 153 m/167 yds)
    Main Color (MC) White(ish) (00004) 3 balls
    Contrast A Turquoise(ish) (00017) 1 ball
    Contrast C Yellow(ish) (00012) 2 balls
    Contrast B Chartreuse(ish) (00020) 2 balls
    Contrast D Coral(ish) (00014) 3 balls
  • Size 5 mm (U.S. H/8) crochet hook or size needed to obtain gauge.
  • Stitch marker.

MEASUREMENTS
Approx 42" x 48" [106.5 x 122 cm]
GAUGE
1 Block= 5½" [14 cm] square.
INSTRUCTIONS
Block (make 36) See diagram on page 3.
With A, ch 4. Join with sl st to first ch to form a ring.
1st rnd: Ch 2 (does not count as st). (2 hdc. 3 dc. 2 tr. 3 dc. 2 hdc) into ring. Join with sl st to top of first hdc. Fasten off. 12 sts.
2nd row: Miss first hdc. Join B with sl st in next hdc. Ch 1. Miss same hdc where sl st was made. 2 sc in next dc. (2 hdc. 1 dc) in next dc. (2 dc. 1 tr) in next dc. 3 tr in next tr. (1 tr. 2 dc) in next tr. (1 dc. 2 hdc) in next dc. 2 sc in next dc. Ch 1. Sl st in next hdc. Fasten off. 21 sts, including ch-1 sps.
3rd row: Miss first 2 sc of 2nd row. Join C with sl st in next hdc. Ch 1. Miss same hdc where sl st was made. 1 sc in next hdc. 1 hdc in next dc. 1 dc in next dc. 2 tr in next dc. 2 tr in next tr. (1 tr. 1 dtr) in next tr. 3 dtr in next tr. (1 dtr. 1 tr) in next tr. 2 tr in next tr. 2 tr in next dc. 1 dc in next dc. 1 hdc in next dc. 1 sc in next dc. Ch 1. Sl st in next hdc. Fasten off. 23 sts, including ch-1 sps.
4th row: Join D with sl st in first hdc of 3rd row. Ch 1. Miss same hdc where sl st was made. 1 sc in next st. 1 hdc in next st. 1 dc in next st. (1 dc. 1 tr) in next st. (1 tr. 2 dtr) in next st. Stitch Combo 1. Stitch Combo 2. Stitch Combo 3. Stitch Combo 4. Stitch Combo 5. Stitch Combo 6. Stitch Combo 7. (2 dtr. 1 tr) in next st. (1 tr. 1 dc) in next st. 1 dc in next st. 1 hdc in next st. 1 sc in next st. Ch 1. Sl st in next st. Fasten off.
Note: When working 5th rnd, ch-1 sp counts as st. Sl st does not count as st.
5th rnd: Join MC with sl st in marked st. Ch 6 (counts as tr and ch 2). 2 tr in same sp as sl st, *1 tr in next st. 1 dc in next st. 1 hdc in each of next 3 sts. 1 sc in each of next 2 sts. 1 hdc in each of next 3 sts. 1 dc in next st. 1 tr in next st.** (2 tr. Ch 2. 2 tr) in next st. Rep from * twice more, then from * to ** once. 1 tr in same sp as first sl st. Join with sl st to 4th ch of ch 6. Fasten off.
FINISHING
Using flat seam, join 4 Blocks into Flower Square. Sew Flower Squares into 3 Strips, having 3 Flower Squares in each Strip.
Side Strip Edging: **1st row: (RS). Join C with sl st in corner ch-2 sp of Strip. Ch 3 (counts as dc). Working across long edge of Strip, 1 dc in each st to end of Strip, working 1 dc in each ch-2 sp. Fasten off.
2nd row: (RS). Join B with sl st to top of ch 3. Ch 2 (does not count as st). 1 hdc in each dc to end of row. Fasten off.
3rd row: (RS). Join A with sl st to top of ch 2. Ch 1. 1 sc in each hdc to end of row. Fasten off.**
Rep for Second Strip.
Middle Strip Edgings
Work from ** to ** as given for Side Strip Edging. Rep on opposite side of same Strip.
With A, sew Strips tog into Blanket as shown in diagram.
Blanket edging: **1st rnd: (RS). Join MC with sl st to top right ch-2 sp corner of Blanket. Ch 1. *1 sc in each st to next corner, working 1 sc in each ch-2 sp. (1 sc. Ch 2. 1 sc) in next corner ch-2 sp. Rep from * twice more. 1 sc in each st to end of rnd. (1 sc. Ch 2) in first ch-2 sp. Join A with sl st to first sc. Break MC.
2nd rnd: With A, ch 1. 1 sc in each sc around, working (1 sc. Ch 2. 1 sc) in corner ch-2 sps. Join B with sl st to first sc. Break A.
3rd to 5th rnds: Rep 2nd rnd, changing colors in the following sequence: B, C, and D. Fasten off at end of last rnd.

ABBREVIATIONS
Stitch Combo 1: Yoh and draw up a loop in 2nd horizontal bar of stitch just made. Yoh and draw up a loop in next st of 3rd row. (Yoh and draw through 2 loops on hook) 4 times - 1 loop rem on hook. 1 dc in 2nd horizontal bar of last st made. Yoh and draw up a loop in same sp as last dc. Draw up a loop in 3rd horizontal bar of last long st made. Draw up a loop in same st of Row 3 - (5 loops on hook). Yoh and draw through 1 loop on hook. (Yoh and draw through 2 loops on hook) 4 times - (1 loop left on hook).
Stitch Combo 2: Yoh and draw up a loop in 2nd horizontal bar of stitch just made. Draw up a loop in 3rd horizontal bar of last long st made. Draw up a loop in next st of 3rd row. Yoh and draw through 1 loop on hook. (Yoh and draw through 2 loops on hook) 4 times - (1 loop left on hook). 1 dc in 2nd horizontal bar of stitch just made. Yoh and draw up a loop in same sp as last dc. Draw up a loop in 3rd horizontal bar of last long st made. Yoh and draw up a loop in same st of Row 3. (Yoh and draw through 2 loops on hook) 5 times - (1 loop left on hook).
Stitch Combo 3: Yoh and draw up a loop in 2nd horizontal bar of stitch just made. Yoh and draw up a loop in 3rd horizontal bar of last long st made. Yoh and draw up a loop in next st of Row 3. (Yoh and draw through 2 loops on hook) 6 times - (1 loop left on hook). 1 dc in 2nd horizontal bar of last st made. Yoh and draw up a loop in same sp as last dc. Yoh and draw up a loop in 4th horizontal bar of last long st made. Draw up a loop in same st of Row 3. (Yoh and draw through 2 loops on hook) 5 times - (1 loop left on hook).
Stitch Combo 4: Yoh and draw up a loop in 2nd horizontal bar of stitch just made. Yoh and draw up a loop in 3rd horizontal bar of last long st made. Draw up a loop in 4th horizontal bar of last long st made. Draw up a loop in next st of Row 3. Yoh and draw through 1 loop on hook. (Yoh and draw through 2 loops on hook) 6 times - (1 loop left on hook). Yoh and draw up a loop in 2nd horizontal bar of stitch just made. Yoh and draw up a loop in 4th horizontal bar of last long st made. (Yoh and draw through 2 loops on hook) 4 times - (1 loop left on hook, place marker on this stitch). Yoh and draw up a loop in 2nd horizontal bar of stitch just made. Yoh and draw up a loop in 4th horizontal bar of last long st made. Draw up a loop in 5th horizontal bar of last long st made. Draw up a loop in same st of Row 3. Yoh and draw through 1 loop on hook. (Yoh and draw through 2 loops on hook) 6 times - (1 loop left on hook).
Stitch Combo 5: Yoh and draw up a loop in 2nd horizontal bar of stitch just made. Yoh and draw up a loop in 4th horizontal bar of last long st made. Draw up a loop in 5th horizontal bar of last long st made. Draw up a loop in next st of Row 3. (Yoh and draw through 2 loops on hook) 6 times - (1 loop left on hook). 1 dc in 2nd horizontal bar of stitch just made. Yoh and draw up a loop in same sp as last dc. Draw up a loop in 4th horizontal bar of last long st made. Yoh and draw up a loop in same st of Row 3. (Yoh and draw through 2 loops on hook) 5 times - (1 loop left on hook).
Stitch Combo 6: Yoh and draw up a loop in 2nd horizontal bar of stitch just made. Draw up a loop in 3rd horizontal bar of stitch just made. Yoh and draw up a loop in next st of Row 3. (Yoh and draw through 2 loops on hook) 5 times - (1 loop left on hook). 1 dc in 2nd horizontal bar of stitch just made. Yoh and draw up a loop in same sp as last dc. Draw up a loop in 3rd horizontal bar of last long st made. Yoh and draw up a loop in same st of Row 3. Yoh and draw through 1 loop on hook. (Yoh and draw through 2 loops on hook) 5 times - (1 loop left on hook).
Stitch Combo 7: Yoh and draw up a loop in 2nd horizontal bar of stitch just made. Yoh and draw up a loop in next st of Row 3. (Yoh and draw through 2 loops on hook) 4 times - (1 loop left on hook). 1 dc in 2nd horizontal bar of stitch just made. Yoh and draw up a loop in same sp as last dc. Yoh and draw up a loop in same st of Row 3. Yoh and draw through 1 loop on hook. (Yoh and draw through 2 loops on hook) 4 times - (1 loop left on hook).
Approx = Approximately
Ch = Chain(s)
Dc = Double crochet
Dtr = (Yoh) 3 times. Draw up a loop in next stitch. (Yoh and draw through 2 loops on hook) 4 times - Double treble crochet made.
Hdc = Half double crochet
Rem = Remaining
Rnd(s) = Round(s)
Sc = Single crochet
Sl st = Slip stitch
Sp(s) = Space(s)
Tog = Together
Tr = (Yoh) twice. Draw up a loop in next stitch. (Yoh and draw through 2 loops on hook) 3 times.
Yoh = Yarn over hook

Source: Bernat.com

Tuesday 28 April 2015

Sunrise Washcloth Crochet Pattern

Free Crochet Pattern: Sunrise Washcloth – Lion Brand Yarns

Image of Sunrise Washcloth

Lion Brand® Kitchen Cotton  Pattern #: L30180

SKILL LEVEL:  Easy +

SIZE: One Size

About 9 in. (23 cm) diameter

Sunrise Washcloth
Lion Brand® Kitchen Cotton

GAUGE:

Exact gauge is not essential to this project.

STITCH EXPLANATION:

TECHNIQUE EXPLANATION
This design begins by working an adjustable ring to create a neat, closed center on the finished Washcloth.
Adjustable ring method: Wrap yarn around index finger. Insert hook into ring on finger, yarn over and draw up a loop. Carefully slip ring from finger and work the stitches of Rnd 1 (in pattern, below) into the ring. When Rnd 1 is complete gently, but firmly, pull tail to close up the ring.

NOTES:

Washcloth is worked in continuous rnds. Do NOT join and do NOT turn at the end of rnds.

WASHCLOTH
Following the Technique Explanation above, make an adjustable ring.
Rnd 1: Ch 1. Work 9 sc in ring; do not join. Place marker to indicate beginning of rnd. Move marker up as each rnd is completed.
Rnd 2: Work 2 hdc in each sc around - 18 hdc at the end of this rnd.
Rnd 3: (2 dc in next hdc, ch 1, sk next hdc) 9 times - 18 dc and 9 ch-1 sps at end of this rnd.
Rnds 4-8: (2 dc in next dc, dc in each dc to next ch-1 sp, ch 1, sk ch-1 sp) 9 times.
Rnd 9: (2 dc in next dc, dc in next 6 dc, ch 1, sk next ch-1 sp) 5 times, sl st in each st to end of rnd.
Fasten off.

FINISHING
Weave in ends.

For more free crochet patterns click here to visit Lion Brand yarns.

Sunday 26 April 2015

Granny Square Bookmarks Free Crochet Pattern

Free Crochet Pattern: Mini Granny Square Bookmarks

Image of Mini Granny Square Bookmarks

Lion Brand® Bonbons
Pattern #: L20370

Be the first to rate this pattern!
Write a review

SKILL LEVEL:  Easy

SIZE: Varies

Small About 1 1/4 x 3 3/4 in. (3 x 9.5 cm)
Medium About 1 1/4 x 5 in. (3 x 12.5 cm)
Large About 1 1/4 in. x 6 1/4 in. (3 x 16 cm)

Lion Brand® Bonbons

GAUGE:

One Square = about 1 1/4 x 1 1/4 in. (3 x 3 cm).

NOTES:

1. Squares are crocheted, then sewed together in a strip to make the Bookmark. Braids are added to one end of the Bookmark.
2. Squares are worked in joined rnds, with RS facing at all times.
3. Each rnd is worked in a different color.

MINI GRANNY SQUARE
With first color, ch 4; join with sl st in first ch to form a ring.
Rnd 1 (RS): Ch 3 (counts as dc here and throughout), 2 dc in ring, ch 2, (3 dc in ring, ch 2) 3 times; join with sl st in top of beg ch - 12 dc and 4 ch-2 sps. Fasten off the first color.
Rnd 2: With RS facing, join the second color with sl st in any ch-2 sp, ch 3, (2 dc, ch 2, 3 dc) in same ch-2 sp (corner made), *(3 dc, ch 2, 3 dc) in next ch-2 sp (corner made); rep from * 2 more times; join with sl st in top of beg ch - 24 dc and 4 ch-2 sps. Fasten off, leaving a long tail for sewing.

SMALL BOOKMARK
1. Make 3 Mini Granny Squares in the following colors or colors as desired.
Squares 1 and 3: first color = pea green, second color = light blue
Square 2: first color = pea green, second color = purple
2. Sew Squares together to make a strip.
3. Cut 6 strands of light blue, each about 17 in. (43 cm) long.
4. Hold strands together and fold in half. With crochet hook, draw fold through center at one end of Bookmark, forming a loop. Pull ends of yarn through this loop. Pull to tighten.
5. Separate strands into 2 groups of 6 strands each. Divide one group into 3 groups of 2 strands each and braid, knotting strands at end. Trim remaining strands about 1 in. (2.5 cm) shorter, then braid, knotting strands at end.

MEDIUM BOOKMARK
1. Make 4 Mini Granny Squares in the following colors or colors as desired.
Squares 1 and 3: first color = hot pink, second color = pea green
Squares 2 and 4: first color = sparkling peach, second color = emerald
2. Sew Squares together to make a strip.
3. Cut 2 strands each of sparkling peach, pea green, and hot pink, each about 17 in. (43 cm) long.
Repeat Steps 4 and 5 of Small Bookmark.

LARGE BOOKMARK
1. Make 5 Mini Granny Squares in the following colors or colors as desired.
Square 1: first color = red, second color = dark blue
Square 2: first color = hot pink, second color = dark blue
Square 3: first color = sparkling peach, second color = dark blue
Square 4: first color = pea green, second color = dark blue
Square 5: first color = light blue, second color = dark blue
2. Sew Squares together to make a strip.
3. Cut 6 strands of dark blue, each about 17 in. (43 cm) long.
Repeat Steps 4 and 5 of Small Bookmark.

FINISHING
Weave in ends.

Saturday 25 April 2015

Child's Royal Crown Free Crochet Pattern Red Heart

Child's Royal Crown

Every child will enjoy feeling like royalty in this beautiful crocheted crown. It’s perfect for birthdays, Halloween or everyday dress up. Crochet thread with a shiny silver filament gives it a wonderful sparkle. For adult size crown see pattern LC3683.

Project Number:
LC3717

Designed By:
Amy Shelton

Skill Level:

  • Easy

Category:

  • Crochet

Project Type:

  • Toy / Kid

Supplies:

RED HEART® Fashion Crochet, size 5: 2 balls 90G Gold/Gold.

Susan Bates® Crochet Hook: 2.25mm [US B-1]

Notions: Yarn needle

Size:

Directions are given for size Baby/Toddler. Changes for Child, Preteen and Adult are in parentheses.

Finished Sizes: 15 (17½, 20, 22½)” (38 [44.5, 51, 57] cm) in circumference, blocked. 4” (10 cm) tall (all sizes).

Gauge/Tension:

GAUGE: 28 sts = 4” (10 cm). Height of 6-row pattern repeat = 2¼” (5.5 cm) unblocked. CHECK YOUR GAUGE. Use any size hook to obtain the gauge given.

Click here to download the free pattern.

Friday 24 April 2015

Catch a Wave Blanket Free Crochet Pattern

Catch a Wave Throw–Crochet Pattern

Designed by Joyce Nordstrom

Throw measures 48 inches wide by 57 inches long

Red Heart Designer Sport: 2 skeins each 3261 Terra Cotta (A), 3620 Celadon (B), 3650 Pistachio (C), 3101 Ivory (D), 3251 Melon (E), 3801 Aqua Ice (F)

Crochet hook: Size H/8 (5mm)
Yarn needle

Gauge: 15 sts = 4-1/4 inches; 12 rows in pattern = 4 inches. Check your gauge. Use any size needle to obtain gauge given.

How to Make a Gauge Swatch
Ch 16.
Rows 1-5 Work same as rows 1-5 on Throw , except work wave patterns only once in each odd-numbered row and do not change color at end of each even-numbered row -- 15 sts.
Rows 6-12 Repeat rows 2-5 once, then repeat rows 2-4 once more. Swatch should measure approx 4-1/4 inches wide by 4 inches high. Adjust hook size if necessary to obtain correct gauge.

Stitch Patterns
Wave #1

(worked over 14 sts) Sc in next st, hdc in next 2 sts, dc in next 2 sts, tr in next 3 sts, dc in next 2 sts, hdc in next 2 sts, sc in next 2 sts.

Wave #2
(worked over 14 sts) Tr in next st, dc in next 2 sts, hdc in next 2 sts, sc in next 3 sts, hdc in next 2 sts, dc in next 2 sts, tr in next 2 sts.

Throw
With A, ch 170.
Row 1 (right side) Sc in 2nd ch from hook; work Wave #1 pattern 12 times -- 169 sts.
Row 2 Ch 1, turn; sc in first st andin each st across, changing to B inlast sc.

Fasten off A.
Row 3 With B, ch 4 (counts as tr), turn; work Wave #2 pattern 12 times.
Row 4 Ch 1, turn; sc in first st and in each st across, working last sc in 4th ch of turning ch-4 and changing to C in last sc. Fasten off B.
Row 5 With C, ch 1, turn; sc in first st; work Wave #1 pattern 12 times.
Rows 6-170 Repeat rows 2-5, 41 more times, then work row 2 once more, working 2 rows in each color in order from A-F and ending with 2 rows of A. At end of last row, fasten off.

Finishing
Weave in all ends.

Abbreviations: ch(s) = chain(s); dc = double crochet; hdc = half double crochet; sc = single crochet; st(s) = stitch(es); tr = treble crochet; * = Repeat directions following * as many times as indicated.; [ ] = Work directions inside brackets as many times as indicated; ( ) = Work directions inside parentheses into st or space indicated.

Catch a Wave Throw

Thursday 23 April 2015

Sunday 19 April 2015

Neon Retro Cushion Pillow Cover Crochet Pattern

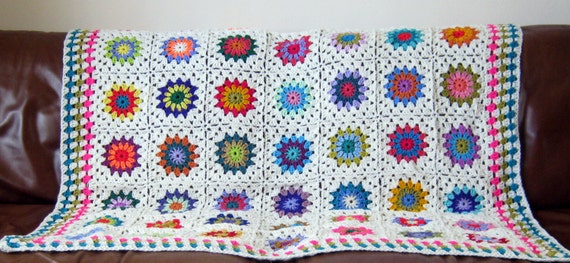
Neon Retro Cushion Cover


Skill Level:            Easy
Materials:             5.5mm hook, tapestry needle, 200g assorted DK yarn –               black, green, pink, orange, purple & blue
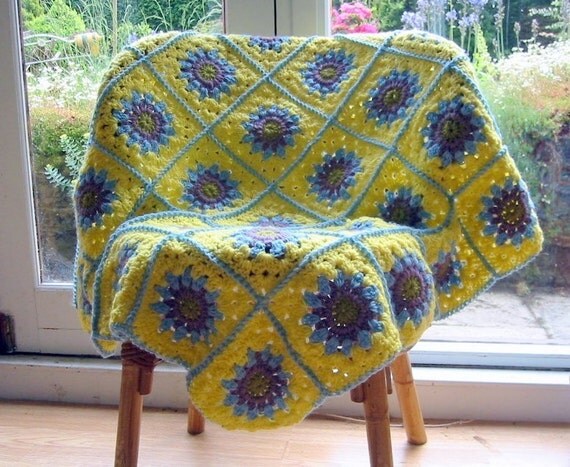
Notes:                   Bi sided cushion cover for a 16”  square cushion insert.

Measurements:     17” x 17”
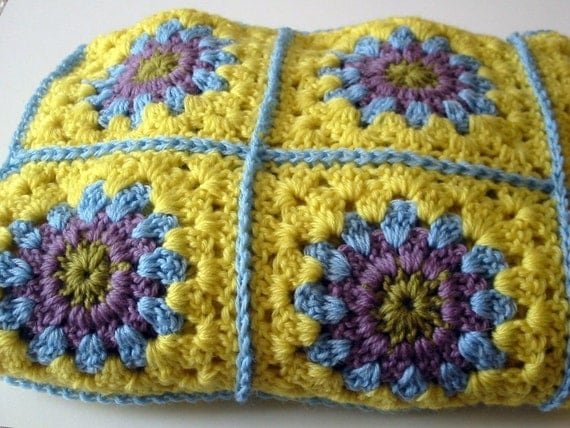
Pattern – Front.
Using black yarn, ch 4 join with a slip st to form ring.
Rnd 1: ch 2 work 11 dc into centre ring, join with sl st and fasten off yarn.
Rnd 2: Join orange yarn in sp between the dc’s, ch 2, work 1 dc into same sp, work 2 dc into each space to end, join with sl st and fasten off yarn.
Rnd 3: Join green yarn in any space between the double dc’s, ch 2 work 2 dc into same space, work 3 dc into each sp around the circle and join with a slip st, fasten off yarn.
Rnd 4: Join pink yarn in any space between the double dc’s, ch 2 work 3 dc into same space, work 4 dc into each sp around the circle and join with a slip st, fasten off yarn.
Rnd 5: Join purple yarn in any space between the quadruple dc’s, in any space between the double dc’s, ch 2 work 4 dc into same space, work 5 dc into each sp around the circle and join with a sl st, fasten off yarn.
Rnd 6: Join black yarn in any space between the 5dc clusters, ch 2, work 2 dc into same sp, *work 3 dc into centre dc in cluster, work 3 dc into next space between 5 dc’s*, repeat a further two times, ch 3 and work another triple dc into same space (to create corner). *Work 7 triple dc’s along next edge to next corner, ch 3 and work another triple dc into same space*, **rep to end until a full round has been completed, join with a sl st, fasten off yarn.
Rnd 7: work as rnd 6 in purple, increasing 1 triple dc cluster each side of the square.
Rnd 8: work as rnd 6 in black, increasing 1 triple dc cluster each side of the square.
Rnd 9: work as rnd 6 in pink, increasing 1 triple dc cluster each side of the square.
Rnd 10: work as rnd 6 in black, increasing 1 triple dc cluster each side of the square.
Rnd 11: work as rnd 6 in green, increasing 1 triple dc cluster each side of the square.
Rnd 12: work as rnd 6 in black, increasing 1 triple dc cluster each side of the square.
Rnd 13: work as rnd 6 in orange, increasing 1 triple dc cluster each side of the square.
Rnd 14: work as rnd 6 in black, increasing 1 triple dc cluster each side of the square.
Pattern – Back.

Ch 50
work 43 rows of HDC in following colour sequence.
Blue x 2, Pink x 3, Orange x1, Purple x1, green x3, Pink x 1, Blue x3, Pink x2, Green x1, Orange x1, Green x1, Pink x2, Purple x2, Green x2, Blue x2, Pink x1, Orange x1, Purple x1, Green x1, Blue x1, Orange x2, Pinkx3, purple x2, pink x1, orange x1, green x2.
To Finish:
Darn all ends in. Sew or crochet (sc) front and back together on 3 sides. Insert cushion and make ties to shut to 4th edge.
This pattern is offered and made available for personal use only. If you wish to reproduce this in any way please contact me or make sure that reference is made to the original author’s blog http://www.goodtimesithinkso.blogspot.com/


Thank you Crochet Conversion Chart US/UK International Yarn Weight Conversion Chart