googleads

Friday 31 May 2013

Child's Royal Crown Free Crochet Pattern Red Heart


Child's Royal Crown

Every child will enjoy feeling like royalty in this beautiful crocheted crown. It’s perfect for birthdays, Halloween or everyday dress up. Crochet thread with a shiny silver filament gives it a wonderful sparkle. For adult size crown see pattern LC3683.

Project Number:
LC3717

Designed By:
Amy Shelton

Skill Level:

  • Easy

Category:

  • Crochet

Project Type:

  • Toy / Kid

Supplies:

RED HEART® Fashion Crochet, size 5: 2 balls 90G Gold/Gold.

Susan Bates® Crochet Hook: 2.25mm [US B-1]

Notions: Yarn needle

Size:

Directions are given for size Baby/Toddler. Changes for Child, Preteen and Adult are in parentheses.

Finished Sizes: 15 (17½, 20, 22½)” (38 [44.5, 51, 57] cm) in circumference, blocked. 4” (10 cm) tall (all sizes).

Gauge/Tension:

GAUGE: 28 sts = 4” (10 cm). Height of 6-row pattern repeat = 2¼” (5.5 cm) unblocked. CHECK YOUR GAUGE. Use any size hook to obtain the gauge given.

Click here to download the free pattern.

Free Crochet Pattern: Sunrise Washcloth – Lion Brand Yarns


Image of Sunrise Washcloth

Lion Brand® Kitchen Cotton  Pattern #: L30180

SKILL LEVEL:  Easy +

SIZE: One Size

About 9 in. (23 cm) diameter

Sunrise Washcloth
Lion Brand® Kitchen Cotton

GAUGE:

Exact gauge is not essential to this project.

STITCH EXPLANATION:

TECHNIQUE EXPLANATION
This design begins by working an adjustable ring to create a neat, closed center on the finished Washcloth.
Adjustable ring method: Wrap yarn around index finger. Insert hook into ring on finger, yarn over and draw up a loop. Carefully slip ring from finger and work the stitches of Rnd 1 (in pattern, below) into the ring. When Rnd 1 is complete gently, but firmly, pull tail to close up the ring.

NOTES:

Washcloth is worked in continuous rnds. Do NOT join and do NOT turn at the end of rnds.

WASHCLOTH
Following the Technique Explanation above, make an adjustable ring.
Rnd 1: Ch 1. Work 9 sc in ring; do not join. Place marker to indicate beginning of rnd. Move marker up as each rnd is completed.
Rnd 2: Work 2 hdc in each sc around - 18 hdc at the end of this rnd.
Rnd 3: (2 dc in next hdc, ch 1, sk next hdc) 9 times - 18 dc and 9 ch-1 sps at end of this rnd.
Rnds 4-8: (2 dc in next dc, dc in each dc to next ch-1 sp, ch 1, sk ch-1 sp) 9 times.
Rnd 9: (2 dc in next dc, dc in next 6 dc, ch 1, sk next ch-1 sp) 5 times, sl st in each st to end of rnd.
Fasten off.

FINISHING
Weave in ends.

For more free crochet patterns click here to visit Lion Brand yarns.

Thursday 30 May 2013

Free Crochet Pattern: Mini Granny Square Bookmarks


Image of Mini Granny Square Bookmarks

Lion Brand® Bonbons
Pattern #: L20370

Be the first to rate this pattern!
Write a review

SKILL LEVEL:  Easy

SIZE: Varies

Small About 1 1/4 x 3 3/4 in. (3 x 9.5 cm)
Medium About 1 1/4 x 5 in. (3 x 12.5 cm)
Large About 1 1/4 in. x 6 1/4 in. (3 x 16 cm)

Lion Brand® Bonbons

GAUGE:

One Square = about 1 1/4 x 1 1/4 in. (3 x 3 cm).

NOTES:

1. Squares are crocheted, then sewed together in a strip to make the Bookmark. Braids are added to one end of the Bookmark.
2. Squares are worked in joined rnds, with RS facing at all times.
3. Each rnd is worked in a different color.

MINI GRANNY SQUARE
With first color, ch 4; join with sl st in first ch to form a ring.
Rnd 1 (RS): Ch 3 (counts as dc here and throughout), 2 dc in ring, ch 2, (3 dc in ring, ch 2) 3 times; join with sl st in top of beg ch - 12 dc and 4 ch-2 sps. Fasten off the first color.
Rnd 2: With RS facing, join the second color with sl st in any ch-2 sp, ch 3, (2 dc, ch 2, 3 dc) in same ch-2 sp (corner made), *(3 dc, ch 2, 3 dc) in next ch-2 sp (corner made); rep from * 2 more times; join with sl st in top of beg ch - 24 dc and 4 ch-2 sps. Fasten off, leaving a long tail for sewing.

SMALL BOOKMARK
1. Make 3 Mini Granny Squares in the following colors or colors as desired.
Squares 1 and 3: first color = pea green, second color = light blue
Square 2: first color = pea green, second color = purple
2. Sew Squares together to make a strip.
3. Cut 6 strands of light blue, each about 17 in. (43 cm) long.
4. Hold strands together and fold in half. With crochet hook, draw fold through center at one end of Bookmark, forming a loop. Pull ends of yarn through this loop. Pull to tighten.
5. Separate strands into 2 groups of 6 strands each. Divide one group into 3 groups of 2 strands each and braid, knotting strands at end. Trim remaining strands about 1 in. (2.5 cm) shorter, then braid, knotting strands at end.

MEDIUM BOOKMARK
1. Make 4 Mini Granny Squares in the following colors or colors as desired.
Squares 1 and 3: first color = hot pink, second color = pea green
Squares 2 and 4: first color = sparkling peach, second color = emerald
2. Sew Squares together to make a strip.
3. Cut 2 strands each of sparkling peach, pea green, and hot pink, each about 17 in. (43 cm) long.
Repeat Steps 4 and 5 of Small Bookmark.

LARGE BOOKMARK
1. Make 5 Mini Granny Squares in the following colors or colors as desired.
Square 1: first color = red, second color = dark blue
Square 2: first color = hot pink, second color = dark blue
Square 3: first color = sparkling peach, second color = dark blue
Square 4: first color = pea green, second color = dark blue
Square 5: first color = light blue, second color = dark blue
2. Sew Squares together to make a strip.
3. Cut 6 strands of dark blue, each about 17 in. (43 cm) long.
Repeat Steps 4 and 5 of Small Bookmark.

FINISHING
Weave in ends.

Wednesday 29 May 2013

GRANNY SQUARES HOW-TO Article – Crochet Today


Even a complete beginner can learn to make cute and colorful granny motifs by following our free step-by-step how to. Be sure to register and log in, then click on the pdf icon below to download the entire article.

Download PDF

application/pdf iconCT_GrannySquares.pdf

Click here to register with Crochet Today.

Tuesday 28 May 2013

Free Crochet Pattern: Multicolored Scarf


Image of Multicolored Scarf

Lion Brand® Heartland
Pattern #: L20658

Be the first to rate this pattern!
Write a review

SKILL LEVEL:  Easy

SIZE: One Size

About 6 1/2 x 104 in. (16.5 x 264 cm)

GAUGE:

1 Granny Square = about 6 1/2 x 6 1/2 in. (16.5 x 16.5 cm).

BE SURE TO CHECK YOUR GAUGE. When you match the gauge in a pattern, your project will be the size specified in the pattern and the materials specified in the pattern will be sufficient. If it takes you fewer stitches and rows to make a 4 in. [10 cm] square, try using a smaller size hook or needles; if more stitches and rows, try a larger size hook or needles.

NOTES:

1. Scarf is made from 16 Granny Squares sewn together.
2. Each Granny Square is made with 6 different colors. Follow Color Sequences, changing colors every rnd. Work over yarn ends as you go, or if you prefer, weave them in at the end.
3. Border is crocheted around the outside edge of completed Scarf.

COLOR SEQUENCES
Square 1:
Work 1 rnd each with J, K, F, B, H, G.
Square 2: Work 1 rnd each with M, D, B, L, K, C.
Square 3: Work 1 rnd each with B, J, L, G, F, M.
Square 4: Work 1 rnd each with I, C, M, J, D, A.
Square 5: Work 1 rnd each with L, K, H, A, C, F.
Square 6: Work 1 rnd each with I, H, E, N, J, B.
Square 7: Work 1 rnd each with E, F, D, A, G, K.
Square 8: Work 1 rnd each with K, B, F, M, C, L.
Square 9: Work 1 rnd each with G, M, K, D, A, B.
Square 10: Work 1 rnd each with L, G, A, J, H, M.
Square 11: Work 1 rnd each with A, L, J, E, F, D.
Square 12: Work 1 rnd each with C, I, D, K, A, G.
Square 13: Work 1 rnd each with J, M, G, H, B, I.
Square 14: Work 1 rnd each with D, F, N, B, J, H.
Square 15: Work 1 rnd each with J, D, C, L, G, E.
Square 16:Work 1 rnd each with M, B, J, K, H, N.

GRANNY SQUARE
Ch 4; join with sl st in first ch to form a ring.
Rnd 1 (RS): Ch 3 (counts as first dc in this rnd and in all following rnds), 2 dc in ring, ch 2, (3 dc in ring, ch 2) 3 times; join with sl st in top of beg ch - 12 dc and 4 ch-2 sps at the end of this rnd. Fasten off.
Rnd 2: With RS facing, join next color with sl st in any ch-2 sp, ch 3, (2 dc, ch 2, 3 dc) in same ch-2 sp (corner made), ch 1, *(3 dc, ch 2, 3 dc) in next ch-2 sp (corner made), ch 1; rep from * 2 more times; join with sl st in top of beg ch - 4 corners at the end of this rnd. Fasten off.
Rnd 3: With RS facing, join next color with sl st in any corner ch-2 sp, ch 3, (2 dc, ch 2, 3 dc) in same ch-2 sp, ch 1, 3 dc in next ch-1 sp, ch 1, *(3 dc, ch 2, 3 dc) in next ch-2 sp, ch 1, 3 dc in next ch-1 sp, ch 1; rep from * 2 more times; join with sl st in top of beg ch - 4 corners and one 3-dc group on each side. Fasten off.
Rnd 4: With RS facing, join next color with sl st in any corner ch-2 sp, ch 3, (2 dc, ch 2, 3 dc) in same ch-2 sp, (ch 1, 3 dc in next ch-1 sp) twice, ch 1, *(3 dc, ch 2, 3 dc) in next ch-2 sp, (ch 1, 3 dc in next ch-1 sp) twice, ch 1; rep from * 2 more times; join with sl st in top of beg ch - 4 corners and two 3-dc groups on each side. Fasten off.
Rnd 5: With RS facing, join next color with sl st in any corner ch-2 sp, ch 3, (2 dc, ch 2, 3 dc) in same ch-2 sp, ch 1, (3 dc in next ch-1 sp, ch 1) to next corner ch-2 sp, *(3 dc, ch 2, 3 dc) in next ch-2 sp, ch 1, (3 dc in next ch-1 sp, ch 1) to next corner ch-2 sp; rep from * 2 more times; join with sl st in top of beg ch - 4 corners and three 3-dc groups on each side. Fasten off.
Rnd 6: With last color, rep Rnd 5 - 4 corners and four 3-dc groups on each side.
Fasten off.

FINISHING
Sew Squares in order, from Square 1 to Square 16, into a strip 6 1/2 x 104 in. (16.5 x 264 cm) long.
Border
Join H with sl st anywhere along outside edge of Scarf; ch 1, sc evenly around outside edge of Scarf, working 3 sc in each corner; join with sl st in first st.
Fasten off. Weave in ends.

Click here to visit Lion Brand yarns.

Monday 27 May 2013

WHIMSY BLANKET Crochet Pattern – Crochet Today


Whimsy Blanket by Ellen K. Gormley
Have fun making different motifs and attaching them at random to the underlying mesh blanket. With this pattern, anything goes!

YARN
RED HEART Soft Yarn, 5oz/140g balls (solids), each approx 256yd/234m; 4oz/113g balls (prints), each approx 204yd/187m (acrylic)

  • 5 balls #9388 Wheat
  • 1 ball #9275 Paprika
  • 1 ball #9114 Honey
  • 1 ball #9518 Teal
  • 1 ball #9522 Leaf
  • 1 ball #9344 Chocolate
  • 1 ball #9543 Embers Print

CROCHET HOOK
Size J/10 (6mm) crochet hook

NOTIONS
Yarn needle

FINISHED MEASUREMENTS
Approx 48"/122cm wide x 65"/165cm long GAUGE 16 sts and 6 rows in mesh pattern = 4"/10cm

FREE PATTERN: CLICK ON THE PDF ICON BELOW TO DOWNLOAD.

Download PDF

application/pdf iconWhimseyBlanket_CTNovDec11.pdf

Sunday 26 May 2013

Sochi Throw Crochet Pattern


Source - Naturally Caron

GAUGE

1 Square = 6"/15cm measured on the diagonal.

STITCHES USED

Chain (ch), double crochet (dc), single crochet (sc), slip stitch (sl st).

SPECIAL TERM

PSt: Paris Stitch—(2 dc, ch 2, sc) in indicated stitch.

SQUARE 1 (make 72 – 18 each with A, B, C, and D)

With smaller hook, ch 20 loosely.

Row 1 (WS): Sc in 2nd ch from hook, *ch 1, sk next 2 ch, (2 dc, ch 2, sc) in next ch (PSt made), ch 1, sk next 2 ch, sc in next ch; repeat from * across, turn—3 PSt, and 4 sc.

Row 2: Ch 3 (counts as first dc here and throughout), dc in first sc, ch 1, sk next ch-1 sp, sc in ch-2 sp of next PSt, ch 1, *sk next ch-1 sp, PSt in next sc, ch 1, sk next ch-1 sp, sc in ch-2 sp of next PSt, ch 1; repeat from * across to last ch-1 sp, sk last ch-1 sp, 2 dc in last sc, turn—2 PSt, 4 dc, and 3 sc.

Row 3: Ch 1, sc in first dc, ch 1, sk next ch-1 sp, PSt in next sc, ch 1, *sk next ch-1 sp, sc in ch-2 sp of next PSt, ch 1, sk next ch-1 sp, PSt in next sc, ch 1; repeat from * across to last ch-1 sp, sk last ch-1 sp, sc in last dc, turn.

Rows 4–11: Repeat last 2 rows 4 times.

Last Row: Ch 1, sc in first sc, ch 1, sk next ch-1 sp, sc in ch-2 sp of next PSt, ch 2, *[sc in next ch-1 sp, ch 1] twice, sc in ch-2 sp of next PSt, ch 2; repeat from * to across to last ch-1 sp, sk last ch-1 sp, sc in last sc—9 sc, and 8 ch-sp.

Fasten off and weave in ends.

SQUARE 2 (make 56 – 14 each with A, B, C, and D)

With larger hook, ch 17 loosely.

Row 1 (WS): Ch 1, sc in 2nd ch from hook, *ch 3, sk next 2 ch, sc in next ch; repeat from * across, turn—6 sc, and 5 ch- sp.

Row 2: Ch 3, turn, dc in first sc, ch 3, sk next ch-3 sp, sc in next ch-3 sp, ch 1, PSt in next sc, ch 3, sk next ch-3 sp, sc in next ch-3 sp, ch 3, sk last ch-3 sp, 2 dc in last sc, turn—1 PSt, 4 dc, 2 sc, and 4 ch-sp.

Row 3: Ch 1, sc in first dc, ch 3, sc in next ch-3 sp, ch 1, PSt in next sc, ch 3 sk next ch-3 sp, sc in ch-2 sp of next PSt, ch 3, sc in next ch-1 sp, ch 3, sc in next ch-3 sp, ch 3, sc in last dc, turn—1 PSt, 6 sc, and 6 ch-sp.

Row 4: Ch 1, sc in first sc, ch 3, sk next ch-3 sp, [sc in next ch-3 sp, ch 3] 3 times, ch 3, sk next PSt, sc in next ch-1 sp, ch 3, sk last ch-3 sp, sc in last sc, turn—6 sc, and 5 ch-sp.

Rows 5–10: Repeat Rows 2–4 twice.

Row 11: Repeat Row 2.

Row 12: Ch 1, sc in first dc, ch 1, sc in next ch-3 sp, ch 2, sc in next ch-3 sp, ch 2, sc in ch-2 sp of next PSt, ch 2, sc in next ch-1 sp, ch 2, sc in next ch-3 sp, ch 1, sc in last dc—7 sc, and 6 ch-sp.

Fasten off and weave in ends.

FINISHING

Arrange squares as shown in assembly diagram and sew together.

Using yarn needle, weave in all ends.

Saturday 25 May 2013

Aphrodite Shawl–Crochet Pattern Naturally Caron Com

FINISHED MEASUREMENTS:

Shawl measures approximately 49"/124.5 cm wide x 23"/58.5 cm long

GAUGE

In pattern stitch, 24 sts and 3 1/2 rows = 4"/10 cm.

Exact gauge is not critical for this project.

STITCHES USED

Chain (ch), single crochet (sc), slip stitch (slip st), treble crochet (tr)

SPECIAL TERMS

Beg-trCl: Beginning treble cluster—Ch 4, yarn over twice, insert hook in indicated stitch and draw up a loop, [yarn over and draw through 2 loops on hook] twice (2 loops on hook); yarn over twice, insert hook in same stitch and draw up a loop, [yarn over and draw through 2 loops on hook] twice (3 loops on hook); yarn over and draw through all 3 loops on hook.

trCl: Treble cluster—Yarn over twice, insert hook in indicated stitch and draw up a loop, [yarn over and draw through 2 loops on hook] twice (2 loops on hook); *yarn over twice, insert hook in same stitch and draw up a loop, [yarn over and draw through 2 loops on hook] twice; repeat from * once more; yarn over and draw through all 4 loops on hook.

Beg-trCl shell: Beginning treble cluster shell—(Beg-trCl, ch 3, trCl) in indicated stitch.

trCl shell: Treble cluster shell—(trCl, ch 3, trCl) in indicated stitch.

trCl shell-INCREASE: Treble cluster shell increase—([trCl, ch 3] twice, trCl) in indicated stitch.

picot: Ch 6, slip st in top of last st made.

NOTE

This shawl was inspired by a vintage doily pattern.

SHAWL

Chain 10; taking care not to twist ch, join with slip st in first ch to form a ring.

Row 1: Ch 4 (counts as first tr), work 22 tr in ring, turn—23 tr.

Row 2: Beg-trCl in first tr, *ch 3, skip next tr, trCl in next tr; repeat from * across, working last trCl in top of turning ch, turn—12 clusters.

Row 3: Beg-trCl in first trCl, *ch 2, tr in next ch-3 space, ch 2, trCl in next trCl; repeat from * across, turn—12 clusters and 11 tr.

Row 4: Beg-trCl in first trCl, *ch 3, tr in next tr, ch 3, trCl in next trCl; repeat from * across, turn.

Row 5: Beg-trCl in first trCl, *ch 4, tr in next tr, ch 4, trCl in next trCl; repeat from * across, turn.

Row 6: Beg-trCl in first trCl, *ch 5, tr in next tr, ch 5, trCl in next trCl; repeat from * across, turn.

Row 7: Beg-trCl shell in first trCl, *ch 4, tr in next tr, ch 4, trCl shell in next trCl; repeat from * across, turn—12 shells and 11 tr.

Row 8: Beg-trCl in first trCl, ch 5, trCl in next trCl, *ch 3, tr in next tr, ch 3, trCl in next trCl, ch 5, trCl in next trCl; repeat from * across, turn—24 clusters and 11 tr.

Row 9: Beg-trCl in first trCl, ch 9, trCl in next trCl, *ch 3, tr in next tr, ch 3, trCl in next trCl, ch 9, trCl in next trCl; repeat from * across, turn.

Row 10: Beg-trCl in first trCl, ch 5, sc in 5th ch of next ch-9 space, picot, ch 5, trCl in next trCl, *picot, trCl in next trCl, ch 5, sc in 5th ch of next ch-9 space, picot, ch 5, trCl in next trCl; repeat from * across, turn—24 clusters.

Row 11: Beg-trCl in first trCl, ch 5, 6 tr in next picot, ch 5, *trCl shell in next picot, ch 5, 6 tr in next picot, ch 5; repeat from * across to last trCl, trCl in last trCl, turn—11 shells, 2 clusters and 12 6-tr groups.

Row 12: Beg-trCl in first trCl, ch 5, sc in next tr, [ch 6, sc in next tr] 5 times (beginning of pineapple), ch 5, *trCl shell in ch-3 space of next trCl shell, ch 5, sc in next tr, [ch 6, sc in next tr] 5 times, ch 5; repeat from * across to last trCl, trCl in last trCl, turn—11 shells, 2 clusters, and 12 pineapple beginnings.

Row 13: Beg-trCl in first trCl, ch 6, [sc in next ch-6 space, ch 6] 5 times, *trCl shell in ch-3 space of next trCl shell, ch 6, [sc in next ch-6 space, ch 6] 5 times; repeat from * across to last trCl, trCl in last trCl, turn.

Row 14: Beg-trCl in first trCl, ch 6, skip next ch-6 space, [sc in next ch-6 space of pineapple, ch 6] 4 times, *trCl shell in ch-3 space of next trCl shell, ch 6, skip next ch-6 space, [sc in next ch-6 space of pineapple, ch 6] 4 times; repeat from * across to last trCl, trCl in last trCl, turn.

Note: Take extra care when working Row 15. trCl shell-INCREASE is worked instead of regular trCl shells. Definition of trCl shell-INCREASE is given in the Special Terms section (above).

Row 15 (trCl shell INCREASE row): Beg-trCl shell in first trCl, ch 6, skip next ch-6 space, [sc in next ch-6 space of pineapple, ch 6] 3 times, *trCl shell-INCREASE in ch-3 space of next trCl shell, ch 6, skip next ch-6 space, [sc in next ch-6 space of pineapple, ch 6] 3 times; repeat from * across to last trCl, trCl shell in last trCl, turn—11 shell INCREASES, 2 shells, and 12 pineapples.

Row 16: Beg-trCl in first trCl, ch 3, sc in next ch-3 space, ch 3, trCl in next trCl, ch 6, skip next ch-6 space, [sc in next ch-6 space of pineapple, ch 6] twice, *[trCl in next trCl, ch 3, sc in next ch-3 space, ch 3] twice, trCl in next trCl, ch 6, skip next ch-6 space, [sc in next ch-6 space of pineapple, ch 6] twice; repeat from * across to last shell, trCl in next trCl, ch 3, sc in next ch-3 space, ch 3, trCl in last trCl, turn—37 clusters, and 12 pineapples.

Row 17: Beg-trCl in first trCl, [ch 3, sc in next ch-3 space] twice, ch 3, trCl in next trCl, ch 3, sc in next ch-6 space, ch 3, (sc, ch 3, sc) in next ch-6 space (pineapple point), ch 3, sc in next ch-6 space, ch 3, **trCl in next trCl, *[ch 3, sc in next ch-3 space] twice, ch 3, trCl in next trCl; repeat from * once more, ch 3, sc in next ch-6 space, ch 3, (sc, ch 3, sc) in next ch-6 space (pineapple point), ch 3, sc in next ch-6 space, ch 3; repeat from ** to last 2 trCl, trCl in next trCl, [ch 3, sc in next ch-3 space] twice, ch 3, trCl in last trCl, turn.

Row 18: Ch 5, sc in next ch-space, *ch 3, sc in next ch-space; repeat from * across skipping all trCl to last trCl, ch 3, slip st in last trCl, turn.

Rows 19–22: Ch 5, sc in first ch-space, *ch 3, sc in next ch-space; repeat from * across, turn.

Do not fasten off.

Edging

Note: Work edging around entire shawl as follows:

Row 1: Ch 5, sc in first ch-space, *ch 3, sc in next ch-space; repeat from * across, ch 3, sc in same (last) ch-space again (for corner); pivot to work along top edge,  **ch 3, sc in end of next row; repeat from ** across working (sc, ch 3, sc) in center of beginning ring; ch 3, join with slip st in 2nd ch of beginning ch-5, do not turn.

Row 2: Beg-trCl in same st as join; *ch 3, slip st in next ch-3 space, ch 3, trCl in next ch-3 space; repeat from * across to opposite top corner, ending with ch 3, slip st in corner ch-space; working along top edge, work 3 sc in each ch-space across; join with slip st in Beg-trCl. Fasten off.

FINISHING

Using yarn needle, weave in ends. If desired, block lightly.

Printer friendly instructions from naturallycaron.com click here.

Friday 24 May 2013

Grace Bikini Crochet Pattern


This sizzlin' hot bikini is a cinch to crochet for summer beach days. Top: To fit bra cup sizes A, B or C. Bottom: one size. Shown in Patons Grace 60604 Terracotta. 2.25 mm (U.S. B or 1) crochet hook.

This sizzlin' hot bikini is a cinch to crochet for summer beach days. Top: To fit bra cup sizes A, B or C. Bottom: one size. Shown in Patons Grace 60604 Terracotta. 2.25 mm (U.S. B or 1) crochet hook.

Skill Level
Easy

SIZE
Top:
To fit bra cup sizes A, B or C.
Bottom: One Size

MATERIALS
Patons® Grace
(50 g / 1.75 oz)
Size A–B–C
Top (60604 Terracotta) 1–1–2 ball(s)
Bottom (one size) (60604 Terracotta) 2 balls

Size 2.25 mm (U.S. B or 1) crochet hook or size needed to obtain tension. Invisible elastic thread for Bottom.

TENSION
24 sc and 28 rows = 4 ins [10 cm].

INSTRUCTIONS
The instructions are written for smallest size. If changes are necessary for larger sizes the instructions will be written thus ( ).

TOP
Cup
(make 2).
Ch 15 (16-20).
1st row: (RS). 1 sc in 2nd ch from hook. 1 sc in each ch to last ch. 5 sc in last ch. Mark center sc. Do not turn. Working into other side of ch, work 1 sc in each rem loop of ch to end of ch. Turn. 31 (33-41) sc.
2nd row: Ch 1. 1 sc in each sc to end of row. Turn.
3rd row: Ch 1. 1 sc in each sc to center sc. 5 (5-3) sc in center sc. 1 sc in each sc to end of row. Turn.
4th row: As 2nd row.
5th row: Ch 1. 1 sc in each sc to center sc. 3 sc in center sc. 1 sc in each sc to end of row. Turn.
Rep last 4 rows 4 (5-6) times more, then 2nd row once. 61 (69-69) sc.

All sizes: Next row: (WS). 1 sc in each of next 3 (4-4) sc. *Ch 1. Miss next sc. 1 sc in each of next 2 sc. Rep from * to last 1 (2- 2) sc. 1 sc in each of last 1 (2-2) sc. Turn.
Next row: Ch 1. 1 sc in each of first 1 (2-2) sc. *5 dc in next ch-1 sp. 1 sc in next ch-1 sp. Rep from * to last 3 (4-4) sc. 1 sc in each of last 3 (4-4) sc. Fasten off.

Join Cups and Make Ties: Ch 95. With WS of work facing, work 28 (28- 30) sc evenly across bottom of first Cup. Ch 4. Work 28 (28-30) sc evenly across bottom of second Cup. Ch 96. Turn.
Next row: Sl st in 2nd ch from hook. Sl st in each of next 94 ch. 1 sc in each of next 28 (28-30) sc. 1 sc in each of next 4 ch. 1 sc in each of next 28 (28- 30) sc. Sl st in each of next 95 ch. Fasten off.

Neck Ties: With RS of work facing, join yarn with sl st to top center 5 dc group. Ch 106. Sl st in 2nd ch from hook. Sl st in each ch to end of ch. Fasten off.
Rep for Second Cup.

BOTTOM
Back:
Ch 63.
1st row: 1 sc in 2nd ch from hook. 1 sc in each ch to end of ch. 62 sc. Turn.
2nd row: Ch 1. 1 sc in each sc to end of row. Turn.
Rep last row 7 times more.

Back shaping: 1st row: (RS). Draw up a loop in each of first 2 sts. Yoh and draw through all loops on hook – sc2tog made. 1 sc in each sc to last 2 sc. Sc2tog over last 2 sc. Turn.
2nd row: Ch 1. 1 sc in each st to end of row. Turn.
Rep last 2 rows until there are 14 sc, ending with RS facing for next row.
Next row: Ch 1. 1 sc in each sc to end of row. Turn.
Rep last row 19 times more.

Front shaping: Next row: Ch 1. 2 sc in first sc. 1 sc in each sc to last sc. 2 sc in last sc. Turn.
Next 2 rows: Ch 1. 1 sc in each sc to end of row. Turn.
Rep last 3 rows 13 times more. 42 sc. Fasten off.

Back Edging and Side Ties: 1st row: Ch 55. With RS of work facing, sl st in first ch of foundation ch on Back. Ch 1. 1 sc in each ch of foundation ch. Ch 56. Turn.
2nd row: Sl st in 2nd ch from hook. Sl st in each of next 54 ch. 1 sc in each sc across Back. sl st in each of next 55 ch. Fasten off.
Rep for Front Edging and Side Ties.

Leg Edging: 1st row: With RS of work facing, join yarn with sl st to Front Side edge where Tie is joined. Ch 1. Work 1 row of sc evenly along Leg Opening. Turn.
2nd row: Ch 1. 1 sc in each sc to end of row. Fasten off.
Rep for second Leg Edging, joining yarn with sl st to Back Side edge where tie is joined.
Thread invisible elastic through last sc row of Back, Front and Leg Edgings.

This pattern can be completed with one of the following Patons yarns:

Patons Grace

Click here to get the free PDf at Patons.

Thursday 23 May 2013

Elegant Floral Throw Blanket–Crochet Pattern Patons


This heirloom afghan features modern flowers in traditional colors. Shown in Patons Decor.

This heirloom afghan features modern flowers in traditional colors. Shown in Patons Decor.

Skill Level
Intermediate

MEASUREMENTS
Approx 55 x 71 ins [139.5 x 180.5 cm]

MATERIALS
Patons® Decor
(100 g)
Main Color (MC): (Aran) 10 balls
Contrast A: (Gold) 2 balls
Contrast B: (Brown) 1 ball
Contrast C: (Green) 1 ball
Contrast D: (Blue) 1 ball
Contrast E: (Aqua) 1 ball

Size 5 mm (U.S. H or 8) crochet hook or size needed to obtain tension.

TENSION
13 sc and 16 rows = 4 ins [10 cm].
1 motif = 7 ins [18 cm] square

INSTRUCTIONS
Note
: To change color, work to last 2 loops on hook. Draw loop in next color through 2 loops on hook to complete st and proceed in next color.

Motif A (make 20).
With MC, ch 3. Join with sl st to form a ring.
1st rnd: Ch 1. 12 sc in ring.With A, join with sl st to first sc. Break MC.
2nd rnd: With A, ch 1. 1 sc in same sc as sl st. *2 sc in next sc. 1 sc in next sc. Rep from * 4 times more. 2 sc in next sc. (18 sc).With B, join with sl st to first sc. Do not break A.
3rd rnd: With B, ch 1. 1 sc in same sc as sl st. *2 sc in next sc. 1 sc in each of next 2 sc. Rep from * 4 times more. 2 sc in next sc. 1 sc in next sc. With A, join with sl st to first sc. Break B. 24 sc.
4th rnd: *With A, ch 10. 1 sl st in 2nd ch from hook. 1 sc in next ch. 1 hdc in next ch. 1 dc in next ch. 1 tr in each of next 2 ch. 1 dc in next ch. 1 hdc in next ch. 1 sc in next ch. Miss next sc of 3rd rnd. Join MC with ss in next sc of 3rd rnd.With MC, ch 10. 1 sl st in 2nd ch from hook. 1 sc in next ch. 1 hdc in next ch. 1 dc in next ch. 1 tr in each of next 2 ch. 1 dc in next ch. 1 hdc in next ch. 1 sc in next ch. Miss next sc of 3rd rnd.With A, sl st in next sc of 3rd rnd. Rep from * 5 times more ending with sl st in first st of 3rd rnd. (12 petals). Break A.
5th rnd: Turn.Working into last petal, with MC, sl st in last sc. Sl st in next hdc. Sl st in next dc. Sl st in each of next 2 tr. Sl st in next dc. Turn. Sl st in 6th ch of first petal. Ch 5. Sl st in top of first petal. Ch 5. Sl st in next dc of first petal. *Sl st in 6th ch of next petal. Ch 5. Sl st in top of same petal. Ch 5. Sl st in next dc of same petal. Rep from * around. Join with sl st in 6th ch of first petal.
6th rnd: Ch 4 (counts as tr). (Yoh) 3 times and draw up a loop in same sp as last sl st. (Yoh and draw through 2 loops on hook) 4 times – dtr made. *Sl st in next ch 5 sp. [Sl st in next ch 5 sp. (1 tr. 2 dc. 1 tr) all in sp between next 2 sl st. Sl st in next ch 5 sp] twice. 1 sl st in next ch 5 sp.** (1 tr. 1 dtr. Ch 3. 1 dtr. 1 tr) all in sp between next 2 sl st. Rep from * twice more, then from * to ** once. (1 tr. 1 dtr) all between next 2 sl st. Ch 3. Join with sl st to top of ch 4.
7th rnd: Ch 1. 1 sc in same sp as last sl st. 1 sc in each st around, working (1 sc. Ch 3. 1 sc) into each corner ch 3 sp. Join with sl st to first sc. Fasten off.

Motif B (make 15).Work as given for Motif A substituting C for A.

Motif C (make 16).Work as given for Motif A substituting D for A.

Motif D (make 12).Work as given for Motif A substituting E for A.

Finishing
Join Motifs into 7 strips, 9 motifs long as shown on Diagram as follows: Join MC in any corner ch 3 sp of the first motif.With WS facing each other, ch 2. 1 sc in corner ch 3 sp of second motif. *Ch 2. Miss next sc. 1 sc in next sc of first motif. Ch 2. Miss next sc. 1 sc in next sc of second motif. Rep from * to end of row, always working into corner ch 3 sp.
Edging: 1st rnd: With RS of work facing, join MC to top right corner. Ch 1. 1 sc in same sp. *Work 18 sc across motif. 2 sc in joining ch 5 sp.* Rep from * to * across top edge of Afghan. 3 sc in corner st. Rep from * to * along side of Afghan. 3 sc in corner st. Rep from * to * across bottom edge of Afghan. Rep from * to * along side of Afghan. Join with sl st to first sc.
2nd rnd: Ch 1. 1 sc in same sp as sl st. *Ch 3. Miss next sc. 1 sc in next sc. Rep from * around, working (1 sc. Ch 3. 1 sc) in corner sc and ending with ch 3. Sl st to first sc.
3rd rnd: Sl st in first ch 3 sp. Ch 1. 1 sc in same ch 3 sp. *Ch 3. 1 sc in next ch 3 sp. Rep from * around working (1 sc. Ch 3. 1 sc) in corner ch 3 sps and ending with ch 3. Join with sl st to first sc.
Rep last rnd once more. Break MC.
5th rnd: Join B with sl st in first ch 3 sp. Ch 1. 1 sc in same ch 3 sp. Ch 2. Ch 3. Sl st in 3rd ch from hook – picot made. Ch 2. *1 sc in next ch 3 sp. Ch 2. Picot. Ch 2. Rep from * around. Join with sl st to first sc.

Download Pattern:
ENG

Wednesday 22 May 2013

Retro Rainbow Baby Blanket–Free Crochet Pattern Bernat


Retro Rainbow Baby Blanket

This Retro Rainbow Baby Blanket is perfect for baby boys and girls alike. The bright rainbow motifs will look great in any nursery. This is an advanced crochet afghan pattern for ambitious crocheters to complete. Sheep(ish) by Vickie Howell yarn is used. It's a great pattern to make for any mother-to-be, including yourself! This crochet afghan measures approximately 42 inches by 48 inches when complete.

Crochet Hook: H/8 or 5 mm hook

Yarn Weight: (4) Medium Weight/Worsted Weight and Aran (16-20 stitches to 4 inches)

MATERIALS

  • Sheep(ish)™ by Vickie Howell (85 g/ 3 oz, 153 m/167 yds)
    Main Color (MC) White(ish) (00004) 3 balls
    Contrast A Turquoise(ish) (00017) 1 ball
    Contrast C Yellow(ish) (00012) 2 balls
    Contrast B Chartreuse(ish) (00020) 2 balls
    Contrast D Coral(ish) (00014) 3 balls
  • Size 5 mm (U.S. H/8) crochet hook or size needed to obtain gauge.
  • Stitch marker.

MEASUREMENTS
Approx 42" x 48" [106.5 x 122 cm]
GAUGE
1 Block= 5½" [14 cm] square.
INSTRUCTIONS
Block (make 36) See diagram on page 3.
With A, ch 4. Join with sl st to first ch to form a ring.
1st rnd: Ch 2 (does not count as st). (2 hdc. 3 dc. 2 tr. 3 dc. 2 hdc) into ring. Join with sl st to top of first hdc. Fasten off. 12 sts.
2nd row: Miss first hdc. Join B with sl st in next hdc. Ch 1. Miss same hdc where sl st was made. 2 sc in next dc. (2 hdc. 1 dc) in next dc. (2 dc. 1 tr) in next dc. 3 tr in next tr. (1 tr. 2 dc) in next tr. (1 dc. 2 hdc) in next dc. 2 sc in next dc. Ch 1. Sl st in next hdc. Fasten off. 21 sts, including ch-1 sps.
3rd row: Miss first 2 sc of 2nd row. Join C with sl st in next hdc. Ch 1. Miss same hdc where sl st was made. 1 sc in next hdc. 1 hdc in next dc. 1 dc in next dc. 2 tr in next dc. 2 tr in next tr. (1 tr. 1 dtr) in next tr. 3 dtr in next tr. (1 dtr. 1 tr) in next tr. 2 tr in next tr. 2 tr in next dc. 1 dc in next dc. 1 hdc in next dc. 1 sc in next dc. Ch 1. Sl st in next hdc. Fasten off. 23 sts, including ch-1 sps.
4th row: Join D with sl st in first hdc of 3rd row. Ch 1. Miss same hdc where sl st was made. 1 sc in next st. 1 hdc in next st. 1 dc in next st. (1 dc. 1 tr) in next st. (1 tr. 2 dtr) in next st. Stitch Combo 1. Stitch Combo 2. Stitch Combo 3. Stitch Combo 4. Stitch Combo 5. Stitch Combo 6. Stitch Combo 7. (2 dtr. 1 tr) in next st. (1 tr. 1 dc) in next st. 1 dc in next st. 1 hdc in next st. 1 sc in next st. Ch 1. Sl st in next st. Fasten off.
Note: When working 5th rnd, ch-1 sp counts as st. Sl st does not count as st.
5th rnd: Join MC with sl st in marked st. Ch 6 (counts as tr and ch 2). 2 tr in same sp as sl st, *1 tr in next st. 1 dc in next st. 1 hdc in each of next 3 sts. 1 sc in each of next 2 sts. 1 hdc in each of next 3 sts. 1 dc in next st. 1 tr in next st.** (2 tr. Ch 2. 2 tr) in next st. Rep from * twice more, then from * to ** once. 1 tr in same sp as first sl st. Join with sl st to 4th ch of ch 6. Fasten off.
FINISHING
Using flat seam, join 4 Blocks into Flower Square. Sew Flower Squares into 3 Strips, having 3 Flower Squares in each Strip.
Side Strip Edging: **1st row: (RS). Join C with sl st in corner ch-2 sp of Strip. Ch 3 (counts as dc). Working across long edge of Strip, 1 dc in each st to end of Strip, working 1 dc in each ch-2 sp. Fasten off.
2nd row: (RS). Join B with sl st to top of ch 3. Ch 2 (does not count as st). 1 hdc in each dc to end of row. Fasten off.
3rd row: (RS). Join A with sl st to top of ch 2. Ch 1. 1 sc in each hdc to end of row. Fasten off.**
Rep for Second Strip.
Middle Strip Edgings
Work from ** to ** as given for Side Strip Edging. Rep on opposite side of same Strip.
With A, sew Strips tog into Blanket as shown in diagram.
Blanket edging: **1st rnd: (RS). Join MC with sl st to top right ch-2 sp corner of Blanket. Ch 1. *1 sc in each st to next corner, working 1 sc in each ch-2 sp. (1 sc. Ch 2. 1 sc) in next corner ch-2 sp. Rep from * twice more. 1 sc in each st to end of rnd. (1 sc. Ch 2) in first ch-2 sp. Join A with sl st to first sc. Break MC.
2nd rnd: With A, ch 1. 1 sc in each sc around, working (1 sc. Ch 2. 1 sc) in corner ch-2 sps. Join B with sl st to first sc. Break A.
3rd to 5th rnds: Rep 2nd rnd, changing colors in the following sequence: B, C, and D. Fasten off at end of last rnd.

ABBREVIATIONS
Stitch Combo 1: Yoh and draw up a loop in 2nd horizontal bar of stitch just made. Yoh and draw up a loop in next st of 3rd row. (Yoh and draw through 2 loops on hook) 4 times - 1 loop rem on hook. 1 dc in 2nd horizontal bar of last st made. Yoh and draw up a loop in same sp as last dc. Draw up a loop in 3rd horizontal bar of last long st made. Draw up a loop in same st of Row 3 - (5 loops on hook). Yoh and draw through 1 loop on hook. (Yoh and draw through 2 loops on hook) 4 times - (1 loop left on hook).
Stitch Combo 2: Yoh and draw up a loop in 2nd horizontal bar of stitch just made. Draw up a loop in 3rd horizontal bar of last long st made. Draw up a loop in next st of 3rd row. Yoh and draw through 1 loop on hook. (Yoh and draw through 2 loops on hook) 4 times - (1 loop left on hook). 1 dc in 2nd horizontal bar of stitch just made. Yoh and draw up a loop in same sp as last dc. Draw up a loop in 3rd horizontal bar of last long st made. Yoh and draw up a loop in same st of Row 3. (Yoh and draw through 2 loops on hook) 5 times - (1 loop left on hook).
Stitch Combo 3: Yoh and draw up a loop in 2nd horizontal bar of stitch just made. Yoh and draw up a loop in 3rd horizontal bar of last long st made. Yoh and draw up a loop in next st of Row 3. (Yoh and draw through 2 loops on hook) 6 times - (1 loop left on hook). 1 dc in 2nd horizontal bar of last st made. Yoh and draw up a loop in same sp as last dc. Yoh and draw up a loop in 4th horizontal bar of last long st made. Draw up a loop in same st of Row 3. (Yoh and draw through 2 loops on hook) 5 times - (1 loop left on hook).
Stitch Combo 4: Yoh and draw up a loop in 2nd horizontal bar of stitch just made. Yoh and draw up a loop in 3rd horizontal bar of last long st made. Draw up a loop in 4th horizontal bar of last long st made. Draw up a loop in next st of Row 3. Yoh and draw through 1 loop on hook. (Yoh and draw through 2 loops on hook) 6 times - (1 loop left on hook). Yoh and draw up a loop in 2nd horizontal bar of stitch just made. Yoh and draw up a loop in 4th horizontal bar of last long st made. (Yoh and draw through 2 loops on hook) 4 times - (1 loop left on hook, place marker on this stitch). Yoh and draw up a loop in 2nd horizontal bar of stitch just made. Yoh and draw up a loop in 4th horizontal bar of last long st made. Draw up a loop in 5th horizontal bar of last long st made. Draw up a loop in same st of Row 3. Yoh and draw through 1 loop on hook. (Yoh and draw through 2 loops on hook) 6 times - (1 loop left on hook).
Stitch Combo 5: Yoh and draw up a loop in 2nd horizontal bar of stitch just made. Yoh and draw up a loop in 4th horizontal bar of last long st made. Draw up a loop in 5th horizontal bar of last long st made. Draw up a loop in next st of Row 3. (Yoh and draw through 2 loops on hook) 6 times - (1 loop left on hook). 1 dc in 2nd horizontal bar of stitch just made. Yoh and draw up a loop in same sp as last dc. Draw up a loop in 4th horizontal bar of last long st made. Yoh and draw up a loop in same st of Row 3. (Yoh and draw through 2 loops on hook) 5 times - (1 loop left on hook).
Stitch Combo 6: Yoh and draw up a loop in 2nd horizontal bar of stitch just made. Draw up a loop in 3rd horizontal bar of stitch just made. Yoh and draw up a loop in next st of Row 3. (Yoh and draw through 2 loops on hook) 5 times - (1 loop left on hook). 1 dc in 2nd horizontal bar of stitch just made. Yoh and draw up a loop in same sp as last dc. Draw up a loop in 3rd horizontal bar of last long st made. Yoh and draw up a loop in same st of Row 3. Yoh and draw through 1 loop on hook. (Yoh and draw through 2 loops on hook) 5 times - (1 loop left on hook).
Stitch Combo 7: Yoh and draw up a loop in 2nd horizontal bar of stitch just made. Yoh and draw up a loop in next st of Row 3. (Yoh and draw through 2 loops on hook) 4 times - (1 loop left on hook). 1 dc in 2nd horizontal bar of stitch just made. Yoh and draw up a loop in same sp as last dc. Yoh and draw up a loop in same st of Row 3. Yoh and draw through 1 loop on hook. (Yoh and draw through 2 loops on hook) 4 times - (1 loop left on hook).
Approx = Approximately
Ch = Chain(s)
Dc = Double crochet
Dtr = (Yoh) 3 times. Draw up a loop in next stitch. (Yoh and draw through 2 loops on hook) 4 times - Double treble crochet made.
Hdc = Half double crochet
Rem = Remaining
Rnd(s) = Round(s)
Sc = Single crochet
Sl st = Slip stitch
Sp(s) = Space(s)
Tog = Together
Tr = (Yoh) twice. Draw up a loop in next stitch. (Yoh and draw through 2 loops on hook) 3 times.
Yoh = Yarn over hook

Source: Bernat.com

Tuesday 21 May 2013

Tumbling Blocks Throw Free Crochet Pattern Red Heart


Tumbling Blocks Throw

Based on a classic quilt pattern, this stunning throw adds visual delight to any room. We’ve crocheted it using 15 colors for a scrap look.

Project Number:
LW3556

Designed By:
Katherine Eng

Skill Level:

  • Intermediate

Category:

  • Crochet

Project Type:

  • Throws / Afghans

Supplies:

RED HEART® With Love®: 2 skeins 1012 Black A, 1 skein each 1814 True Blue B, 1401 Pewter C, 1542 Aubergine D, 1601 Lettuce E, 1701 Hot Pink F, 1704 Bubblegum G, 1502 Iced Aqua H, 1909 Holly Berry I, 1201 Daffodil J, 1252 Mango K, 1538 Lilac L, 1308 Tan M, 1805 Bluebell N, and 1621 Evergreen O

Susan Bates® Crochet Hook: 6mm [US J-10]

Yarn needle

Size:

Throw measures 44” (112 cm) wide and 54” (137 cm) long

Gauge/Tension:

GAUGE: One diamond measures about 2 x 3” (5 x 7.5 cm). CHECK YOUR GAUGE. Use any size hook to obtain the gauge.

To download the printable instructions visit RedHeart by clicking here.

Monday 20 May 2013

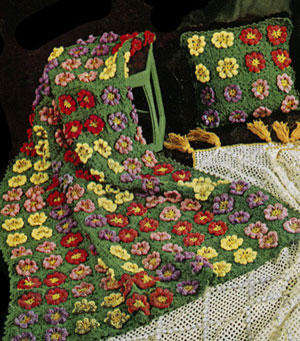
Flower Garden Afghan Crochet Pattern


Flower Garden Afghan Pattern

Source - Free Vintage Crochet.com

Size: 48 x 64 inches

Materials Required:
AMERICAN THREAD COMPANY
"DAWN" KNITTING WORSTED
13 - 4 ounce skeins Lt. Olive Green
3 - 4 ounce skeins Antique Gold
2 - 4 ounce skeins each Pink, Dk. Coral, Canary and Violet (Flower Colors)

Plastic Crochet Hook Size J OR ANY SIZE HOOK WHICH WILL RESULT IN MOTIF GAUGE BELOW
½ yd. Lining and Shredded foam rubber for Pillow

GAUGE: Each motif measures 4 inches.

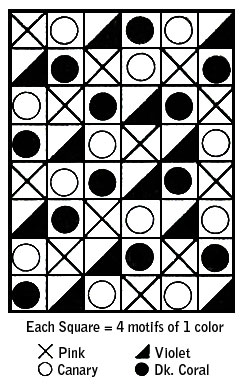
1st MOTIF: With Antique Gold ch 4, join to form a ring, * ch 8, s c in ring, repeat from * 7 times, join, cut yarn. 2nd ROUND:At­tach a flower color in any loop, work 1 s c, 5 d c, 1 s c in each loop all around, join in 1st s c, cut yarn. 3rd ROUND: Attach Lt. Olive Green between any 2 petals, s c in same space, * ch 2, holding petal to front, s c between next 2 petals, repeat from * all around, join in 1st s c. 4th ROUND: Sl st in next space, ch 3, 2 d c in same space, * 3 d c, ch 2, 3 d c in next space (corner), 3 d c in next space, repeat from * twice, 3 d c, ch 2, 3 d c in next space, join in 3rd st of ch. 5th ROUND: Sl st in each of the next 2 d c to space between next d c groups, ch 3, 2 d c in same space, * 3 d c, ch 2, 3 d c in corner ch 2 loop, 3 d c in between next d c groups, 3 d c in between next d c groups, repeat from * twice, 3 d c, ch 2, 3 d c in corner ch 2 loop, 3 d c in between next d c groups, join in 3rd st of ch, cut yarn. 2nd MOTIF: Work 1st 4 rounds same as 1st motif. 5th ROUND: Join to 1st motif as follows: sl st in each of next 2 d c to space between next d c groups, ch 3, 2 d c in same space, 3 d c in corner ch 2 loop, ch 1, drop loop from hook, insert hook in corner ch 2 loop of 1st motif, pick up loop and pull through, ch 1, 3 d c in same loop of 2nd motif, * drop loop, insert hook in next space between d c goups of 1st motif, pull loop through, 3 d c in between next d c groups of 2nd motif, repeat from * once, drop loop, insert hook in next space between d c groups of 1st motif, pull loop through, 3 d c in ch 2 loop of 2nd motif, ch 1, drop loop, insert hook in ch 2 loop of 1st motif, ch 1, 3 d c in same space of 2nd motif, and complete round same as 1st motif. Join 3rd motif to 1st motif and 4th motif to 3rd and 2nd motifs in same manner. Work 192 motifs arranging motifs in 12 groups of 4 flower colors according to chart on this page. (If desired work 12 groups of each of 4 colors and then sew groups tog according to chart).

EDGE: Attach Lt. Olive Green in any corner loop, ch 3, 3 d c in same space, * 4 d c between next d c groups, repeat from * twice, 4 d c in seam, 4 d c in each of next 3 spaces, 4 d c in seam. Continue all around in same man­ner working 4 d c, ch 2, 4 d c in each corner, join. 2nd ROUND: Sl st to next space between d c groups, * ch 4, 5 d c in 3rd st from hook, ch 1, s c in next space between d c groups, continue all around in same manner, join, cut yarn.

PILLOW

Work 16 motifs same as afghan working 1 group of each of the 4 colors. Finish with edge same as afghan.

LINING: Cut 2 sections lining ma­terial allowing about 1 inch more on each edge for seams. Sew 3 sides. Fill with shredded foam rubber and sew opening closed. Place crochet section over pillow and sew in place as illustrated.

Flower Garden Afghan Pattern chart

Sunday 19 May 2013

Cotton-ish - Tri-Light by Vickie Howell (knit)


This chic kerchief is the perfect finishing touch for any look. Shown in Bernat Cotton-ish by Vickie Howell.

Skill Level
Easy

This chic kerchief is the perfect finishing touch for any look. Shown in Bernat Cotton-ish by Vickie Howell.

Download Pattern:
ENG

Make this with:

Cotton-ish by Vickie Howell

MEASUREMENT
Approx 40" [101.5 cm] at widest point.

MATERIALS
Bernat® Cotton-ish™ by Vickie Howell (70 g/2.4 oz; 258 m/282 yds)
Cotton Gin (85315) 2 balls
Size 4 mm (U.S. 6) knitting needles. Size 4 mm (U.S. 6) circular knitting needle 36" [90 cm] long or size needed to obtain gauge. 4 stitch markers.

GAUGE
20 sts and 30 rows = 4" [10 cm] in garter stitch.

ABBREVIATIONS
www.bernat.com/abbreviations
Inc 1 = Increase 1 stitch by knitting into front and back of next stitch
K = Knit
K2tog = Knit next 2 stitches together
Pm = Place marker
Psso = Pass slipped stitch over
Rep = Repeat(s)
RS = Right side
Sl1 = Slip the next stitch knitwise
St(s) = Stitch(es)
WS = Wrong side
Yo = Yarn over

INSTRUCTIONS
With pair of needles, cast on 3 sts.
1st row: (RS). Inc 1 in first st. K1, place marker (Pm) for center st. Inc 1 in last st. 5 sts.
2nd row: Knit.
3rd row: K1. yo. Knit to marked st. yo. K1. yo. Knit to last st. yo. K1. 4 sts increased.
4th row: Knit. Rep last 2 rows until there are 173 sts, changing to circular needle to accommodate all sts and ending with a WS row.

Edging
1st row: (RS). K1. Pm. Knit to center marked st. yo. K1. yo. Pm. Knit to end of row.
2nd row: Purl.
3rd row: K1. yo. Knit to marker. Sl marker. K1. (yo. K1. Sl1. K2tog. psso. K1. yo. K1) 14 times. Knit to center marked st. yo. K1. yo. Knit to next marker. (K1. yo. K1. Sl1. K2tog. psso. K1. yo) 14 times. Knit to last st. yo. K1. (4 sts increased). Rep last 2 rows 6 times more. Knit 5 rows. Cast off knitwise (WS).