
Get the Free PDF Pattern at Patons here.
Measurements
Blanket: Approx 48 x 57 ins [122 x 144.5 cm].
Pillow: Approx 18 ins [45.5 cm] square (excluding edging).
Tension
15 dc and 7 rows = 4 ins [10 cm].
Materials
Patons® Decor (100 g / 3.5 oz)
Blanket Pillow
Contrast a (16206 New Teal) 1 1 ball
Contrast B (16309 New Lilac) 1 1 ball
Contrast C (16310 Rich New Lilac) 1 1 ball
Contrast D (16141 Rich Periwinkle) 1 1 ball
Contrast E (16433 New Rose) 1 1 ball
Contrast F (01714 Barn Red) 1 1 ball
Contrast g (01633 Chocolate Taupe) 1 1 ball
Contrast H (16523 New Green) 1 1 ball
Contrast I (16525 Dark New Green) 1 1 ball
Size 5 mm (U.S. H or 8) crochet hook or size needed to obtain tension. 18 ins [45.5 cm] square pillow form.
Stitch Glossary
approx = Approximately.
Beg = Beginning.
Ch = Chain(s).
Dc = Double crochet.
Rep = Repeat.
Rnd(s) = Round(s).
RS = Right side.
Sc = Single crochet.
Sl st = Slip stitch.
Sp(s) = Space(s).
St(s) = Stitch(es).
tog = Together.
WS = Wrong side.
Instructions
Blanket
Large Motif
With Color 1, ch 5. Join with sl st in first ch to form a ring.
1st rnd: Ch 3 (counts as dc). [3 dc. (Ch 3. 4 dc) 3 times] all in ring. Ch 3. Join with sl st to top of ch 3. Fasten off.
2nd rnd: Join Color 2 with sl st in any ch-3 sp. Ch 3 (counts as dc). (1 dc. Ch 3. 2 dc) in same sp as sl st. *1 dc in each dc across to next ch-3 sp. (2 dc. Ch 3. 2 dc) in next ch-3 sp. Rep from * twice more. 1 dc in each dc to end of rnd. Join with sl st to top of ch 3. Fasten off.
3rd rnd: Join Color 3 with sl st in any ch-3 sp. As 2nd rnd. Fasten off.
4th rnd: Join Color 4 with sl st in any ch-3 sp. As 2nd rnd. Fasten off.
5th rnd: Join Color 5 with sl st in any ch-3 sp. As 2nd rnd. Do not fasten off.
6th rnd: Ch 3 (counts as dc). 1 dc in next dc. *(2 dc. Ch 3. 2 dc) in next ch-3 sp. 1 dc in each dc across to next ch-3 sp. Rep from * twice more. (2 dc. Ch 3. 2 dc) in next ch-3 sp. 1 dc in each dc to end of rnd. Join with sl st to top of ch 3. Fasten off.
7th rnd: Join Color 6 with sl st in any ch-3 sp. As 2nd rnd. Fasten off.
Small Motif
With Color 1, ch 5. Join with sl st in first ch to form a ring.
1st rnd: Ch 3 (counts as dc). [3 dc. (Ch 3. 4 dc) 3 times] all in ring. Ch 3. Join with sl st to top of ch 3. Fasten off.
2nd rnd: Join Color 2 with sl st in any ch-3 sp. Ch 3 (counts as dc). (1 dc. Ch 3. 2 dc) in same sp as sl st. *1 dc in each dc across to next ch-3 sp.
(2 dc. Ch 3. 2 dc) in next ch-3 sp. Rep from * twice more. 1 dc in each dc to end of rnd. Join with sl st to top of ch 3. Fasten off.
3rd rnd: Join Color 3 with sl st in any ch-3 sp. As 2nd rnd. Fasten off.
Finishing
Sew Motifs tog following Diagram III (see page 36).
Edging: 1st rnd: With RS facing, join A with sl st in bottom right corner. Ch 1. Work sc evenly around outer edge of Blanket having 3 sc in each corner.
Join B with sl st in first sc.
2nd rnd: With B, ch 1. Work 1 sc in each sc around, having 3 sc in each corner sc. Join C with sl st in first sc.
3rd rnd: With C as 2nd rnd, joining D at end of rnd.
4th rnd: With D as 2nd rnd, joining G at end of rnd.
5th rnd: With G as 2nd rnd. Fasten off.
Pillow
Make Large and Small Motifs as given for Blanket, following Guides below for Colors and quantities of Large and Small Motifs:
Finishing
Sew Motifs tog following Diagram IV shown for each Front and Back piece (see page 36).
Edging: 1st rnd: With WS facing each other, place Front and Back pieces tog. With RS of Front facing, join A through both thicknesses at bottom right corner and work 1 row of sc through both thicknesses to join pieces, working 3 sc in corners. Do not work across bottom edge. Insert pillow form. Complete working sc across bottom edge. Join B with sl st to first sc.
2nd rnd: With B, ch 1. Work 1 sc in each sc around, working 3 sc in each corner sc. Join C with sl st in first sc.
3rd rnd: With C as 2nd rnd, joining D at end of rnd.
4th rnd: With D as 2nd rnd, joining G at end of rnd.
5th rnd: With G, ch 1. Working from left to right, instead of from right to left as usual, work 1 reverse sc in each sc around. Join with sl st to first sc.
Fasten off.


The Victoria & Albert Museum have a collection of 1940’s knitting patterns to download free. Click here to download the Victory Jumper pattern or view the other patterns in this collection.

April Showers Bring May Flowers!
Stitch a floral accent for your kitchen. This vintage pattern appeared in a 1948 Coats & Clark pattern booklet (shown above).

![]()
Carry this colorful warmer in your car for picnics and pre-game parties. Pick up a new stitch, too!
By Bobbi Anderson
photo by Nicole Hill Gerulat
YARN
RED HEART Super Saver, 7oz/198g skeins, each approx 364yd/333m (acrylic)
1 skein #984 Shaded Dusk
1 skein #256 Carrot
1 skein #313 Aran
1 skein #376 Burgundy
1 skein #633 Dark Sage
1 skein #661 Frosty Green
CROCHET HOOK
Size J/10 (6.0mm) crochet hook or any size to obtain correct gauge
Size I/9 (5.5mm) crochet hook
NOTIONS
Stitch markers
Yarn needle
finished measurements
Width Approx 34"/86.5cm
Length Approx 48"/122cm
YARN
RED HEART Super Saver, 7oz/198g skeins, each approx 364yd/333m (acrylic)
CROCHET HOOKS
NOTIONS
FINISHED MEASUREMENTS
Width Approx 34"/86.5cm
Length Approx 48"/122cm
FREE Pattern--Click on the PDF link below to download.
Download PDF
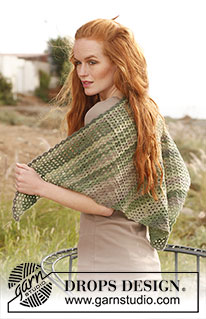
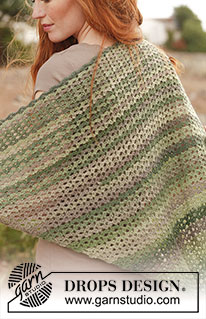
If you fancy learning how to do broomstick lace then there is a great photo tutorial over at speckless. Heidi also has a pattern for an Easy Broomstick lace collar, or scarf pattern - click here.
Below is a picture of Heidi’s Infinity Broomstick lace cowl. Click here to get the pattern and visit her lovely blog.


Lots of good luck wishes go into each stitch of this wonderful crocheted throw. Make it for St. Patrick’s Day, a March birthday or any time you want to send a good luck sentiment.
Project Number:
LW2983
Designed By:
Shari White
Skill Level:
Category:
Project Type:
Supplies:
RED HEART® Super Saver®: 8 skeins 629 Green Tones A and 2 skeins 389 Hunter Green B.
Crochet Hook: 5.5 mm [US I-9].
Yarn needle.
Size:
Throw measures 45” x 55”.
Gauge/Tension:
Gauge : Square measures 5” x 5”. CHECK YOUR GAUGE. Use any size hook to obtain the gauge.

FINISHED MEASUREMENTS
Shawl measures approximately 61"/155 cm wide (at top edge, widest point) x 27"/68.5 cm long;
Shawl Base (without motif strip) measures approximately 53"/134.5 cm (at top edge, widest point) x 20"/51 cm long
MATERIALS
Caron International's Simply Soft(100% acrylic; 6 oz/170 g, 315 yds/288 m skein):
#9722 Plum Wine, 3 skeins
One crochet hook size US H-8 (5 mm), or size to obtain gauge
Size 35 (19 mm) knitting needle
Yarn needle
GAUGE
In single crochet (worked in front loops only), using US H-8 (5 mm) hook, 11 sts and 8 rows = 3"/7.5 cm;
Each completed motif measures 4"/10 cm.
STITCHES USED
Chain (ch)
Double crochet (dc)
Single crochet (sc)
Treble crochet (tr)
SPECIAL TERM
sc2tog: Single crochet 2 together – Insert hook in next stitch, yarn over and pull up a loop, (two loops on hook), insert hook in next stitch, yarn over and pull up a loop, yarn over and draw through all three loops on hook.
NOTE
The shawl includes rows of Broomstick (Jiffy) lace. There are two steps in working Broomstick lace. First, loops of stitches are extended and placed on a large knitting needle (the broomstick). Next the loops are worked off the needle with single crochet.
HELPFUL
In Broomstick lace, there are many different ways to hold the large knitting needle. Experiment with different grips and placement of the large knitting needle to find a position that works for you.
SHAWL
Base
Ch 4.
Row 1: Sc in second ch from hook and in each remaining ch across, turn—3 sc.
Row 2 (RS): Ch 1, working in front loops only, sc in each st to last st, 2 sc in last st, turn—4 sc.
Row 3: Ch 2, turn, sc in second ch from hook; working in front loops only, sc in each sc across, turn—5 sc.
Rows 4 and 5: Work Rows 2 and 3—7 sc.
Row 6 (opening loops): Hold knitting needle close to work. Extend loop on hook slightly and place on knitting needle. *Working in front loops only, insert hook in next sc, yarn over and draw up a loop, extending the loop slightly place loop on the knitting needle; repeat from * to last sc; insert hook in front loop of last sc, yarn over and draw up a loop, place loop on the knitting needle, insert hook in back loop of last sc, yarn over and draw up a loop, place loop on the knitting needle, turn—8 loops on needle.
Row 7 (closing loops): Working loosely, insert hook in first loop on knitting needle, yarn over and draw up a loop; ch 1, 2 sc in same loop; remove loop from knitting needle, *sc in next loop on knitting needle, remove loop from knitting needle; repeat from * until all loops are removed from knitting needle, turn—9 sts.
Row 8 (RS): Ch 1, working in front loops only, sc in each st to last st, 2 sc in last st, turn—10 sc.
Row 9: Ch 2, turn, sc in second ch from hook; working in front loops only, sc in each sc across, turn—11 sc.
Rows 10–69: Repeat 4–9 ten times—71 sc.
Row 70: Ch 1, working in front loops only, sc in each st across to last 2 sts, sc2tog, turn—70 sts.
Row 71: Ch 1, working in front loops only, sc2tog, sc in each remaining st across, turn—69 sts.
Row 72: Hold knitting needle close to work. Extend loop on hook slightly and place on knitting needle. *Working in front loops only, insert hook in next sc, yarn over and draw up a loop, extending the loop slightly place loop on the knitting needle; repeat from * to last sc; leave last sc unworked, turn—68 loops on needle.
Row 73 (closing loops): Working loosely, insert hook into first 2 loops on knitting needle at the same time, yarn over and draw up a loop; ch 1, inserting hook into first 2 loops at the same time, work 1 sc; remove loops from knitting needle, *sc in next loop on knitting needle, remove loop from knitting needle; repeat from * until all loops are removed from knitting needle, turn—67 sts.
Row 74: Ch 1, working in front loops only, sc in each st across to last 2 sc, sc2tog, turn—66 sts.
Row 75: Ch 1, working in front loops only, sc2tog, sc in each remaining st across, turn—65 sts.
Rows 76 and 77: Repeat Rows 74 and 75—63 sts.
Rows 78–137: Repeat Rows 72–77 ten times—3 sts.
Row 138: Ch 1, working in front loops only, sc in first st, sc2tog—1 st. Fasten off.
Edging
With WS facing and point facing upwards, join yarn with slip st in lower side corner.
Row 1: Ch 1, working along lower edge of shawl base, work 133 sc evenly spaced to point of shawl, 2 sc in point, work 133 sc evenly spaced to opposite corner of shawl base—268 sc. Fasten off.
MOTIF (make 19)
Ch 4; join with slip st in first ch to form a ring.
Round 1: Ch 1, work 7 sc in ring; join with slip st in first sc.
Round 2: Ch 8, slip st in same st as join, *(slip st, ch 8, slip st) in next sc; repeat from * 5 more times; (sl st, ch 4, tr) in first sc (at base of beginning ch-8). (8 LOOPS)
Round 3: Ch 1, sc in space formed by last st of previous round, ch 2, (2 dc, ch 2, 2 dc) in next ch-8 space, ch 2, *sc in next ch-8 sp, ch 2, (2 dc, ch 2, 2 dc) in next ch-8 sp, ch 2; repeat from * 2 more times; join with slip st in first sc.
Round 4: Ch 1, sc in same st as join, 2 sc in next ch-2 sp, sc in next 2 dc, (2 sc, ch 2, 2 sc) in next ch-2 sp, sc in next 2 dc, 2 sc in next ch-2 sp, *sc in next sc, 2 sc in next ch-2 sp, sc in next 2 dc, (2 sc, ch 2, 2 sc) in next ch-2 sp, sc in next 2 dc, 2 sc in next ch-2 sp; repeat from * 2 more times; join with slip st in first sc. Fasten off.
Assemble Motif Strip
Arrange motifs according to assembly diagram. Using yarn needle, whipstitch motifs together.
FINISHING
Join Base and Motif Strip
With WS facing, join yarn with slip st in inner corner of first motif of strip.
Row 1: Hold piece to work along inner v-edge of motif strip; ch 1, working along inner edge of motif strip, work 268 sc evenly spaced across inner edge to opposite corner of motif strip, turn.
Row 2 (opening loops): Hold knitting needle close to work. Extend loop on hook slightly and place on knitting needle. *Working in front loops only, insert hook in next sc, yarn over and draw up a loop, extending the loop slightly place loop on the knitting needle; repeat from * across, turn—268 loops on needle.
Row 3 (closing loops): Working loosely, insert hook in first loop on knitting needle, yarn over and draw up a loop; ch 1, sc in same loop; remove loop from knitting needle, *sc in next loop on knitting needle, remove loop from knitting needle; repeat from * until all loops are removed from knitting needle, turn—268 sts.
Fasten off. Align sts of Row 3 with sts of shawl edging. Using yarn needle, whipstitch shawl base and motif strip together, sewing through corresponding sts.
Border
Note: The shawl has two side corners and one point. The corners are located at each side and correspond to the outer corners of the first and last motifs of the motif strip. The point is located at the lowest point of the shawl and corresponds with the lowest point of the center motif of the motif strip.
With RS facing, join yarn with slip st in any st along edge of shawl.
Round 1: Ch 1, work sc evenly spaced around entire shawl, working 3 sc in each corner and point of shawl; join with slip st in first st.
Round 2: Ch 1, sc in each sc around, working 3 sc in each corner and point of shawl; join with slip st in first st. Fasten off.
Using yarn needle, weave in ends.


8 dc = 3 inches.STITCH EXPLANATION:
BE SURE TO CHECK YOUR GAUGE. When you match the gauge in a pattern, your project will be the size specified in the pattern and the materials specified in the pattern will be sufficient. If it takes you fewer stitches and rows to make a 4 in. [10 cm] square, try using a smaller size hook or needles; if more stitches and rows, try a larger size hook or needles.
FOUNDATION ROW: Using Color A, make a Magic Ring.PillowMake 6 squares in the following colors:
ROUND 1: Ch 2 (counts as 1 hdc), 11 hdc into ring, join with slip st through Front Loop only of top of beginning ch. (12 sts.)
ROUND 2: * Ch 7, slip st through Front Loop of next hdc; rep from * 10 more times, ch 7, join with slip st into Back Loop only of top of Round 1 beginning ch. (12 ch sps.)
ROUND 3: Ch 2 (counts as 1 hdc), hdc tbl in same place, 2 hdc tbl in each st around, join with slip st into Front Loop of top of beginning ch. (24 sts.)
ROUND 4: * Ch 7, slip st through Front Loop of next hdc; rep from * 22 more times, ch 7, join with slip st into Back Loop only of top of Round 3 beginning ch. End Color A. (24 ch sps.)
ROUND 5: Join Color B, ch 2 (counts as 1 hdc), * 2 hdc tbl in next st, 1 hdc tbl in next st; rep from * 11 more times, 2 hdc tbl in next st, join with slip st into Front Loop only of top of beginning ch. (36 sts.)
ROUND 6: * Ch 7, slip st through Front Loop of next hdc; rep from * 34 more times, ch 7, join with slip st into Back Loop only of top of Round 5 beginning ch. End Color B. (36 ch sps.)
ROUND 7: Join Color C through Back Loop only, ch 1 and sc tbl in same space, * sc tbl in next st, hdc tbl in next st, dc tbl in next 2 sts, (dc, tr, dc) tbl in next st, dc tbl in next 2 sts, hdc tbl in next st **, sc tbl in next st; rep from * twice more, then from * to ** once more, join with slip st in first sc made. (44 sts.)
ROUND 8: Ch 3 (counts as 1 dc), * dc in each st across to corner tr, work (dc, tr, dc) in tr; rep from * 3 more times, dc in each st to end of round, join with slip st in top of beginning ch. (52 sts.)
ROUND 9: Ch 3 (counts as 1 dc), * dc in each st across to corner tr, work (dc, tr, dc) in tr; rep from * 3 more times, dc in each st to end of round, join with slip st in top of beginning ch. (60 sts.)
ROUND 10: Ch 1, sc in same space, sc in each st across to corner tr, work (sc, hdc, sc) in tr; rep from * 3 more times, sc in each st to end of round, join with slip st into first sc made. End Color C. (68 sts.)
![]()
TECHNIQUE USED: Crochet
![]()
FINISHED MEASUREMENTS
Width 36"/ 91.5 cm
Length 47.5"/120.5 cm
MATERIALS![]()
Caron International's Simply Soft Light (100% Acrylic; 3oz/85g, 334yds/306m):
#0003 Honey (A); 1 skein
#0007 Capri (B), 1 skein
#0002 Heavy Cream (C), 1 skein
#0010 Pansy (D), 1 skein
#0001 White (E), 1 skein
#0005 Key Lime (F), 2 skeins
![]()
Crochet Hook - One size US E-4 (3.5 mm), or size to obtain gauge
Yarn needle
GAUGE
Using size U.S. E-4 (3.5mm) crochet hook, square = 11.5"/29cm x 11.5”/29cm
STITCHES USED
Chain (ch)
Single crochet (sc)
Double crochet (dc)
Extended double crochet (Edc)
Slip stitch (slip st)
SPECIAL TERMS
Extended dc: Yo, insert hook in specified st or sp and draw up a lp, yo and draw through 1 lp on hook, [yo and draw through 2 lps on hook] twice.
Closed mesh: Edc in next 3 Edc (or 2 Edc in next ch-2 sp, Edc in next Edc).
Open mesh: Ch 2, skip next 2 sts, Edc in next Edc.
NOTES
Make 2 squares with each color.
Edc are used throughout squares to obtain taller stitches to help squares come out square.
BLANKET
SQUARES (make 12)
With appropriate color, ch 67 loosely.
Row 1 (RS): Working in back bump of chs, Edc in 5th ch from hook (skipped chs count as first Edc), Edc in each rem ch across - 64 Edc (21 closed mesh).
Row 2: Ch 3 (counts as Edc), turn; Edc in next 3 Edc, [ch 2, skip next 2 Edc, Edc in next Edc] 19 times, Edc in next 2 Edc, Edc in first skipped ch - 2 closed mesh and 19 open mesh.
Rows 3-21: Work according to chart and Special Terms. On each row, ch 3, turn at beginning of row and work last Edc of last closed mesh into 3rd ch of turning ch. Do not fasten off.
EDGING
Round 1 (RS): Ch 1, 3 sc in top of last Edc made, working along left edge, work 62 sc evenly spaced down left edge, working in free lps on bottom edge, 3 sc in first ch, sc in each ch across to last ch, 3 sc in last ch, work 62 sc evenly spaced up right edge, 3 sc in 3rd ch at beginning of Row 21, sc in each Edc across; join with slip st in first sc -260 sc. Fasten off, leaving a long tail for sewing.
FINISHING
With RS together, whip stitch squares together into 4 rows with 3 squares in each row as per assembly diagram. Using yarn needle, weave in all ends.
BORDER
Round 1 (RS): With RS facing, join F with sl st in center sc in any corner, ch 1, 2 sc in same sc as joining, sc in each sc around, working 3 sc in center sc in each corner, sc in same sc as joining; join with slip st in first sc - 928 sc.
Round 2: Ch 1, 2 sc in same sc as joining, sc in each sc around, working 3 sc in center sc in each corner, sc in same sc as joining; join with slip st in first sc - 936 sc.
Round 3: Ch 3, 2 dc in same sc as joining (beg shell made), *skip next 2 sc, (slip st, ch 3, 2 dc) in next sc (shell made); rep from * around; skip last 2 sc; join with slip st in same sc as joining sl st - 312 shells. Fasten off.
Weave in ends.
![]()
![]()

FINISHED MEASUREMENTS
Width 18.75"/47.5cm, Length 64"/162.5cm
MATERIALS
Caron International's Simply Soft (100% Acrylic, 6 oz/170g, 315 yd/288 m):
#0004 Blueberry (A), 1 skein
#0011 Celestial (B), 1 skein
#0014 Pagoda (C), 1 skein
#9608 Blue Mint (D), 1 skein
#9610 Grape (E), 1 skein
Caron International's Simply Soft Prints (100% Acrylic; 4oz/113g, 200yds/182m)
#0006 Oceana (F), 2 skeins
Size US J-10 (6mm) crochet hook or size to obtain gauge
Stitch markers, Tapestry needle

Click here to Visit Caron.com and download the PDF
GAUGE
One motif = 6.25"/16cm square.
Gauge is not critical for this project but may change the finished size and needed yarn amounts.
STITCHES USED
Chain (ch)
Double crochet (dc)
Single crochet (sc)
Slip stitch (sl st)
SPECIAL TERMS
Working square: The square you are currently working to complete.
Previous square: The square you are joining the working square to.
NOTES
1. All motifs are worked with RS facing.
2. All stripe sections begin with a WS row; the work is turned and Row 2 is a RS row.
3. The number in each motif indicates the order in which the motifs are made and assembled.
4. The first motif made is completed through Round 7. All other motifs are joined during the completion of Round 7.
5. This shawl begins with the center panel of motifs, then the stripes are added to both side edges. The side panels of motifs are completed next and then the final stripe panels are done.
6. It is helpful to mark the RS of work.
7. Ch 1 at beginning of stripe rows does not count as a stitch.
8. Follow diagram for pattern sequence.
MOTIF 1 (motifs using 2 colors)
With first color (A), ch 5, join with sl st in first ch to form ring.
Rnd 1 (RS): Ch 3 (counts as dc here and throughout), 2 dc in ring, ch 3, (3dc in ring, ch 3) 3 times; join with sl st in top of beg ch—four 3-dc groups and four ch-3 groups.
Rnd 2: Sl st in each st to next ch-3 sp, sl st in next ch-3 sp, ch 4 (counts as sc, ch 3 here and throughout), sc in same ch-3 sp, [ch 3, (sc, ch 3, sc) in next ch-3 sp] 3 times, ch 3; join with sl st in first ch of beg ch—8 sc and 8 ch-3 sps.
Rnd 3: Sl st in first ch-3 sp, ch 3, (2 dc, ch 3, 3 dc) in same ch-3 sp (corner made), ch 1, 3 dc in next ch-3 sp, ch 1, [(3 dc, ch 3, 3 dc) in next ch-3 sp (corner made), ch 1, 3 dc in next ch-3 sp, ch 1] 3 times; join with sl st in top of beg ch.—4 corners, 12 dc with one 3-dc group on each side and 8 ch-1 sps with 2 ch-1 sps on each side.
Fasten off, cut yarn, leaving a tail to weave in later.
Rnd 4: With RS facing, join second color (E) with sl st in any corner ch-3 sp, ch 4, sc in same ch-3 sp, [ch 3, *sc in next ch-1 sp, ch 3; repeat from * to next corner ch-3 sp, (sc, ch 3, sc) in corner ch-3 sp] 3 times, ch 3, **sc in next ch-1 sp, ch 3; repeat from **to end of rnd; join with sl st in first ch of beg ch—16 sc and 16 ch-3 sps.
Rnd 5: Sl st in first ch-3 sp, ch 3, (2 dc, ch 3, 3 dc) in same ch-3 sp, [ch 1, *3 dc in next ch-3 sp, ch 1; repeat from * to next corner ch-3 sp, (3 dc, ch 3, 3 dc) in corner ch-3 sp] 3 times, ch 1, **3 dc in next ch-3 sp, ch 1; repeat from ** to end of rnd; join with sl st in top of beg ch—4 corners, 36 dc with three 3-dc groups on each side, and 16 ch-1 sps with 4 ch-1 sps on each side.
Rnd 6: Sl st in each st to next ch-3 sp, sl st in next ch-3 sp (corner), ch 4, sc in same ch-3 sp, [ch 3, *sc in next ch-1 sp, ch 3; repeat from * to next corner ch-3 sp, (sc, ch 3, sc) in corner ch-3 sp] 3 times, ch 3, ** sc in next ch-1 sp, ch 3; repeat from ** to end of rnd; join with sl st in first ch of beg ch.—24 sc and 24 ch-3 sps.
Rnd 7: Complete as Rnd 5, ending with sl st in top of beg ch—4 corners, 60 dc (five 3-dc groups on each side) and 24 ch-1 sps (6 ch-1 sps on each side)..
Fasten off, leaving a tail to weave in later.
MOTIF 2 (motifs using 3 colors)
With first color (D), ch 5, join with sl st in first ch to form a ring.
Rnds 1-3: Work same as Motif 1.
Rnds 4-5: Using second color (B) same as Motif 1, except at end of Rnd 6, fasten off yarn, leaving a tail to weave in later.
Rnd 6: With RS facing, join third color (F) with sl st in any corner ch-3 sp. Ch 4 and follow directions for Rnd 6 of Motif 1.
Rnd 7: Complete as Rnd 5 of Motif 1
Joining Rnd
Note: When joining to only one side of previous motif, beg join at third corner of working motif. If joining to two sides of previous motif, beg join at second corner of working motif. This allows the working motif to be completed without joining to a previous motif.
Rnd 7: Sl st in first ch-3 sp, ch 3, (2 dc, ch 3, 3 dc) in same ch-3 sp, [ch 1, *3 dc in
next ch-3 sp, ch 1; repeat from * to next corner ch-3 sp, 3 dc in corner ch-3 sp, ch 1, sl
st in corner ch-sp of previous square, ch 1, 3 dc in same corner ch-3 sp of working
square, **sl st in next ch-1 sp of previous square, 3 dc in next ch-3 sp of working
square, repeat from ** to next corner ch-3 sp of working square, working next 3 dc
in corner ch-3 sp of working square, ch 1, sl st in corner ch-sp of previous square, ch 1, 3 dc in same corner ch-3 sp of working square; continue in this manner to join working square and any previous squares and to complete the rnd.
Refer to the joining notes.
BACK PANEL (Motifs 1-9)
Note: Center Panel is made up of Motifs 1, 2 and 3 in first section; Motifs 4, 5 and 6 in the middle section; and Motifs 7, 8 and 9 in the third section.
Motif 1: Work Motif 1 to completion with A as first color and E as second color.
Motif 2: Work Motif 2 with D as first color, B as second color and F as third color, joining it to the first motif during the completion of Rnd 7.
Motif 3: Work Motif 3 with E as first color and C as second color, completed and joined as for Motif 2.
Motif 4: Work Motif 4 with C as first color, E as second color and D as third color, completed and joined as for Motif 2.
Motif 5: Work Motif 5 with B as first color and A as second color, completed and joined as for Motif 2.
Motif 6: Work Motif 6 with C as first color and F as second color, completed and joined as for Motif 2.
Motif 7: Work Motif 7 with F as first color and B as second color, completed and joined as for Motif 2.
Motif 8: Work Motif 8 with D as first color and C as second color, completed and joined as for Motif 2.
Motif 9: Work Motif 9 with E as first color, A as second color and B as third color, completed and joined as for Motif 2.
LEFT STRIPE PANEL (Sections 10-12 to the left of the Center Panel)
Note: Left Stripe Panel is made up of Stripe 10 with B, Stripe 11 with F and Stripe 12 with E.
With WS facing, join first color with sl st in the corner ch-3 of Motif 7.
Set up row (WS): 2 sc in corner ch-3 sp, [*ch 3, sc in next ch-1 sp of motif*; repeat between *'s until reaching where two motifs were previously joined; ch 4, sc between the two joined motifs, ch 4] twice; repeat between *'s once more, ending row with 2 sc in last corner ch-3 sp, turn—21 ch-3 sps, 24 sc (2 sc on each end and 20).
Row 1 (RS): Ch 1, dc into first sc, ch 1, skip 1 sc, 3 dc into next ch-3 sp, *ch 1, skip 1 sc, 3 dc into next ch-3 sp*; repeat between *'s, ending row with ch 1, skip 1 sc, dc into last sc, turn—21 groups of 3 dc. 1 dc on each end, 22 ch-1 sps
Row 2 (WS): Ch 1, sc in first dc, sc into first ch-1 sp, *ch 3, skip 3 dc, sc into next ch-1 sp*; repeat between *'s across row, ending with sc in last dc, turn.
Row 3: Repeat Row 1, completing the last step of the final dc with the new color. Cut the old yarn, leaving a tail to weave in later.
Row 4: With second color, repeat Row 2, turn.
Row 5: Repeat Row 1, turn.
Row 6: Repeat Row 2, turn.
Row 7: Repeat Row 1, completing the last step of the final dc with the new color. Cut the old color, leaving a tail to weave in later.
Rows 8-11: Repeat Rows 4-7 with third color, completing Row 7 with fasten off yarn, leaving a tail to weave in later.
With RS facing, *count over seven 3-dc groups and place a marker in the next ch-1 sp; repeat from * again—these two markers will indicate where the next motifs will be joined to the stripe section. Two corners will be joined in each space.
RIGHT STRIPE PANEL (Sections 13-15 to the right of Center Panel)
Note: Right Stripe Panel is made of Stripe 13 with D, Stripe 14 with C and Stripe 15 with A.
With WS facing, join first color with sl st in the corner ch-3 of Motif 3.
Complete this stripe panel following the directions given for the Left Stripe Section.
LEFT MOTIF SECTION (Motifs 16-21 to the left of Left Stripe Panel)
Note: Left Motif Section is made of Motif 16 with E, A and B; Motif 17 with F and D;
Motif 18 with A and C; Motif 19 with B and F; Motif 20 with C and E; Motif 21 with D, B and F.
Complete following the directions given for Center Panel of motifs.
RIGHT MOTIF SECTION (Motifs 22-27 to the right of the Right Stripe Panel)
Note: Right Motif Section is made of Motif 22 with C and F; Motif 23 with D, A and B; Motif 24 with B and E; Motif 25 with A and B; Motif 26 with E and C; Motif 27 with F and D.
Complete following the directions given for the Center Panel of motifs.
LEFT FRONT EDGE STRIPE PANEL (Motifs 28-30)
Work in the indicated colors following directions given for Left Stripe Panel (Sections #10-12) with Stripe 28 in A, Stripe 29 in D and Stripe 30 in C.
RIGHT FRONT EDGE STRIPE PANEL (Motifs 31-33)
Work in the indicated colors following directions given for Left Stripe Panel (Sections #10-12) with Stripe 31 in F, Stripe 32 in B and Stripe 33 in E.
FINISHING - Weave in all ends and block.


Good news. All around the world, people are recognising that 'progress' should be about increasing human happiness and wellbeing, not just growing the economy at all costs. All 193 United Nations member states have adopted a resolution calling for happiness to be given a greater priority and March 20 has been declared the International Day of Happiness!
ACT on the Day of Happiness
To celebrate the day, we've launched an exciting Day of Happinesscampaign with Cheers and other fantastic partner organisations. Together we're encouraging people all around the world to ACT:
Thanks so much for all your support - and we'd love to hear how you're planning to support the Day of Happiness so please let us know!
Mark Williamson
Director
"How wonderful it is that nobody need wait a single moment before starting to improve the world" ~ Anne Frank

Nothing says Spring like a bed of flowers. Crochet this beautiful throw and bring a little outside in. This will brighten up a room and your day!
Project Number:
LW3031
Designed By:
Roseanna Beck
Skill Level:
Category:
Project Type:
Supplies:
RED HEART® Super Saver®: 3 skeins 400 Grey Heather A, 2 skeins 624 Tea Leaf B, 1 skein each 320 Cornmeal C, 358 Lavender D, and 706 Perfect Pink E
Susan Bates® Crochet Hooks: 4.50 mm [US G-6], 5 mm [US H-8], and 5.50 mm [US I-9]
Yarn needle
Size:
Throw Measures 45” x 56” [114 cm x 142 cm]
Gauge/Tension:
GAUGE: Octagon Motif measures 5½” [14 cm] across with smallest hook; Insert Motif measures 2¼” [5.7 cm] across with middle size hook. CHECK YOUR GAUGE. Use any size hook to obtain the gauge.

Toss this shimmery coverup over jeans, a dress—just about any outfit!
By Laura Gebhardt
YARN
Red Heart Shimmer, 3.5oz/100g skeins, each approx 280yd/256mm (97% acrylic, 3% metallic polyester)
CROCHET HOOK
NOTIONS
FINISHED MEASUREMENTS
Width 15"/38cm
Length 63"/175cm
GAUGE
Rounds 1–3 = 3"/7.5cm
One Flower Motif = 5"/12.5cm across

NOTE ABOUT PATTERNS
To find this pattern, purchase the May/June 2013 issue. If you have specific questions about this pattern, please email the editorial staff.
Crochet Today! is now available in digital format: Apple iPad, Nook, Kindle Fire, Google Play, and Zinio.
Don't miss any of our patterns in the future: SUBSCRIBE NOW. International subscribers can SUBSCRIBE HERE.
