googleads

Showing posts with label Crochet Shawl. Show all posts

Thursday, 11 January 2018

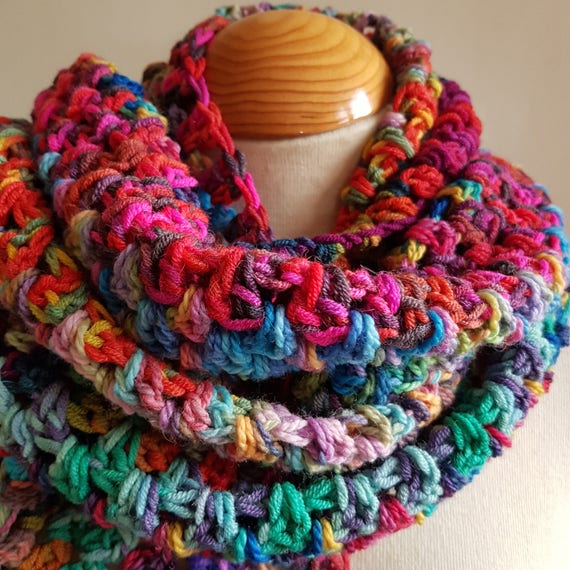
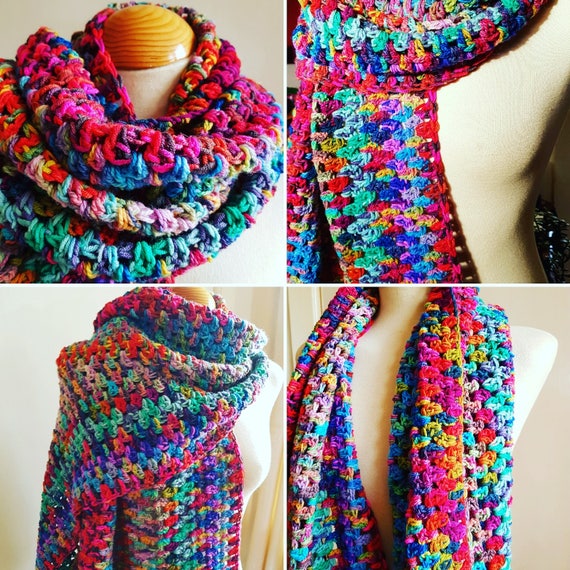
Glorious Granny Stripes Wrap Scarf Shawl Mirasol


Handmade crocheted truly unique scarf wrap. Can be worn in a variety of ways and has a beautiful drape. The item has been made using high quality materils; Mirasol Hachito handpainted yarn and Araucania Molina yarn. I have crocheted this wrap in traditional granny stripes but it has an ultra contemporary look.

The wrap measures 18" x 70"

It will keep you warm and on trend all year long. All ends are fully worked in, and will not pull out with a lifetime of use/washing. Machine washable up to 40 degrees dry flat or air dry for best results.

A little information about the Mirasol Project which I'm hapy to support.

The philosophy behind the Mirasol Project is very simple, the Mirasol Project supports local communities in Peru through the sales of the Mirasol Yarn Collection.
Peru's heritage and culture of textile artistry is rich and ancient. The Mirasol Yarn Collection includes yarn made from the animals bred by these communities for generations in the Peruvian highlands. Without them we would not have this beautiful yarn.

By purchasing the Mirasol Yarn Collection you are supporting the shepherds and their families ensuring the continuation of this tradition.

A portion of every purchase goes directly to the funding of a centre in the remote area of Munani in the region of Puno.

Wednesday, 10 June 2015

Guadalupe Wrap–Free Crochet Pattern


FINISHED MEASUREMENTS:
Wrap measures 54"/137 cm diameter
GAUGE
In mesh pattern, 10 sts = 4"/10 cm and 5 rows = 3"/7.5 cm.
In cluster pattern, 5 cluster repeats = 4"/10 cm and 6 rows = 3 1/2"/9 cm.
STITCHES USED
Chain (ch), double crochet (dc), half double crochet (hdc), single crochet (sc), slip stitch (slip st), treble crochet (tr)
SPECIAL TERMS
edc: extended double crochet:Yarn over, insert hook in indicated stitch or space, yarn over and draw up a loop, yarn over and draw through one loop on hook, [yarn over and draw through 2 loops on hook] twice.
V-st: 2 edc in space between stitches.
V-st in V-st: 2 edc in space between 2 edc of indicated V-st.
Cl: 3-double crochet cluster: Yarn over, insert hook in indicated space, yarn over and draw up a loop (three loops on hook), yarn over and draw through 2 loops on hook (2 loops on hook), [yarn over, insert hook in same space, yarn over and draw up a loop, yarn over and draw through 2 loops on hook] twice, yarn over and draw through all 4 loops on hook.
beg-Cl:2-double crochet cluster: Yarn over, insert hook in indicated space and draw up a loop, yarn over and draw through 2 loops on hook; yarn over, insert hook in same space, yarn over and draw up a loop, yarn over and draw through 2 loops on hook yarn over and draw through all 3 loops on hook.
shell: (2 dc, ch 2, 2 dc) in indicated space.
fan: tr in indicated stitch or space, (ch 1, tr) in same stitch or space.
picot: Ch 3, slip st from top to bottom through all front strands of last stitch made.
NOTES
1. Draped as a cover over an occasional table or as a throw over the back of a chair or worn as a shawl, this round is a lovely, lacy accent piece.  Crocheted in worsted weight NaturallyCaron.com Country, the fabric is soft, resilient and easy-care.  The center of the round is made in a quick crochet mesh, ringed with a striped cluster pattern for color and texture, finished with a “strawberry” lace pattern for a slightly ruffled edge. Change the order of the colors for a different look, or swap out one, two or all three colors as you desire.
2. Fabric is stretchy and will grow in length and block to measurements
3. To change color at end of a round. Fasten off old color. Join new color with slip st in same stitch as join.
4. Cover has three sections: 1) solid color mesh section, worked in joined rounds with RS always facing, 2) three-color cluster section, and 3) lace edging.

SHAWL
Mesh Section
Note: This section is worked in a mesh stitch pattern, placing edc in the space between edc, and increasing 9 stitches each round. If you have difficulty seeing where the increase V-sts are, then mark the increase points and move the markers up as work progresses. Do not turn at end of rounds, RS is always facing.
With A, chain 4; join with slip st in first ch to form a ring.
Round 1 (RS): Ch 1, 9 sc in ring; join with slip st in first sc—9 sc.
Round 2: Ch 3 (counts as one leg of last V-st), V-st in next 8 sc, edc in same sc as beginning; slip st in top of beginning ch (to complete last V-st)—9 V-sts (18 sts).
Mark increase points: Place a marker in the space between legs of each V-st. Move markers up as work progresses.
Round 3: Ch 3, edc in space between V-sts, [V-st in next V-st and move marker up, edc in space between V-sts] 8 times, edc in same space as beginning ch; slip st in top of beginning ch (to complete last V-st)—27 sts.
Round 4: Ch 3, edc in each space between sts to first (marked) V-st, [V-st in next V-st and move marker up, edc in each space between sts to next (marked) V-st] 8 times, edc in same space as beginning ch; slip st in top of beginning ch (to complete last V-st)—36 sts.
Rounds 4–24: Repeat Round 4 twenty more times—216 sts.
Fasten off.
Note: For a larger or smaller cloth, add or omit repeats of Round 4 before starting the cluster section. For the best "math" when setting up the next section, end with an even number of rounds and stitches.
Cluster Section
Notes: This section consists of alternating rows of V-sts (wrong side) and clusters (right side), worked in the following color sequence: 1 row of B, 1 row of C, 1 row of A. Fasten off and change color at the end of each round. Continue to increase at each of the 9 increase points around, moving the markers up to the center st or ch-1 space as work progresses.
Turn work so WS is facing you, join B with slip st in space between legs of last V-st made.
Round 1 (WS): With B, ch 3 (counts as hdc, ch 1), hdc in same space, *[skip next 2 edc, (hdc, ch 1, hdc) in next space between edc sts] 11 times, skip next 2 edc, (hdc, ch 1, hdc, ch 1, hdc) in next (marked) V-st and move marker into center hdc of increase; repeat from * 7 more times; [skip next 2 edc, (hdc, ch 1, hdc) in next space between edc sts] 11 times, skip next 2 edc, hdc in same space as beginning ch, ch 1; join with slip st in 2nd ch of beginning ch (to complete beginning increase), turn—117 ch-1 spaces. Fasten off.
Round 2 (RS): Join next color with slip st in last ch-1 space made, ch 2, beg-Cl in same space, *ch 1, Cl in next ch-1 space; repeat from * around moving increase markers into ch-1 space between clusters, end with ch 1, slip st in top of beg-Cl, turn—117 clusters. Fasten off.
Round 3: Join next color with slip st in first ch-1 space of previous round, ch 3 (counts as hdc, ch 1), hdc in same ch-1 space, *(hdc, ch 1, hdc) in each ch-1 space across to next marked ch-1 space, (hdc, ch 1, hdc, ch 1, hdc) in marked ch-1 space and move marker into center hdc of increase; repeat from * 7 more times, (hdc, ch 1, hdc) in each ch-1 space around; hdc in same space as beginning ch, ch 1; join with slip st in 2nd ch of beginning ch (to complete beginning increase), turn—126 ch-1 spaces. Fasten off.
Rounds 4–10: Continuing in color sequence, repeat Rounds 2 and 3 three more times, then work Round 2 once more (worked with B). At end of last round—153 clusters.
Note: To prepare for the Lace section, the next round needs to end with 160 ch-1 spaces (a multiple of 4). Therefore, it is necessary to omit two of the increases, adding only 7 ch-1 spaces instead of 9. Remove 2 of the increase point markers; select markers that are widely spaced around circle.
Round 11: Repeat Round 3 increasing only at remaining 7 marked increase points—160 ch-1 spaces. Fasten off.
Lace Section
Round 1 (RS): Join A with slip st in last ch-1 space made, ch 3 (counts as dc), dc in same space, *ch 2, [sc in next ch-1 space, ch 3] twice, sc in next ch-1 space, ch 2, shell in next ch-1 space; repeat from * 38 more times, ch 2, [sc in next ch-1 space, ch 3] twice, sc in next ch-1 space, ch 2, 2 dc in same space as beginning ch, ch 1, sc in top of beginning ch (to complete last shell), turn—40 pattern repeats.
Round 2 (WS): Ch 3, dc in same space  (formed by join), *ch 3, skip next ch-2 space, [sc in next ch-3 space, ch 3] twice, skip next ch-2 space, shell in ch-2 space of next shell; repeat from * 38 times, ch 3, skip next ch-2 space, [sc in next ch-3 space, ch 3] twice, skip next ch-2 space, 2 dc in same space as beginning ch, ch 1, sc in top of beginning ch, turn.
Round 3: Ch 3 (counts as dc), dc in same space (formed by join), *ch 1, skip next ch-3 space, fan in next ch-3 space, ch 1, shell in ch-2 space of next shell; repeat from * 38 times, ch 1, skip next ch-3 space, fan in next ch-3 space, ch 1, 2 dc in same space as beginning ch, ch 1, sc in top of beginning ch, turn.
Round 4: Ch 3, dc in same space (formed by join), *ch 1, skip next ch-1 space, sc in next ch-1 space, [ch 3, sc in next ch-1 space] 3 times, ch 1, skip next ch-1 space, shell in ch-2 space of next shell; repeat from * 38 times, ch 1, skip next ch-1 space, sc in next ch-1 space, [ch 3, sc in next ch-1 space] 3 times, ch 1, skip next ch-1 space, 2 dc in same space as beginning ch, ch 1, sc in top of beginning ch, turn.
Round 5: Ch 3, dc in same space (formed by join), *ch 2, skip next ch-1 space, sc in next ch-3 space, [ch 3, sc in next ch-3 space] twice, ch 2, skip next ch-1 space, shell in ch-2 space of next shell; repeat from * 38 more times, ch 2, skip next ch-1 space, sc in next ch-3 space, [ch 3, sc in next ch-3 space] twice, ch 2, skip next ch-1 space, 2 dc in same space as beginning ch, ch 1, sc in top of beginning ch, turn.
Round 6: Ch 3, dc in same space (formed by join), *ch 3, skip next ch-2 space, [sc in next ch-3 space, ch 3] twice, skip next ch-2 space, shell in ch-2 space of next shell; repeat from * 38 more times, ch 3, skip next ch-2 space, [sc in next ch-3 space, ch 3] twice, skip next ch-2 space, 2 dc in same space as beginning ch, ch 2, slip st in top of beginning ch (to complete last shell), turn. Fasten off A.
Round 7 (RS): Join B with slip st in ch-space of last shell made, ch 1, sc in same space, *ch 3, skip next ch-3 space, (Cl, ch 3, Cl, picot, ch 3, Cl) in next ch-3 space, ch 3, skip next ch-3 space, (sc, ch 3, sc) in next ch-2 space of next shell; repeat from * 38 more times, ch 3, skip next ch-3 space, (Cl, ch 3, Cl, picot, ch 3, Cl) in next ch-3 space, ch 3, skip next ch-3 space, sc in same space as beginning, ch 3, slip st in first sc. Fasten off.
FINISHING
Using yarn needle, weave in all ends. Block cloth.


Sunday, 30 June 2013

Guadalupe Wrap–Free Crochet Pattern


FINISHED MEASUREMENTS:
Wrap measures 54"/137 cm diameter
GAUGE
In mesh pattern, 10 sts = 4"/10 cm and 5 rows = 3"/7.5 cm.
In cluster pattern, 5 cluster repeats = 4"/10 cm and 6 rows = 3 1/2"/9 cm.
STITCHES USED
Chain (ch), double crochet (dc), half double crochet (hdc), single crochet (sc), slip stitch (slip st), treble crochet (tr)
SPECIAL TERMS
edc: extended double crochet:Yarn over, insert hook in indicated stitch or space, yarn over and draw up a loop, yarn over and draw through one loop on hook, [yarn over and draw through 2 loops on hook] twice.
V-st: 2 edc in space between stitches.
V-st in V-st: 2 edc in space between 2 edc of indicated V-st.
Cl: 3-double crochet cluster: Yarn over, insert hook in indicated space, yarn over and draw up a loop (three loops on hook), yarn over and draw through 2 loops on hook (2 loops on hook), [yarn over, insert hook in same space, yarn over and draw up a loop, yarn over and draw through 2 loops on hook] twice, yarn over and draw through all 4 loops on hook.
beg-Cl:2-double crochet cluster: Yarn over, insert hook in indicated space and draw up a loop, yarn over and draw through 2 loops on hook; yarn over, insert hook in same space, yarn over and draw up a loop, yarn over and draw through 2 loops on hook yarn over and draw through all 3 loops on hook.
shell: (2 dc, ch 2, 2 dc) in indicated space.
fan: tr in indicated stitch or space, (ch 1, tr) in same stitch or space.
picot: Ch 3, slip st from top to bottom through all front strands of last stitch made.
NOTES
1. Draped as a cover over an occasional table or as a throw over the back of a chair or worn as a shawl, this round is a lovely, lacy accent piece.  Crocheted in worsted weight NaturallyCaron.com Country, the fabric is soft, resilient and easy-care.  The center of the round is made in a quick crochet mesh, ringed with a striped cluster pattern for color and texture, finished with a “strawberry” lace pattern for a slightly ruffled edge. Change the order of the colors for a different look, or swap out one, two or all three colors as you desire.
2. Fabric is stretchy and will grow in length and block to measurements
3. To change color at end of a round. Fasten off old color. Join new color with slip st in same stitch as join.
4. Cover has three sections: 1) solid color mesh section, worked in joined rounds with RS always facing, 2) three-color cluster section, and 3) lace edging.

SHAWL
Mesh Section
Note: This section is worked in a mesh stitch pattern, placing edc in the space between edc, and increasing 9 stitches each round. If you have difficulty seeing where the increase V-sts are, then mark the increase points and move the markers up as work progresses. Do not turn at end of rounds, RS is always facing.
With A, chain 4; join with slip st in first ch to form a ring.
Round 1 (RS): Ch 1, 9 sc in ring; join with slip st in first sc—9 sc.
Round 2: Ch 3 (counts as one leg of last V-st), V-st in next 8 sc, edc in same sc as beginning; slip st in top of beginning ch (to complete last V-st)—9 V-sts (18 sts).
Mark increase points: Place a marker in the space between legs of each V-st. Move markers up as work progresses.
Round 3: Ch 3, edc in space between V-sts, [V-st in next V-st and move marker up, edc in space between V-sts] 8 times, edc in same space as beginning ch; slip st in top of beginning ch (to complete last V-st)—27 sts.
Round 4: Ch 3, edc in each space between sts to first (marked) V-st, [V-st in next V-st and move marker up, edc in each space between sts to next (marked) V-st] 8 times, edc in same space as beginning ch; slip st in top of beginning ch (to complete last V-st)—36 sts.
Rounds 4–24: Repeat Round 4 twenty more times—216 sts.
Fasten off.
Note: For a larger or smaller cloth, add or omit repeats of Round 4 before starting the cluster section. For the best "math" when setting up the next section, end with an even number of rounds and stitches.
Cluster Section
Notes: This section consists of alternating rows of V-sts (wrong side) and clusters (right side), worked in the following color sequence: 1 row of B, 1 row of C, 1 row of A. Fasten off and change color at the end of each round. Continue to increase at each of the 9 increase points around, moving the markers up to the center st or ch-1 space as work progresses.
Turn work so WS is facing you, join B with slip st in space between legs of last V-st made.
Round 1 (WS): With B, ch 3 (counts as hdc, ch 1), hdc in same space, *[skip next 2 edc, (hdc, ch 1, hdc) in next space between edc sts] 11 times, skip next 2 edc, (hdc, ch 1, hdc, ch 1, hdc) in next (marked) V-st and move marker into center hdc of increase; repeat from * 7 more times; [skip next 2 edc, (hdc, ch 1, hdc) in next space between edc sts] 11 times, skip next 2 edc, hdc in same space as beginning ch, ch 1; join with slip st in 2nd ch of beginning ch (to complete beginning increase), turn—117 ch-1 spaces. Fasten off.
Round 2 (RS): Join next color with slip st in last ch-1 space made, ch 2, beg-Cl in same space, *ch 1, Cl in next ch-1 space; repeat from * around moving increase markers into ch-1 space between clusters, end with ch 1, slip st in top of beg-Cl, turn—117 clusters. Fasten off.
Round 3: Join next color with slip st in first ch-1 space of previous round, ch 3 (counts as hdc, ch 1), hdc in same ch-1 space, *(hdc, ch 1, hdc) in each ch-1 space across to next marked ch-1 space, (hdc, ch 1, hdc, ch 1, hdc) in marked ch-1 space and move marker into center hdc of increase; repeat from * 7 more times, (hdc, ch 1, hdc) in each ch-1 space around; hdc in same space as beginning ch, ch 1; join with slip st in 2nd ch of beginning ch (to complete beginning increase), turn—126 ch-1 spaces. Fasten off.
Rounds 4–10: Continuing in color sequence, repeat Rounds 2 and 3 three more times, then work Round 2 once more (worked with B). At end of last round—153 clusters.
Note: To prepare for the Lace section, the next round needs to end with 160 ch-1 spaces (a multiple of 4). Therefore, it is necessary to omit two of the increases, adding only 7 ch-1 spaces instead of 9. Remove 2 of the increase point markers; select markers that are widely spaced around circle.
Round 11: Repeat Round 3 increasing only at remaining 7 marked increase points—160 ch-1 spaces. Fasten off.
Lace Section
Round 1 (RS): Join A with slip st in last ch-1 space made, ch 3 (counts as dc), dc in same space, *ch 2, [sc in next ch-1 space, ch 3] twice, sc in next ch-1 space, ch 2, shell in next ch-1 space; repeat from * 38 more times, ch 2, [sc in next ch-1 space, ch 3] twice, sc in next ch-1 space, ch 2, 2 dc in same space as beginning ch, ch 1, sc in top of beginning ch (to complete last shell), turn—40 pattern repeats.
Round 2 (WS): Ch 3, dc in same space  (formed by join), *ch 3, skip next ch-2 space, [sc in next ch-3 space, ch 3] twice, skip next ch-2 space, shell in ch-2 space of next shell; repeat from * 38 times, ch 3, skip next ch-2 space, [sc in next ch-3 space, ch 3] twice, skip next ch-2 space, 2 dc in same space as beginning ch, ch 1, sc in top of beginning ch, turn.
Round 3: Ch 3 (counts as dc), dc in same space (formed by join), *ch 1, skip next ch-3 space, fan in next ch-3 space, ch 1, shell in ch-2 space of next shell; repeat from * 38 times, ch 1, skip next ch-3 space, fan in next ch-3 space, ch 1, 2 dc in same space as beginning ch, ch 1, sc in top of beginning ch, turn.
Round 4: Ch 3, dc in same space (formed by join), *ch 1, skip next ch-1 space, sc in next ch-1 space, [ch 3, sc in next ch-1 space] 3 times, ch 1, skip next ch-1 space, shell in ch-2 space of next shell; repeat from * 38 times, ch 1, skip next ch-1 space, sc in next ch-1 space, [ch 3, sc in next ch-1 space] 3 times, ch 1, skip next ch-1 space, 2 dc in same space as beginning ch, ch 1, sc in top of beginning ch, turn.
Round 5: Ch 3, dc in same space (formed by join), *ch 2, skip next ch-1 space, sc in next ch-3 space, [ch 3, sc in next ch-3 space] twice, ch 2, skip next ch-1 space, shell in ch-2 space of next shell; repeat from * 38 more times, ch 2, skip next ch-1 space, sc in next ch-3 space, [ch 3, sc in next ch-3 space] twice, ch 2, skip next ch-1 space, 2 dc in same space as beginning ch, ch 1, sc in top of beginning ch, turn.
Round 6: Ch 3, dc in same space (formed by join), *ch 3, skip next ch-2 space, [sc in next ch-3 space, ch 3] twice, skip next ch-2 space, shell in ch-2 space of next shell; repeat from * 38 more times, ch 3, skip next ch-2 space, [sc in next ch-3 space, ch 3] twice, skip next ch-2 space, 2 dc in same space as beginning ch, ch 2, slip st in top of beginning ch (to complete last shell), turn. Fasten off A.
Round 7 (RS): Join B with slip st in ch-space of last shell made, ch 1, sc in same space, *ch 3, skip next ch-3 space, (Cl, ch 3, Cl, picot, ch 3, Cl) in next ch-3 space, ch 3, skip next ch-3 space, (sc, ch 3, sc) in next ch-2 space of next shell; repeat from * 38 more times, ch 3, skip next ch-3 space, (Cl, ch 3, Cl, picot, ch 3, Cl) in next ch-3 space, ch 3, skip next ch-3 space, sc in same space as beginning, ch 3, slip st in first sc. Fasten off.
FINISHING
Using yarn needle, weave in all ends. Block cloth.


Tuesday, 30 August 2011

Granny Stripes Traditional Shawl

I’ve been feeling a tad granny’d out so thought I would make something that wasn’t a granny square blanket. I’m not sure I was too successful in terms of crocheting something none granny but I like this shawl.
IMG_0622
IMG_0621
IMG_0623
IMG_0626
IMG_0619

Friday, 12 August 2011

Tuesday, 5 July 2011

‘Loken’ Crochet Pattern at Berroco

Worn as a shoulderwarmer or a cowl, this floral crochet neckpiece is simultaneously warm and delicate.
loken_lg

Get the free pattern at Berroco by clicking here


Thursday, 7 October 2010

Baby’s Pastel Swirl Blanket Pattern

206-0689_IMG
You can get the pattern here -  buy now.
206-0688_IMGMade using approx. 70g 4 ply yarn in lilac, lemon and mint. A quick and easy project with a gorgeous outcome any baby or parent would be proud to use and show off.

Tuesday, 21 September 2010

Pumpkin Trellis Shoulder Wrap

186-8635_IMG
This shawl is worked in a basic trellis pattern. Shaping is created through beginning each row with 7ch and then 1 dc into 4th ch.
Materials:
50g pumpkin DK yarn, 6.5mm hook

Pattern:
Ch 100 + 7 (counts as first trellis)
Row 1: dc into 8th chain from hook, *ch 7, sk 4 ch, dc into next ch*, ** rep to end.
Rows 2 - 13: *ch 7, dc into 4th ch from previous row*, **rep to end.
Note: Rows 2-13 are worked identically.
To Finish: darn all ends in.
Edging: this wrap doesn’t require an edging and you could apply any that you wish but here I worked as follows.
Row 1: *work 1 dc into 1st ch, sl st next ch*, ** rep to end.

This pattern is offered and made available for personal use only. If you wish to reproduce this in any way please contact me or make sure that reference is made to the original author’s blog http://www.goodtimesithinkso.blogspot.com/ Thank you Crochet Conversion Chart US/UK International Yarn Weight Conversion Chart
I hope you enjoy using this pattern and if you are looking for other free patterns please visit Crochet Pattern Central

Sunday, 12 September 2010

International Crochet Day 2010 – Scarf, Shawl, Kerchief Pattern.


Happy International Crochet Day, 2010. To celebrate I thought I’d create a pattern for crocheter’s around the world. This is a quick and easy project which you can scale up for a big shawl or scale down for a head scarf. Wear it any which way you like, enjoy :-)
Skill Level: – Easy
Materials: - 5.5mm crochet hook, 50g Colinette Jitterbug, Fire
Pattern:
Ch 90  + 1 (to count as first sc)
Row 1: sc into 1st ch and all ch across to end.
Row 2:  *ch 7, sc into 5th st*,** repeat to end of
row, turn.
Rows 3 and all subsequent Rows: *ch 7, sc into 4th ch in the loop*, ** rep to end.
Continue working in this manner decreasing 1 set of 7 ch at the end of each row until only one 7 ch loop remains. Break off yarn and darn all ends in.
This pattern is offered and made available for personal use only. If you wish to reproduce this in any way please contact me or make sure that reference is made to the original author’s blog http://www.thesunroomuk.blogspot.com/ Thank you
Crochet Conversion Chart US/UK International Yarn Weight Conversion Chart
I hope you enjoy using this pattern and if you are looking for other free patterns please visit Crochet Pattern Central

Wednesday, 4 August 2010

Tartan Edinburgh Wrap

200-0086_IMG
Get the pattern here. 
200-0090_IMG
Inspired by all things tartan and especially the Edinburgh Festival and Tattoo. I’m delighted with how it resembles woven tartan fabric.
200-0080_IMG

Thursday, 29 April 2010

Three New Crochet Patterns

189-8909_IMG
189-8906_IMG
189-8920_IMG
Three new crochet patterns completed this week as you can see two are fo shawls and one for a wrap/sarong. These patterns are now available by clicking here for my Folksy Store or here for my Etsy Store.

Wednesday, 10 February 2010

Pumpkin Trellis Shoulder Wrap

 
186-8635_IMG
This shawl is worked in a basic trellis pattern. Shaping is created through beginning each row with 7ch and then 1 dc into 4th ch.
Materials:
50g pumpkin DK yarn, 6.5mm hook


Pattern:
Ch 100 + 7 (counts as first trellis)
Row 1: dc into 8th chain from hook, *ch 7, sk 4 ch, dc into next ch*, ** rep to end.
Rows 2 - 13: *ch 7, dc into 4th ch from previous row*, **rep to end.
Note: Rows 2-13 are worked identically.
To Finish: darn all ends in.
Edging: this wrap doesn’t require an edging and you could apply any that you wish but here I worked as follows.
Row 1: *work 1 dc into 1st ch, sl st next ch*, ** rep to end.

This pattern is offered and made available for personal use only. If you wish to reproduce this in any way please contact me or make sure that reference is made to the original author’s blog http://www.goodtimesithinkso.blogspot.com/ Thank you Crochet Conversion Chart US/UK International Yarn Weight Conversion Chart
I hope you enjoy using this pattern and if you are looking for other free patterns please visit Crochet Pattern Central

Wednesday, 13 January 2010

The History of Shawls – Wednesday Night Project 130110

 [1717144_IMG6.jpg]
The word shawl, derives its origin from the Persian 'shal', which is of ancient origin not only in India but in the Middle East as well. Shawls give warmth and have been used as a protective garment against severe cold since ancient times.
171-7162_IMG Another Comfort Payer shawl please click here for other handmade shawls etc.
The exact origin of shawl is not known. However, people were using shawls since a very long period of time. The Jewish men wore a shawl named "tallit" during prayers and ceremonies since long. In the first decade of the nineteenth century, silk shawls with fringes were available in China. These shawls with more embroidery were also popular in Europe and America during 1820s and were known as China crepe shawls. In Spain, the shawls were termed as "mantons de Manila" because they were brought to Spain from China via the Manila port. Infact, in Spain, shawls were a part of gypsy dress, known as "gitanas".
Shawls were also part of folk dress in various places like Germany, the Near East, Latin America, Andalusia and Madrid during the same period. Indian shawls became very popular as high-fashion garments in Western Europe in the early- to mid-nineteenth century.
181-8180_IMG
Persian shawls were also world famous for their intricate designs and patterns. In fact, the word "shawl" itself is of Persian origin. Persian shawls were mostly manufactured from highly esteemed wool from Kirman goats. Apart from wool, silk and cotton were also used for weaving shawls of exquisite designs in Persia. Shawls were produced mainly in Kirman and in Mashhad in northeastern Persia. Besides, Tabriz town was also known for producing shawls of various types. Persian shawls competed in the market with shawls woven on jacquard looms in Russia and Europe.
Russian shawl history is a blend of oriental and European culture. It is said that Russian trade with Persia centuries ago resulted in the popularity of Persian shawls among Russian women. This in turn, initiated the process of shawl weaving in Russia. But eventually, the ornamental Russian shawl industry came up with innovative designs and finishes and became popular worldwide. Nepal is also known for producing Pashmina shawls of good quality since long.
174-7493_IMG
Shawls were popular amongst Indians in variety of forms since ancient times. The history of shawl weaving is closely linked to the history of woolen textiles in India. Kashmir valley of India is known for weaving shawls from Pashmina wool. Among all other shawls produced in India, Kashmiri shawls are known for their softness, warmth and traditional designs. The intricately embroidered and hand woven shawls from Kashmir are popular throughout Europe, Persia and other western countries since years.
166-6632_IMG

Pashmina is considered as the softest, most luxurious and best wool in the world. The warmest and most luxurious of all the animal fibers, the wool basically comes from the cashmere hair of a Central Asian Species of the mountain goat, Capra hircus, also known as shawl goat. The fiber was also obtained from goats in Tibet and Central Asia. Even in modern India, shawls are a part of traditional male costumes in the colder regions of the Himalayas.
The Indian shawl industry got international recognition during the British rule in India. Apart from Kashmir, shawl making also spread its wings to Punjab, West Bengal, Gujarat and some other north eastern states in India.
Here is another link to a lovely vintage shawl pattern and a fabulous blog.

Friday, 8 January 2010

January Prayer Shawl Crochet


It’s been so ridiculously cold this past week that I decided to create a shawl that is warm and evocative of spring bulbs emerging. This shawl is shaped in such a way that it fits snugly on and around the shoulders giving the feeling of warmth, security and a fabric cuddle.
Materials:
300g Caledon Hills Worsted Wool – 881 Goldenrod
7mm crochet hook
Pattern:
ch 70 (+2) counts as first hdc
Row 1: hdc into each ch to end
Row 2: (Inc Row) ch 2, work 2 dc into 1st and last st, dc into all other sts
Row 3: (Inc Row) ch 1, work 2 hdc into 1st and last st, hdc into all other sts
Row 4: (Inc Row) ch 2, work 2 dc into 1st st and every 10th st, work one dc into all other sts
Row 5: (Inc Row) ch 1, work 2 hdc into 1st and last st, hdc into all other sts
Row 6: (Inc Row) ch 2, work 2 dc into 1st and last st, dc into all other sts
Row 7: (Inc Row) ch 2, work 2 dc into 1st st and every 10th st, work one dc into all other sts
Row 8: ch 1, hdc into all sts
Row 9: (Inc Row) ch 2, work 2 dc into 1st and last st, dc into all other sts
Row 10: (Inc Row) ch 2, work 2 dc into 1st st and every 10th st, work one dc into all other sts
Row 11: (Inc Row) ch 2, work 2 dc into 1st and last st, dc into all other sts and ch between each dc
Row 12 – 14: (Dec Rows) decrease at both sides on each row by ch 3, work 1 dc into 2nd ch sp at beg and end of each row. Continue to work 1 ch, 1dc throughout.
Row 15 – end: (Dec Rows) Continue to decrease at each end of every row and work straight dc without ch in between sts.

This pattern is offered and made available for personal use only. If you wish to reproduce this in any way please contact me or make sure that reference is made to the original author’s blog http://www.goodtimesithinkso.blogspot.com/ Thank you
Crochet Conversion Chart US/UK
International Yarn Weight Conversion Chart
I hope you enjoy using this pattern and if you are looking for other free patterns please visit Crochet Pattern Central
This shawl may be available in my store by clicking here.

Thursday, 27 August 2009

Healing Prayer Shawl – Crochet Pattern

This is my own version of a Healing Prayer Shawl. I made this shawl a couple of weeks ago for someone who I thought may need the comfort of a shawl, post surgery. The shawl was gratefully accepted and has proved it’s worth already. Unfortunately I forgot to photograph my first shawl and so here it is, I’ve made it again.


Healing Payer Shawl Pattern
Materials: Here I used 500gm of loop yarn. The equivalent to (DK) UK or worsted weight US
Crochet Hook 10mm or US N/15
loopyarn
Measurements:
Length: 55” - 140cm approx.
Width: 50” – 127cm approx
Pattern
Note: This pattern is US if making in the UK please substitute tr for dc
Please work all dc's under the previous row not into the ch apart from at each end.
1. Chain 5
171-7115_IMG
2. Row 1 - dc into 1st chain to form bottom point.
171-7120_IMG
3. Row 2 - *ch 4 (to count as first dc + 1 ch) 1 dc under previous row, ch1, 1dc under previous row, ch1, 1 dc into final ch from previous row, turn*.
171-7121_IMG
4. Row 3 – Repeat row 2 ** Increasing by 1 st each row.
171-7126_IMG
4 Rows completed.
171-7127_IMG
6 Rows completed.
Continue until desired length and width is achieved. Here I worked 50 rows.
171-7153_IMG
This pattern is offered and made available for personal use only. If you wish to reproduce this in any way please contact me or make sure that reference is made to the original author’s blog http://www.goodtimesithinkso.blogspot.com/ Thank you
Find my Handmade Silver Crochet or Knitting Stitch Markers here
Crochet http://goodtimesithinkso.blogspot.com/2009/09/crochet-stitch-markers.html Knitting http://goodtimesithinkso.blogspot.com/2009/09/knitting-stitch-markers.html

Tuesday, 18 August 2009

Vegetarian Haggis

Hello Folks,

My unusual Holly bush with trumpet flowers in full bloom, pretty but prickly.


I haven’t been here for quite a few weeks and was eager to get something posted. I’ve been busy with children, more children, relatives coming to stay. Children’s birthdays, decorating and getting ready to go back to school. As well as the usual gardening, entertaining and general domesticity.

In the middle of all this mayhem I had a calling to make a prayer, comfort and healing shawl. This was a pleasure to crochet but in my haste to send it to the intended recipient, I forgot to photograph it which I regret. I don’t know who said it, probably John Lennon but ‘Life is what happens when you’re busy making plans.’

Prayer shawl
From Wikipedia, the free encyclopedia
Jump to: navigation, search

For the jewish prayer shawl see Tallit

A prayer shawl, in Christianity, is a piece of cloth blessed in honor of a saint, angel, or deceased person. They are blessed by the clergy and can be informally blessed through prayer by the laity. They are to be given to a person who is ill, injured, or in bad fortune.[1] They may also be given to people for celebrating events such as childbirth, baptism, or confirmation. [2] Prayer shawls are common in Roman Catholic, Eastern Catholic, Eastern Orthodox, Anglican, and Methodist churches.

Further information about prayer shawls can be found at http://www.shawlministry.com/

Regardless of your religion or non religious beliefs creating a payer, healing or comfort shawl is a spiritual process that is unique to each individual.
I continue to be busy crocheting various other projects, cutting up fabrics for my rag rug – the end is finally in sight.
169-6972_IMG
The other day I got a real urge for a MacSween’s vegetarian haggis which I thought could be lurking somewhere in the chest freezer, I was wrong. I’m not a vegetarian but some dishes are too good to resist. I then got my thinking hat on and decide to try a create something that came near to the delicious, crunchy, spicy and beanie texture of a quality vegetarian haggis. I did some research on the internet of various recipes, I looked at what was available in the kitchen cupboards and came up with the following recipe.


169-6988_IMG

Vegetarian Haggis Recipe
1 Medium Carrot – Finely Chopped

125g Mushrooms Finely Chopped

1 Red Onion Finely Chopped

1 Shallot Finely Chopped

750ml Vegetable Bouillon

5 Tablespoons of Red Lentils

2 Tablespoons Red Kidney Bean

1 Tablespoon Butter Beans

5 Tablespoons Nuts of your choice

1 Tablespoon of Soy Sauce

1 Tablespoon of Lemon Juice

1 tsp of Thyme

1 ½ tsp Parsley

1 tsp Paprika

250g oatmeal or finely processed oats

1 egg beaten

1 tbsp Olive Oil.

All ingredients can be finely chopped in any normal food processor giving a finer texture and ultimately a more satisfying haggis. Choose any nuts that you like – In my haggis I used peanuts, pine nuts and cashew nuts. Feel free to substitute any beans of your choice rather than kidney beans. I wouldn’t recommend baked beans I think this would affect the overall taste. I decided to add butterbeans as they are one of my favourites but many people don’t like them.

1. Sauté the onion and carrot for 5 mins in the olive oil.

2. Add the mushroom and sauté for a further 5 mins.

3. Add all other ingredients, and 400ml of the stock, apart from egg & oats and cook on a low heat for a further 10 mins.

4. Next add all the oatmeal and add the remaining stock until desired texture is reached. Continue on a low heat for a further 20 mins.

5. Using olive oil grease a loaf tin or any other suitable ovenproof container. Add the mixture after 20 mins and place in a pre-heated oven at 200 degrees for a further 30 mins. Leave uncovered if you want a crusty top or cover with foil if you wish to retain a moist texture.

We served this with the traditional accompaniments of mashed potatoes and mashed neeps and it was truly yummy.

For further information on MacSween’s haggis go to http://www.macsween.co.uk/


169-6987_IMG