googleads

Tuesday 30 June 2015

Amie’s Vintage Style Retro Crochet Blanket

In pictures, recently completed and dispatched to Texas today!
IMG_0409
IMG_0412
IMG_0406

Sunday 28 June 2015

Sage Wisdom Spectrum Granny Square Crochet Blanket

Here are a few photos of my latest blanket, which I’m ultra happy with. I’m just a little unsure what to do about a border. At the moment it’s measuring 48” x 48” but with a border will be complete at 55” x 55”
Available in my Etsy store later in the week.
IMG_0355
IMG_0359
IMG_0358

Friday 26 June 2015

Thursday 25 June 2015

Dinner at Eight Crochet Top Pattern


Pattern can be found at lionbrand.com click here.
dinnerat82
Lion Brand® Vanna's Glamour
Pattern #: 90098AD
Rating:
****
4.1 (based on 7 reviews)
SKILL LEVEL:  Easy + (Level 3)
SIZE: Varies
Sizes: S, M-L, 1X-2X
Finished Chest 36 (40, 44) in. (91.5 (101.5, 112) cm)
Finished Length 29 (30, 31) in. (73.5 (76, 78.5) cm)
Lion Brand® Vanna's Glamour®
GAUGE:
17 sc + 20 rows = 4 in. (10 cm); 4 shells = 4 in. (10 cm).
When you match the gauge in a pattern, your project will be the size specified in the pattern and the materials specified in the pattern will be sufficient. The needle or hook size called for in the pattern is based on what the designer used, but it is not unusual for gauge to vary from person to person. If it takes you fewer stitches and rows to make your swatch, try using a smaller size hook or needles; if more stitches and rows, try a larger size hook or needles.
Making a Gauge Swatch
STITCH EXPLANATION:
sc2tog (sc decrease) Insert hook into st and draw up a loop. Insert hook into next st and draw up a loop. Yarn over, draw through all 3 loops on hook.
shell (2 dc, ch 2, 2 dc) in indicated st or sp.


TOP
BODICE
Back

Ch 78 (86, 94).
Row 1 (RS): Sc in 2nd ch from hook and each ch across – 77 (85, 93) sc at end of row.
Row 2: Ch 1, turn, sc in each st across.
Rep Row 2 until piece measures 4 in. (10 cm) from beg.
Shape Armhole
Next Row:
Ch 1, turn, sl st in next 5 (6, 6) sts, ch 1, sc in each st to last 5 (6, 6) sts; leave last 5 (6, 6) sts unworked – 67 (73, 81) sc at end of row.
Next Row: Ch 1, turn, sc in each st across.
Next (Dec) Row: Ch 1, turn, sc in next st, sc2tog, sc in each st to last 3 sts, sc2tog, sc in last st – 65 (71, 79) sts at end of row.
Rep last row 5 (6, 8) more times – 55 (59, 63) sts when all decs are complete.
Next Row: Ch 1, turn, sc in each st across.
Rep last row until piece measures 3 1/2 (4, 4 1/2) in. (9 (10, 11.5) cm) from beg of armhole shaping.
Shape First Shoulder
Next Row: Ch 1, turn, sc in next 27 (29, 31) sts; leave rem sts unworked for second shoulder.
Next (Dec) Row: Ch 1, turn, sc in next st, sc2tog, sc in each st across – 26 (28, 30) sts at end of row.
Next (Dec) Row: Ch 1, turn, sc in each st to last 3 sts, sc2tog, sc in last st – 25 (27, 29) sts at end of row.
Rep last 2 rows 9 more times – 7 (9, 11) sts when all decs are complete.
Next Row: Ch 1, turn, sc in each st across.
Rep last row until piece measures 8 (8 1/2, 9) in. (20.5 (21.5, 23) cm) from beg of armhole shaping. Fasten off.
Shape Second Shoulder
Sk 1 unworked st following first shoulder, join yarn with sc in next st.
Next Row: Ch 1, sc in each st across – 27 (29, 31) sts at end of row.
Next (Dec) Row: Ch 1, turn, sc in each st to last 3 sts, sc2tog, sc in last st – 26 (28, 30) sts at end of row.
Next (Dec) Row: Ch 1, turn, sc in next st, sc2tog, sc in each st across – 25 (27, 29) sts at end of row.
Rep last 2 rows 9 more times – 7 (9, 11) sts when all decs are complete.
Next Row: Ch 1, turn, sc in each st across.
Rep last row until piece measures 8 (8 1/2, 9) in. (20.5 (21.5, 23) cm) from beg of armhole shaping. Fasten off.

Left Front
Ch 48 (54, 58).
Row 1 (RS): Ch 1, turn, sc in 2nd ch from hook and each ch across – 47 (53, 57) sts at end of row.
Row 2: Ch 1, turn, sc in each st across.
Shape Neck
Next (Dec) Row (RS): Ch 1, turn, sc in each st to last 3 sts, sc2tog, sc in last st – 46 (52, 56) sts at end of row.
Next Row: Ch 1, turn, sc in each st across.
Rep last 2 rows 8 more times – 38 (44, 48) sts when all decs are complete.
Shape Armhole
Next Row (RS): Ch 1, turn, sl st in next 5 (6, 6) sts, ch 1, sc in each st to last 3 sts, sc2tog, sc in last st – 32 (37, 41) sts at end of row.
Next (Dec) Row: Ch 1, turn, sc in each st to last 3 sts, sc2tog, sc in last st – 31 (36, 40) sts.
Next (Dec) Row: Ch 1, turn, sc in first st, sc2tog, sc in each st to last 3 sts, sc2tog, sc in last st – 29 (34, 38) sts at end of row.
Rep last 2 rows 5 (6, 8) more times – 14 (16, 14) sts when all decs are complete.
Next Row: Ch 1, turn, sc in each st across.
Next (Dec) Row (RS): Ch 1, turn, sc each st to last 3 sts, sc2tog, sc in last st – 13 (15, 13) sts at end of row.
Rep last 2 rows 6 (6, 2) more time(s) – 7 (9, 11) sts when all decs are complete.
Next Row: Ch 1, turn, sc in each st across.
Rep last row until piece measures same as Back. Fasten off.
Right Front
Ch 48 (54, 58).
Row 1 (RS): Ch 1, turn, sc in 2nd ch from hook and each ch across – 47 (53, 57) sts at end of row. Mark first st of this row for front edge.
Row 2: Ch 1, turn, sc in each st across.
Shape Neck
Next (Dec) Row (RS): Ch 1, turn, sc in first st, sc2tog, sc each st across – 46 (52, 56) sts at end of row.
Next Row: Ch 1, turn, sc in each st across.
Rep last 2 rows 8 more times – 38 (44, 48) sts when all decs are complete.
Shape Armhole
Next Row (RS):
Ch 1, turn, sc in first st, sc2tog, sc in each st to last 5 (6, 6) sts; leave rem sts unworked – 32 (37, 41) sts at end of row.
Next (Dec) Row: Ch 1, turn, sc in first st, sc2tog, sc in each st across – 31 (36, 40) sts at end of row.
Next (Dec) Row: Ch 1, turn, sc in first st, sc2tog, sc in each st to last 3 sts, sc2tog, sc in last st – 29 (34, 38) sts. Rep last 2 rows 5 (6, 8) more times – 14 (16, 14) sts when all decs are complete.
Next Row: Ch 1, turn, sc in each st across.
Next (Dec) Row (RS): Ch 1, turn, sc in first st, sc2tog, sc each st across – 13 (15, 13) sts at end of row.
Rep last 2 rows 6 (6, 2) more time(s) – 7 (9, 11) sts when all decs are complete.
Next Row: Ch 1, turn, sc in each st across.
Rep last row until piece measures same as Back. Fasten off.
SKIRT
Notes:

1. Skirt is worked as a separate piece (rather than as a part of the Bodice) to control waistline fullness.
2. Beg of Skirt is worked in rows to avoid the twisting that is possible with a long beg chain. When 4 rows have been completed, piece is joined and remainder of Skirt is worked in the round to eliminate the need for seaming. Skirt is worked from waist edge to lower edge.
Ch 181 (211, 226).
Row 1 (RS): Sc in 2nd ch from hook and each ch across – 180 (210, 225) sts.
Rows 2-4: Ch 1, turn, sc in each st across.
Rnd 5: Ch 1, turn, sc in each st across; join with sl st in first sc, being careful not to twist.
Rnd 6: Ch 3, (dc, ch 2, 2 dc) in same st as join, sk next 4 sts, *shell in next st, sk next 4 sts; rep from * around; join with sl st in top of beg ch – 36 (42, 45) shells at end of rnd.
Rnd 7: Sl st to first ch-2 sp, ch 3, (dc, ch 2, 2 dc) in first ch-2 sp, shell in each ch-2 sp around; join with sl st in top of beg ch.
Rnd 8: Rep Rnd 7.
Rnd 9: Sl st to first ch-2 sp, ch 3, (dc, ch 2, 2 dc) in first ch-2 sp, (shell in next ch-2 sp) 5 (6, 8) times, shell in next sp between shells (inc made), *(shell in next ch-2 sp) 6 (7, 9) times, shell in next sp between shells (inc made); rep from * around; join with sl st in top of beg ch – 42 (48, 50) shells at end of rnd.
Place 6 (6, 5) markers around, placing one marker in sp following each inc (between shells). Move markers up as work progresses.
Next 3 (3, 2) Rnds: Rep Rnd 7.
Next (Inc) Rnd: Sl st to first ch-2 sp, ch 3, (dc, ch 2, 2 dc) in ch-2 sp, (shell in next ch-2 sp) to first marker, shell in marked sp between shells, *(shell in next ch-2 sp) to next marker, shell in marked sp between shells; rep from * around; join with sl st in top of beg ch – 48 (54, 55) shells at end of rnd.
Rep last 4 (4, 3) rnds 4 (4, 5) more times – 72 (78, 80) shells when all incs are complete.
Next 3 (4, 7) Rnds: Rep Rnd 7. Fasten off.
FINISHING
Sew Bodice fronts to back at shoulders.
Neck Edging
From RS, join yarn with sl st in marked front edge st of Right Front.
Row 1: Ch 1, work sc evenly spaced along Right Front, Back and Left Front.
Rows 2 and 3: Ch 1, turn, sc in each st across.
Fasten off. Sew Bodice side seams.
Armhole Edging
From RS, join yarn with sl st at one side seam.
Rnd 1: Ch 1, work sc evenly spaced around armhole. Join with sl st in first sc.
Rnds 2 and 3: Ch 1, turn, sc in each st around. Join with sl st in first sc.
Fasten off. Rep edging on rem armhole. Lap Right Front about 7 (7 1/2, 8) in. over Left Front and pin in place. Try Bodice on and adjust overlap if needed. When you’re happy with the fit, baste overlapped edge in place. Seam first 4 rows of Skirt. Lap first row (top) of Skirt over lower edge of Bodice, easing Skirt to fit. Sew in place, sewing through all thicknesses at overlap.
Drawstring
Make a ch about 6 ft. (183 cm) long.
Row 1: Sc in 2nd ch from hook and each ch across.
Fasten off. Pin a large safety pin to one end of Drawstring and weave through Row 2 of Skirt. Weave in ends.


Wednesday 24 June 2015

Mosaic Sunset Poncho

mosaicponcho
Intermediate
Crochet Hook: I/9 or 5.5 mm hook
Yarn Weight: (1) Super Fine (27-32 stitches to 4 inches)
MATERIALS:
  • RED HEART® Heart & Sole®: 4 (5, 5, 6, 6, 7) balls 3960 Spring Stripe
  • Susan Bates® Crochet Hook: 5.5mm [US I-9]
  • Yarn needle
GAUGE: 20 dc = 4”(10 cm), 3 sc and 2 shell in lace pattern = 5” (12.7 cm); 4 rows sc and 3 rows dc = 4” (10 cm) blocked. CHECK YOUR GAUGE. Use any size hook to obtain the gauge.
Directions are for size Small/Medium.
Changes for sizes Large/X-Large and XXLarge/ XXX-Large are in parentheses.
To Fit Bust 32-38 (40-46, 48-54)”, (81-97 (102-117, 122-137) cm)
Finished Center Panel Width 11 (13, 15)”, (28 (33, 38) cm)
Finished Length 27” (69 cm) at longest point
Notes
1. Poncho is made with 2 center panels and 2 long sleeve panels.
2. The first half of each long sleeve panel is worked up to Row 41 and fastened off. The second half is worked in the bottom of Row 1 from first half.
Special Stitches
half sh = [Dc, ch 1] 3 times in indicated stitch.
sh = [Dc, ch 1] 5 times in indicated stitch.
sc2tog = [Draw up a loop in next st] 2 times, yarn over and draw through all 3 loops on hook.
CENTER PANEL (Make 2)
Ch 49 (59, 69).
Row 1 (Right Side): Dc in 4th ch from hook, dc in next 2 [7, 12] chs, skip next 3 chs, half sh in next ch, [skip next 3 chs, sc in next ch, ch
1, skip next 3 chs, sh in next ch] 3 times, skip next 3 chs, sc in next ch, ch 1, skip next 3 chs, half sh in next ch, skip next 3 chs, dc in last 4 (9, 14) chs – 8 (18, 28) dc, 2 half sh, 4 sc, 3 sh.
Row 2: Ch 1, turn; sc in first 5 (10, 15) dc, [ch 5, sc in next sc, ch 5, sc in center dc of next sh] 3 times, ch 5, sc in next sc, ch 5, skip next 2 dc, sc in last 5 (10, 15) dc – 17 (27, 37) sc, 8 ch-5 spaces.
Row 3: Ch 3, turn; dc in next 3 (8, 13) sc, [sc in next sc, ch 1, sh in next sc] 4 times, sc in next sc, dc in last 4 (9, 14) sc – 8 (18, 28) dc, 5 sc, 4 sh.
Row 4: Ch 1, turn; sc in first 5 (10 15) sts, [ch 5, sc in center dc of next sh, ch 5, sc in next sc] 4 times, sc in last 4 (9, 14) dc – 17 (27, 37) sc, 8 ch-5 spaces.
Row 5: Ch 3, turn; dc in next 3 (8, 13) sc, half sh in next sc, [sc in next sc, ch 1, sh in next sc] 3 times, sc in next sc, ch 1, half sh in next ch, dc in last 4 (9, 14) sc – 8 (18, 28) dc, 2 half sh, 4 sc, 3 sh.
Rows 6-21: Repeat Rows 2-5, four times.
Rows 22-24: Repeat Rows 2-4 once.
Row 25: Ch 3, turn; dc in next 3 (8, 13) sc, half sh in next sc, sc in next sc, ch 1, shell in next sc, sc in next sc, ch 2, ([tr, ch 2] 5 times) in next sc, sc in next sc, ch 1, sh in next sc, sc in next sc, ch 1, half sh in next sc, dc in last 4 (9, 14) sc – 8 (18, 28) dc, 2 half sh, 4 sc, 2 sh, 5 tr.
Row 26: Ch 1, turn; sc in first 5 (10, 15) dc, ch 5, sc in next sc, ch 5, sc in center dc of next sh, ch 5, sc in next sc, [ch 5, skip next tr, sc in next tr] 2 times, ch 5, sc in next sc, ch 5, sc in center dc of next sh, ch 5, sc in next sc, ch 5, skip next 2 dc, sc in last 5 (10, 15) dc – 18 (28, 38) sc, 9 ch-5 spaces.
Row 27: Ch 3, turn; dc in next 3 (8, 13) sc, sc in next sc, ch 1, [sh in next sc, sc in next sc, ch 1] twice, sh in next ch-5 space, [sc in next sc, ch 1, sh in next sc] twice, sc in next sc, dc in last 4 (9, 14) sc – 8 (18, 28) dc, 6 sc, 5 sh.
Row 28: Ch 1, turn; sc in first 5 (10 15) sts, [ch 5, sc in center dc of next sh, ch 5, sc in next sc] 5 times, sc in last 4 (9, 14) dc – 19 (29, 39) sc, 10 ch-5 spaces.
Row 29: Ch 3, turn; dc in next 3 (8, 13) sc, half sh in next sc, [sc in next sc, ch 1, sh in next sc] 4 times, sc in next sc, ch 1, half sh in next sc, dc in last 4 (9, 14) sc – 8 (18, 28) dc, 2 half sh, 5 sc, 4 sh.
Row 30: Ch 1, turn; sc in first 5 (10, 15) dc, [ch 5, sc in next sc, ch 5, sc in center dc of next sh] 4 times, ch 5, sc in next sc, ch 5, skip next 2 dc, sc in last 5 (10, 15) dc – 19 (29, 39) sc, 10 ch-5 spaces.
Row 31: Ch 3, turn; dc in next 3 (8, 13) sc, [sc in next sc, ch 1, sh in next sc] twice, sc in next sc, ch 3, (tr [ch 2, tr] 4 times) in next sc, ch 3, sc in next sc, [ch 1, sh in next sc, sc in next sc] twice, dc in last 4 (9, 14) sc – 8 (18, 28) dc, 6 sc, 4 sh, 5 tr.
EDGING
Side 1: Ch 1, pivot to work over post of st at each row end; work sc in each sc row end and 2 sc in each dc row end across. Fasten off.
Side 2: With Right Side facing, join yarn with sc in Row 1 on opposite side of panel, sc in same space; work sc in each sc row end and 2 sc in each dc row end across. Fasten off.
SLEEVE PANEL (Make 2)
First Half
Ch 69.
Row 1 (Right Side): Dc in 4th ch from hook, dc in next 12 chs, skip next 3 chs, half-sh in next ch, [skip next 3 chs, sc in next ch, ch 1, skip next 3 chs, sh in next ch] 3 times, skip next 3 chs, sc in next ch, ch 1, skip next 3 chs, half-sh in next ch, skip next 3 chs, dc in last 14 chs – 28 dc, 2 half sh, 4 sc, 3 sh.
Row 2: Ch 1, turn; sc in first 15 dc, [ch 5, sc in next sc, ch 5, sc in center dc of next sh] 3 times, ch 5, sc in next sc, ch 5, skip next 2 dc, sc in last 15 dc – 37 sc, 8 ch-5 sps.
Row 3: Ch 3, turn; dc in next 13 sc, [sc in next sc, ch 1, sh in next sc] 4 times, sc in next sc, dc in last 14 sc – 28 dc, 5 sc, 4 sh.
Row 4: Ch 1, turn; sc in first 15 sts, [ch 5, sc in center dc of next sh, ch 5, sc in next sc] 4 times, sc in last 14 dc – 37 sc, 8 ch-5 spaces.
Row 5: Ch 3, turn; dc in next 13 sc, half-sh in next sc, [sc in next sc, ch 1, sh in next sc] 3 times, sc in next sc, ch 1, half-sh in next ch, dc in last 14 sc – 28 dc, 2 half sh, 4 sc, 3 sh.
Rows 6-41: Repeat Rows 2-5, nine times.
Fasten off after last row
Second Half
Row 1: Working in bottom loops of Row 1 on first half of sleeve panel, join yarn with slip st in first loop, ch 3 (counts as first dc), dc in next 13 chs, skip next 3 chs, half sh in next ch, [skip next 3 chs, sc in next ch, ch 1, skip next 3 chs, sh in next ch] 3 times, skip next 3 chs, sc in next ch, ch 1, skip next 3 chs, halfsh in next ch, skip next 3 chs, dc in last 14 chs – 28 dc, 2 half sh, 4 sc, 3 sh.
Rows 2-41: Repeat Rows 2-5 for First Half, ten times.
Edging
Repeat Edging for Center Panel.
ASSEMBLY
With Wrong Sides facing together, align stitches of Edging on Center Panel with Sleeve Panel keeping center peak pointing outward; working through both thicknesses, join yarn with slip st in first st, ch 1, *slip st in next st, ch 1; repeat from * to end. Repeat for opposite side of same Center Panel to join second Sleeve Panel. Repeat to join second Center Panel to opposite end of each Sleeve Panel.
NECK AND SHOULDER SHAPING
Round 1: With RS facing, join yarn with sc in seam at right side, *working in bottom loops of Row 1 on Center Panel, dc in first 4 (9, 14) chs, [skip next 3 chs, 2 dc in next ch] 9 times, skip next 3 chs, dc in next 4 (9, 14) chs, sc in
center of next seam, working in sts of edging on Sleeve Panel, sc2tog across*, sc in center of next seam; repeat from * to *; join with slip st in first st.
Round 2: Ch 1, sc in first st, *sc2tog 13 (18, 23) times, sc in each st up to next Center Panel; repeat from * to end; join with slip st in first st.
Round 3: Ch 3, dc in each st around; join with slip st in top of beginning ch-3.
Rounds 4-6: Ch 1, sc in each st around; join with slip st in first st. Fasten off after last round.
FINISHING
Weave in ends. Wet block to measurements.


Tuesday 23 June 2015

Striking Stole Free Crochet Pattern

strikingstole

Source: Redheart.com

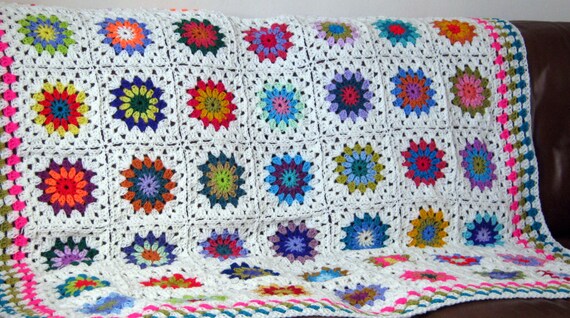
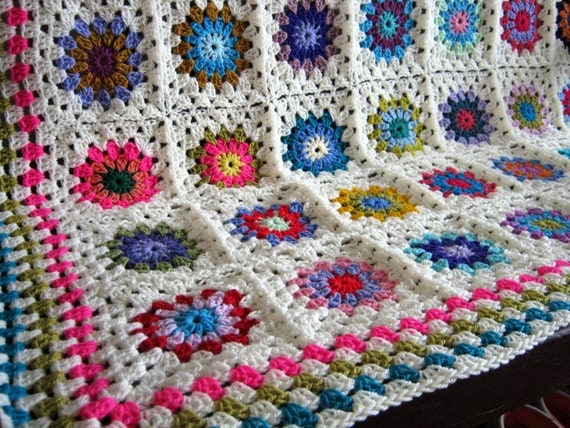
You can't miss this Seriously Striking Crochet Stole. The patchwork design with lots of fun colors makes it an awesome accessory you can take anywhere. I really love the way it not only matches everything in your closet, but it has just a bit of shimmer to make it seem fancier than it actually is. Crochet shawl and stoles have their own way of really spicing up an outfit and making it something totally new. Wear your crochet stole wherever you want, make one for a friend, or give them out as gifts. You can't go wrong with something as fun as this!

Crochet Hook: G/6 or 4 mm hook, I/9 or 5.5 mm hook

Yarn Weight: (1) Super Fine (27-32 stitches to 4 inches)

Materials List
  1. RED HEART Stardust: 1 ball each 1530 Purple A, 1623 Green B, 1252 Orange C, 1701 Pink D, and 1805 Blue E.
  2. 4.00 mm [US G-6] Crochet Hook
  3. 5.5 mm [US I-9] Crochet Hook
Crochet Gauge

Rounds 1-3= 2square.

Finished Size: Shawl measures 16 wide by 64 long, not including Edging.

Instructions
Special Stitch

Petal = *yo twice, insert hook in ring, yo and pull up a loop, (yo and draw through 2 loops on hook) twice; repeat from * 2 times more, yo and draw through all 4 loops on hook.

First Square

With smaller hook and A, ch 6; join with a slip st in first ch to form a ring.
Round 1 (Right side): Ch 4, *yo twice, insert hook into ring, yo and pull up a loop, (yo and draw through 2 loops on hook) twice; repeat from * once more, yo and draw through all 3 loops on hook (counts as first Petal), ch 5, (work Petal, ch 5) 6 times, work Petal, ch 2, join with dc to first Petal: 8 ch-5 spaces.
Round 2: Ch 5, sc in same space, ch 5, *(sc in next ch-5 space, ch 5) twice, sc in same space, ch 5; repeat from * 2 times more, sc in next ch-5 space, ch 5, join with slip st to first ch-5 space: 8 ch-5 spaces and 4 corner ch-5 spaces.
Rounds 3-7: Ch 5, sc in same space (corner made), ch 5, *(sc in next ch-5 space, ch 5) across to next corner ch-5 space, sc in corner ch-5 space, ch 5, sc in same space, ch 5; repeat from * around to first corner ch-5 space, join with sc to first corner ch-5 space: 28 ch-5 spaces and 4 corner ch-5 spaces.
Fasten off.
Round 8: With right side facing, join B with sc in any corner ch-5 space, ch 5, sc in same space, ch 5, *(sc in next ch-5 space, ch 5) across to next corner ch-5 space, sc in corner ch-5 space, ch 5, sc in same space, ch 5; repeat from * around to first corner ch-5 space, join with sc to first corner ch-5 space: 32 ch-5 spaces and 4 corner ch-5 spaces.
Round 9: Repeat Round 3; fasten off.
Round 10: With right side facing, join C with sc in any corner ch-5 space, ch 5, sc in same space, ch 5, *(sc in next ch-5 space, ch 5) across to next corner ch-5 space, sc in corner ch-5 space, ch 5, sc in same space, ch 5; repeat from * around to first corner ch-5 space, join with sc to first corner ch-5 space: 40 ch-5 spaces and 4 corner ch-5 spaces.
Rounds 11-23: Repeat Round 3: 92 ch-5 spaces and 4 corner ch-5 spaces.
Fasten off.
Round 24: With right side facing, join B with sc in any corner ch-5 space, ch 5, sc in same space, ch 5, *(sc in next ch-5 space, ch 5) across to next corner ch-5 space, sc in corner ch-5 space, ch 5, sc in same space, ch 5; repeat from * around to first corner ch-5 space, join with sc to first corner ch-5 space; fasten off: 96 ch-5 spaces and 4 corner ch-5 spaces.

Remaining Squares

Note: Work 3 Squares, one in each color combination listed below, joining on one side while working Round 24 and following the Assembly Diagram as a guide for placement.
Square 2: D, B, E, B
Square 3: E, B, D, B
Square 4: C, B, A, B
With smaller hook and first color, ch 6; join with a slip st to form a ring.
Round 1 (Right side): Ch 4, *yo twice, insert hook into ring, yo and pull up a loop, (yo and draw through 2 loops on hook) twice; repeat from * once more, yo and draw through all 3 loops on hook (counts as first Petal), ch 5, (work Petal, ch 5) 6 times, work Petal, ch 2, join with dc to first Petal: 8 ch-5 spaces.
Round 2: Ch 5, sc in same space (corner made), ch 5, *(sc in next ch-5 space, ch 5) twice, sc in same space, ch 5; repeat from * 2 times more, sc in next ch-5 space, ch 5, join with slip st to first ch-5 space: 8 ch-5 spaces and 4 corner ch-5 spaces.
Rounds 3-7: Ch 5, sc in same space, ch 5, *(sc in next ch-5 space, ch 5) across to next corner ch-5 space, sc in corner ch-5 space, ch 5, sc in same space, ch 5; repeat from * around to first corner ch-5 space, join with sc to first corner ch-5 space: 28 ch-5 spaces and 4 corner ch-5 spaces.
Fasten off.
Round 8: With right side facing, join second color with sc in any corner ch-5 space, ch 5, sc in same space, ch 5, *(sc in next ch-5 space, ch 5) across to next corner ch-5 space, sc in corner ch-5 space, ch 5, sc in same space, ch 5; repeat from * around to first corner ch-5 space, join with sc to first corner ch-5 space: 32 ch-5 spaces and 4 corner ch-5 spaces.
Round 9: Repeat Round 3; fasten off.
Round 10: With right side facing, join third color with sc in any corner ch-5 space, ch 5, sc in same space, ch 5, *(sc in next ch-5 space, ch 5) across to next corner ch-5 space, sc in corner ch-5 space, ch 5, sc in same space, ch 5; repeat from * around to first corner ch-5 space, join with sc to first corner ch-5 space: 40 ch-5 spaces and 4 corner ch-5 spaces.
Rounds 11-23: Repeat Round 3: 92 ch-5 spaces and 4 corner ch-5 spaces.
Fasten off.
Round 24 (Joining round): With right side facing, join fourth color with slip stitch to any corner ch-5 space, ch 5, sc in same space, ch 5, (sc in next ch-5 space, ch 5) across to next corner ch-5 space, sc in corner ch-5 space, ch 2, with wrong sides together and matching stitches, slip st in any corner ch-5 space on previous square, ch 2, sc in same corner ch-5 space on current square, ch 2, *slip st in next ch 5 space on previous square, ch 2, sc in next ch-5 space on current square, ch 2; repeat from * across to next corner ch-5 space on current square, slip st in next ch-5 space on previous square, ch 2, sc in corner ch-5 space on current square, ch 2, slip st in corner ch-5 space on previous square, ch 2, sc in same corner ch-5 space on current square, ch 5, (sc in next ch-5 space, ch 5) across to next corner ch-5 space, sc in corner ch-5 space, ch 5, sc in same space, ch 5, (sc in next ch-5 space, ch 5) across to first corner ch-5 space, join with slip st to first corner ch-5 space; fasten off.

Edging

With right side facing and larger hook, join B with slip st to any corner ch-5 space.
Round 1: Ch 5, sc in same space, ch 5, *(sc in next ch-5 space, ch 5) across to next corner ch-5 space, sc in corner ch-5 space, ch 5, sc in same space, ch 5; repeat from * around to first corner ch-5 space, join with sc to first corner ch-5 space.
Round 2: Ch 6, sc in same space, ch 6, *(sc in next ch-5 space, ch 6) across to next corner ch-5 space, sc in corner ch-5 space, ch 6, sc in same space, ch 6; repeat from * around to first corner ch-6 space, join with slip st to first corner ch-6 space; fasten off.

Monday 22 June 2015

Retro Pattern Flamboyant Granny Square Afghan Blanket

Here is a client commissioned blanket afghan inspired by an old 1970’s pattern. The blanket is huge approx. 62” x 80” and all sewn together with turquoise yarn. Completed yesterday and ready for dispatch.

IMG_0344

IMG_0342

IMG_0339

IMG_0345

Sunday 21 June 2015

Hollies Retro Vintage Style Granny Square Blanket

Here are some quick photos of stage 1,2 & 3 of a blanket just completed today. The blanket was made for Hollie in Australia and measures 63” x 63” and is constructed using 225 squares. You can order a blanket like this in my Etsy store here.
IMG_0312
IMG_0315
IMG_0336
IMG_0334

Wednesday 17 June 2015

I love Colour Crochet Blanket Afghan

Fun, colorful, and unique are words that will immediately pop into your head when looking at this gorgeous crochet blanket pattern for the I Love Color Crochet Afghan. Combining squares, octagons, and triangles, this crochet afghan will keep you on your toes. Its a one-of-a-kind crochet blanket that not only combines an array of motifs, but colors, too. If you’re looking to create a statement piece for your home, then this pattern is just for you!

ilovecolour
Pattern by Red Heart Yarn 

Crochet Hook: J/10 or 6 mm hook

Yarn Weight: (4) Medium Weight/Worsted Weight and Aran (16-20 stitches to 4 inches)

SIZE:
45” x 54” (114 x 137 cm)

MATERIALS:
RED HEART® With Love®: 1 skein each of 1101 Eggshell A, 1909 Holly Berry B, 1252 Mango C, 1201 Daffodil D, 1601 Lettuce E, 1621 Evergreen F, 1805 Bluebell G, 1803 Blue Hawaii H, 1538 Lilac I, 1915 Merlot J, and 1907 Boysenberry K.
Crochet hook: 6.0 mm [US J-10]
Yarn needle

GAUGE:
12 sts and 7 rows dc = 4” (10 cm). CHECK YOUR GAUGE. Use any size hook to obtain the gauge given.

ABBREVIATIONS:
A, B, C, D, E, F, G, H, I, J, K = color A, B, C, D, E, F, G, H, I, J, K; ch = chain; dc = double crochet; sc = single crochet; st(s) = stitch(es); ( ) = work directions in parentheses into same st; [ ] = work directions in brackets the number of times specified; * or ** = repeat whatever follows the * or ** as indicated.
Special Abbreviations: 2-dc cluster (Cl): [Yarn over, insert hook in next st, yarn over, draw yarn through st, yarn over, draw yarn through 2 loops on hook] twice in same st or space, yarn over, draw through all 3 loops on hook.

NOTES:
When sewing the motifs together, be careful not to pull the yarn too tightly or puckering may occur. When assembling the throw, be sure to work from the back, the assembly diagram shows the back side of the throw. When working border rounds, there are 8 corners due to the angled corners of the throw.

OCTAGON MOTIF:
[geometric color lovers throw 2 Celebrate I Love Yarn Day Week: Day #1]

(make 14; 2 in each of the following color sequences):

Color Sequence O1: I , C , B , F , A , H.

Color Sequence O2: D , E , K , H , A , I.

Color Sequence O3: F , H , D , G , A , E.

Color Sequence O4: K , D , G , J , A , B.

Color Sequence O5: E , G , J , D , A , F.

Color Sequence O6: J , I , E , C , A , G.

Color Sequence O7: H , B , F , K , A , C.
With first color, ch 4; join with a slip st to form a ring.
Round 1 (right side): Ch 3 (counts as dc, here and throughout), dc in ring (counts as first Cl), ch 1, (Cl, ch 1) 7 times in ring; join with a slip st in top of beginning ch-3— 8 Cl; 8 ch-1 spaces. Fasten off.

Round 2: With right side facing, join next color in any ch-1 space, ch 3, (dc, ch 1, Cl) in same ch-1 space, (Cl, ch 1, Cl) in each ch-1 space around; join with a slip st in top of beginning ch-3— 16 Cl; 8 ch-1 spaces. Fasten off.

Round 3: With right side facing, join next color in any ch-1 space, ch 3, 4 dc in same ch-1 space, *sc between next 2 Cl**, 5 dc in next ch-1 space; repeat from * around, ending last repeat at **; join with a slip st in top of beginning ch-3—8 shells. Fasten off.

Round 4: Working in back loops only, with right side facing, join next color in 3rd dc of any 5 dc group, ch 1, sc in same st, *hdc in next dc, dc in next dc, 2 tr in next sc, dc in next dc, hdc in next dc**, sc in next dc; repeat from * around, ending last repeat at **; join with a slip st in top of first sc—56 sts. Fasten off.

Round 5: With right side facing, join next color with a slip st between 2 tr of any 2-tr pair, *ch 3, skip next 3 sts, working over next sc in Round 4, dc in corresponding dc, 1 round below, ch 3 , skip next 3 sts**, slip st between 2 tr of next 2-tr pair; repeat from * around, ending last repeat at **; join with a slip st in first slip st—16 ch-3 spaces. Do not fasten off.

Round 6: Slip st in next ch-3 space, ch 3, 3 dc in same ch-3 space, *ch 2, 4 dc in next ch-3 space, ch 1**, 4 dc in next ch-3 space; repeat from * around, ending last repeat at **; join with a slip st in top of beginning ch-3—8 ch-2 corner spaces; 8 ch-1 side spaces. Fasten off.

Round 7: With right side facing, join next color in any ch-2 space, ch 3, *dc in each of next 2 dc, ch 1, skip 1, dc in next dc, dc in next ch-1 space, dc in next dc, ch 1, skip one, dc in each of next 2 dc**, (dc, ch 2, dc) in ch-2 space; repeat from * around, ending last repeat at **, dc in first ch-2 space, ch 2; join with a slip st in top of beginning ch-3—8 ch-2 corner spaces; 2 ch-1 spaces across each side. Fasten off, leaving a long sewing length.

TRIANGLE MOTIF:

(make 20; 2 in each of the following color sequences):

Color Sequence T1: K , F , J.

Color Sequence T2: B , I , G.

Color Sequence T3: J , D , H.

Color Sequence T4: E , J , D.

Color Sequence T5: G , K , C.

Color Sequence T6: H , B , E.

Color Sequence T7: F , H , I.

Color Sequence T8: C , G , F.

Color Sequence T9: I , E , K.

Color Sequence T10: D , C , B.

With first color, ch 4; join with a slip st to form a ring.

Row 1 (right side): Ch 3, 2 dc in ring, ch 2, 3 dc in ring, turn—6 dc; 1 ch-2 space. Fasten off.

Row 2: With right side facing, join next color in top of beginning ch-3, ch 3, dc in first st, dc in next st, ch 1, (3 dc, ch 2, 3 dc) in next ch-2 space, ch 1, skip next st, dc in next st, 2 dc in last st, turn—12 dc; 2 ch-1 spaces; 1 ch-2 space. Fasten off. Geometric Color Lovers Throw

Row 3: With right side facing, join next color in top of beginning ch-3, ch 3, dc in same st, dc in next st, ch 1, 3 dc in next ch-1 space, ch 1, (3 dc, ch 2, 3 dc) in next ch-2 space, ch 1, 3 dc in next ch-1 space, ch 1, skip next st, dc in next st, 2 dc in last st—18 dc; 4 ch-1 spaces; 1 ch-2 space. Fasten off, leaving a long sewing length.

CORNER MOTIF:

(make 4; 1 in each of the following color sequences):

Color Sequence C1: G , J , E .

Color Sequence C2: F , G , I .

Color Sequence C3: B , E , D .

Color Sequence C4: H , K , C.

With first color, ch 4; join with a slip st to form a ring.

Row 1 (right side): Ch 3, 2 dc in ring, [ch 2, 3 dc] twice in ring, turn—9 dc; 2 ch-2 spaces. Fasten off.

Row 2: With right side facing, join next color in top of beginning ch-3, ch 3, dc in first st, dc in next st, ch 1, (3 dc, ch 2, 3 dc) in next ch-2 space, ch 1, (3 dc, ch 2, 3 dc) in next ch-2 space, ch 1, skip next st, dc in next st, 2 dc in last st, turn—18 dc; 3 ch-1 spaces; 2 ch-2 spaces. Fasten off.

Row 3: With right side facing, join next color in top of beginning ch-3, ch 3, dc in first st, dc in next st, ch 1, *3 dc in next ch-1 space, ch 1, (3 dc, ch 2, 3 dc) in next ch-2 space, ch 1; repeat from * once, 3 dc in next ch-1 space, ch 1, skip next st, dc in next st, 2 dc in last st—27 dc; 6 ch-1 spaces; 2 ch-2 spaces. Fasten off, leaving a long sewing length.
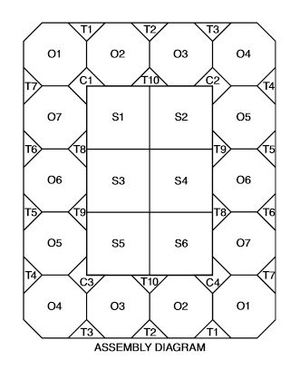
SQUARE MOTIF:

(make 6; 1 in each of the following color sequences):

Color Sequence S1: I , K , F , A , D , J , H.

Color Sequence S2: B , G , C , A , E , D , K.

Color Sequence S3: E , F , I , A , H , K , D.

Color Sequence S4: G , B , E , A , J , F , I.

Color Sequence S5: D , H , K , A , B , C , J.

Color Sequence S6: C , J , H , A , I , G , F .

Work same a Octagon through Round 3.

Round 4: Working in back loops only, with right side facing, join next color in 3rd dc of any 5 dc group, ch 1, sc in same st, sc in each of next 2 dc, *hdc in next sc, sc in each of next 3 dc, hdc in next dc, dc in next dc, (tr, ch 2, tr) in next sc, dc in next dc, hdc in next dc**, sc in each of next 3 dc, rep from * around, ending last repeat at **; join with a slip st in first sc—4 ch-2 spaces; 13 sts across each side. Fasten off.

Round 5: With right side facing, join next color with a slip st in any ch-2 space, ch 3, 2 dc in same space, *[ch 1, skip next st, dc in each of next 3 sts] 3 times, ch 1, skip next st**, (3 dc, ch 2, 3 dc) in next ch-2 space; repeat from * around, ending last repeat at **, 3 dc in first ch-2 space, ch 2; join with a slip st in top of beginning ch-3 space—4 ch-2 corner spaces; 4 ch-1 spaces across each side. Fasten off.

Round 6: With right side facing, slip st next color in any ch-2 space, ch 3, 2 dc in same space, *(ch 1, 3 dc) in each of next 4 ch-1 spaces, ch 1**, (3 dc, ch 2, 3 dc) in next ch-2 space, ch 1; repeat from * around, ending last repeat at **, 3 dc in first ch-2 space, ch 2; join with a slip st in top of beginning ch-3—4 ch-2 corner spaces; 5 ch-1 spaces across each side. Fasten off.

Round 7: With right side facing, join next color with a slip st in any ch-2 space, ch 3, 2 dc in same space, *(ch 1, 3 dc) in each of next 5 ch-1 spaces, ch 1**, (3 dc, ch 2, 3 dc) in next ch-2 space, ch 1, repeat from * around ending last repeat at **, 3 dc in Geometric Color Lovers Throwfirst ch-2 space, ch 2; join with a slip st in top of beginning ch-3—4 ch-2 corner spaces; 6 ch-1 spaces across each side. Fasten off, leaving a long sewing length.

ASSEMBLY: With wrong sides facing, arrange all motifs following assembly diagram. With yarn needle and sewing lengths, working through back loops of sts, whip stitch motifs together.

BORDER:

Round 1 (right side): With right side of afghan facing, join A with a slip st in any ch-2 corner space, ch 1, *(sc, ch 2, sc) in ch-2 corner space, sc evenly around entire afghan, working 1 sc in each dc and each ch-1 space, (sc, ch 2, sc) in each of the 7 remaining ch-2 corners, and 15 sc evenly spaced across each triangle edge (do not work in ch-spaces before and after each triangle); join with a slip st in first sc—8 ch-2 corner spaces. Fasten off.

Round 2: With right side facing, join G with a slip st in first sc after any ch-2 corner space, ch 1, *sc in each sc to next ch-2 space, ch 2, skip ch-2 space, repeat from * around; join with a slip st in first sc. Fasten off.

Round 3: With right side facing, join H to any ch-2 corner space, ch 3, (dc, ch 2, 2 dc) in same space, ch 1, skip next sc, *(dc in each of next 3 sc, ch 1, skip next sc) across to next ch-2 corner space**, (2 dc, ch 2, 2 dc) in next ch-2 corner space; repeat from * around, ending last repeat at **, join with a slip st in top of beginning ch-3. Fasten off.

Round 4: With right side facing, join J with a slip st in any ch-2 corner space, ch 5 (counts as first dc, ch 2), dc in same ch-2 corner space, ch 1, *(3 dc in next ch-1 space, ch 1) across to next ch-2 corner space**, (dc, ch 2, dc) in next ch-2 corner space; repeat from * around, ending last repeat **; join with a slip st to 3rd ch of beginning ch-5. Fasten off.

Round 5: With right side facing, join D with a slip st in any ch-2 corner space, ch 5, dc in same ch-2 corner space, 2 dc in next ch-1 space, ch 1, *(3 dc in next ch-1 space, ch 1) across to next ch-1 space before next ch-2 corner space, 2 dc in next ch-1 space**, (dc, ch 2, dc) in next ch-2 corner space, 2 dc in ch-1 space, ch 1; repeat from * around, ending last repeat at **; join with a slip st to 3rd ch of beginning ch-5. Fasten off.

Round 6: With right side facing, join E to any ch-2 corner space, ch 3, (dc, ch 2, 2 dc) in same ch-2 space, ch 1, *(3 dc in next ch-1 space, ch 1) across to next ch-2 corner space**, (2 dc, ch 2, 2 dc) in next ch-2 corner space; repeat from * around, ending last repeat at **; join with a slip st top of beginning ch-3. Fasten off.

Round 7: With right side facing, join I with a slip st in any ch-2 corner space, ch 1, *(sc, ch 2, sc) in ch-2 corner space, sc in each dc and ch-1 space across to next ch-2 corner space; repeat from * around, ending last repeat at **; join with a slip st in first sc. Fasten off.

Round 8: With right side facing, join F with a slip st in first sc after any ch-2 corner space, ch 1, *sc in each sc to next ch-2 space, ch 2, skip next ch-2 space; repeat from * around; join with a slip st in beginning sc. Fasten off.

Round 9: With right side facing, join K with a slip st in sc before any ch-2 corner space, *5 hdc in next ch-2 corner space, slip st in next sc, (skip next st, 3 hdc in next sc, skip next st, slip st in next sc) across to first sc before next ch-2 corner space; repeat from * around; join with a slip st in first hdc. Fasten off.

Tuesday 16 June 2015

Tiny Tiles Mosaic Crochet Blanket

I started making this on Sunday (re-blogged from July, 2013) and just crocheted right on until I finished it yesterday. I really love the neatness and structure of it. As you can see lots of ends to sew in…………

I’m also unsure what type of border to use as it needs to be really simple so it doesn’t detract from the square pattern. I thought this was going to take forever as each square is so tiny but it’s remarkably quick.

The blanket measures 28”  x 28” at the moment.

Monday 15 June 2015

Softee Chunky Colours Lover’s Afghan Blanket Free Crochet Pattern


Whether you decide on Version I's rainbow stripes or Version II's cool blue hues, this crocheted afghan is the perfect way to brighten up a room. Shown in Bernat Softee Chunky.
MEASUREMENTS
Approx 45" x 60" [114.5 x 152.5 cm], excluding fringe.
GAUGE
6 sc and 7 rows = 4"
MATERIALS
Bernat® Softee® Chunky™ (100 g/3.5 oz; 99 m/108 yds)

Version I
Contrast A
Teal (28203) 1 ball
Contrast B Linen (28021) 1 ball
Contrast C Seagreen (28219) 1 ball
Contrast D Faded Denim (28114) 1 ball
Contrast E Grass (28223) 1 ball
Contrast F Clay (28041) 1 ball
Contrast G Glowing Gold (28607) 1 ball
Contrast H Beetroot (28440) 1 ball
Contrast I Grape (28332) 1 ball
Contrast J Royal Purple (28334) 1 ball
Contrast K Natural (28008) 1 ball
Contrast L Pumpkin (28630) 1 ball
Version II
Contrast A
Faded Denim (28114) 4 balls
Contrast B
Seagreen (28219 ) 4 balls
Contrast C Natural (28008 ) 4 balls
Size U.S. M/13 (9mm) crochet hook or size needed to obtain gauge.
ABBREVIATIONS
www.bernat.com/abbreviations
Approx = Approximately
Beg = Beginning
Ch = Chain(s)
Cont = Continue(ity)
Hdc = Half double crochet
Pat = Pattern
Rem = Remain(ing)
Rep = Repeat
RS = Right side
Sc = Single crochet
Sl st = Slip stitch
St(s) = Stitch(es)
Tog = Together
Tr = Treble crochet
INSTRUCTIONS
Notes: Afghan is worked sideways.
Always start each row with RS facing.
Leave 7" [18 cm] yarn tails at beg and end of each row. These tails will be worked into fringe.
Ch 2 at beg of row counts as hdc.
VERSION I
Stripe Pat
With A, work 1 row.
With B, work 1 row.
With C, work 1 row.
With D, work 1 row.
With E, work 1 row.
With F, work 1 row.
With G, work 1 row.
With H, work 1 row.
With I, work 1 row.
With J, work 1 row.
With K, work 1 row.
With L, work 1 row.
These 12 rows form Stripe Pat.
**With A, ch 91, leaving a 7" [18 cm] tail at beg.
1st row: (RS). 1 sc in 2nd ch from hook. 1 sc in each ch to end of chain. Fasten off, leaving a 7" [18 cm] tail. 90 sc.
2nd row: (RS). Join B with sl st to first sc, leaving a 7" [18 cm] tail. Ch 2 (counts as hdc). Working in back loops only, 1 hdc in each sc to end of row. Fasten off, leaving a 7" [18 cm] tail.
3rd row: (RS). Join C with sl st to top of ch 2, leaving a 7" [18 cm] tail. Ch 2. Working in back loops only, 1 hdc in each of next 3 hdc. 1 tr in rem front loop of next st 2 rows below. *1 hdc in each of next 4 hdc. 1 tr in rem front loop of next st 2 rows below. Rep from * to end of row. Fasten off, leaving a 7" [18 cm] tail.**
4th row: (RS). Join D with sl st to top of ch 2, leaving a 7" [18 cm] tail. Ch 1 (does not count as st). 1 tr in rem front loop of first st 2 rows below. Working in back loops only, 1 hdc in each of next 4 sts. *1 tr in rem front loop of next st 2 rows below. 1 hdc in each of next 4 sts. Rep from * to end of row. Fasten off, leaving a 7" [18 cm] tail.
5th row: (RS). Join E with sl st to first tr, leaving a 7" [18 cm] tail. Ch 2. *1 tr in rem front loop of next st 2 rows below.Working in back loops only, 1 hdc in each of next 4 sts. Rep from * to last 4 sts. 1 tr in rem front loop of next st 2 rows below. 1 hdc in each of last 3 hdc. Fasten off, leaving a 7" [18 cm] tail.
6th row: (RS). Join F with sl st to top of ch 2, leaving a 7" [18 cm] tail. Ch 2. Working in back loops only, 1 hdc in next tr. *1 tr in rem front loop of next st 2 rows below. 1 hdc in each of next 4 sts. Rep from * to last 3 sts. 1 tr in rem front loop of next st 2 rows below. 1 hdc in each of last 2 hdc. Fasten off, leaving a 7" [18 cm] tail.
7th row: (RS). Join G with sl st to top of ch 2, leaving a 7" [18 cm] tail. Ch 2 (counts as hdc). Working in back loops only, 1 hdc in each of next 2 sts. *1 tr in rem front loop of next st 2 rows below. 1 hdc in each of next 4 sts. Rep from * to last 2 sts. 1 tr in rem front loop of next st 2 rows below. 1 hdc in last hdc. Fasten off, leaving a 7" [18 cm] tail.
First 7 rows of Stripe Pat are complete.
Keeping cont of Stripe Pat, rep 3rd to 7th rows until work from beg measures 45" [114.5 cm].
Fringe: Cut yarn 14" [35.5 cm] long. Take 2 strands of appropriate color tog, fold in half and knot into fringe, taking yarn tails from Stripe Pat into fringe across ends of Afghan. Trim fringe evenly.
VERSION II
Stripe Pat

With A, work 1 row.
With B, work 1 row.
With C, work 1 row.
These 3 rows form Stripe Pat.
Work from ** to ** as given for Version I.
4th row: With A, as 4th row of Version I.
5th row: With B, as 5th row of Version I.
6th row: With C, as 6th row of Version I.
7th row: With A, as 7th row of Version I.
First 7 rows of Stripe Pat are complete.
Keeping cont of Stripe Pat, rep 3rd to 7th rows until work from beg measures 45" [114.5 cm].
Fringe: Work as for Version I.


Sunday 14 June 2015

Mirasol Hacho Crochet Granny Square Blanket

mirasol
Absolutely stunning granny square blanket made using Mirasol Hacho 100% pure wool. The blanket is constructed using various sizes of grnny squares and various shades of Mirasol Hacho yarn. The colours are beautiful, opulent and create a kaleidoscope or cornucopia of colour.

Blanket measures 130cm square approx. The blanket can be crocheted together as shown in the photographs with top stitch textured detail or alternatively crocheted together as I go so there would be no top seam.
mirasol2
The blanket is now available to order in my Etsy Store here.
Mirasol project details can be found here at The Mirasol project website click here.
mirasol3
The philosophy behind the Mirasol Project is very simple, the Mirasol Project supports local communities in Peru through the sales of the Mirasol Yarn Collection.
Peru's heritage and culture of textile artistry is rich and ancient. The Mirasol Yarn Collection includes yarn made from the animals bred by these communities for generations in the Peruvian highlands. Without them we would not have this beautiful yarn.
By purchasing the Mirasol Yarn Collection you are supporting the shepherds and their families ensuring the continuation of this tradition.
A portion of every purchase goes directly to the funding of a centre in the remote area of Munani in the region of Puno
mirasol4
mirasol5


Saturday 13 June 2015