I have just been commissioned to make a Tutti Frutti Blanket and thought I would post some photos here. The crochet pattern is available in my etsy store.
The blanket can be ordered here too.
I have just been commissioned to make a Tutti Frutti Blanket and thought I would post some photos here. The crochet pattern is available in my etsy store.
The blanket can be ordered here too.
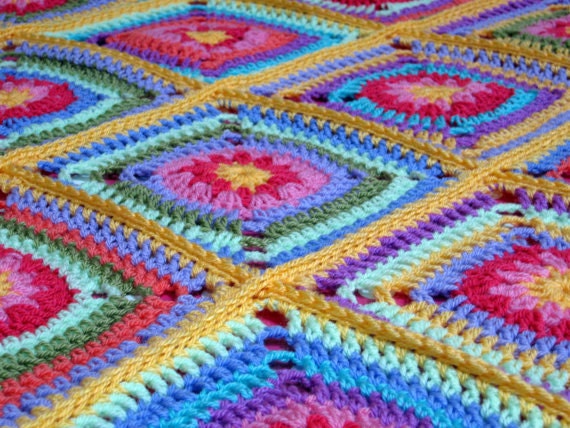
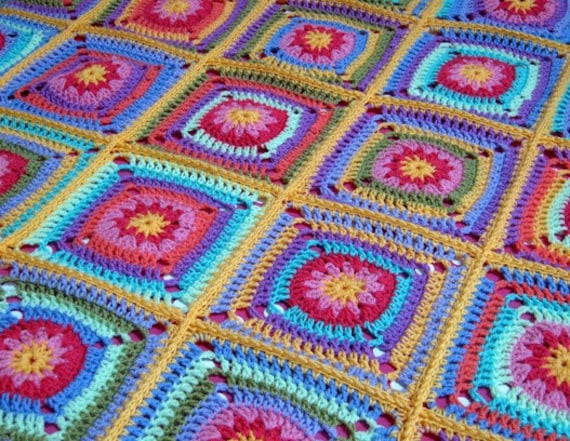
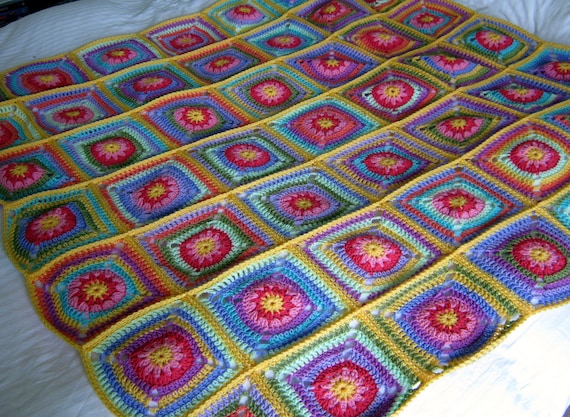
I’m busy finishing off this blanket for a customer. It is so bright I just love the colours.


Here is an absolutely stunning granny square blanket made using mirasol hacho 100% pure wool. The blanket is constructed using various sizes of granny squares and various shades of Mirasol hacho yarn. The colours are beautiful, opulent and create a kaleidoscope or cornucopia of colour.
Blanket measures 130cm square approx.
If you are familiar with The Mirasol Project - The philosophy behind the Mirasol Project is very simple, the Mirasol Project supports local communities in Peru through the sales of the Mirasol Yarn Collection.
Peru’s heritage and culture of textile artistry is rich and ancient. The Mirasol Yarn Collection includes yarn made from the animals tended by these communities for generations in the Peruvian highlands. Without them we would not have this beautiful yarn.
By purchasing the Mirasol Yarn Collection you are supporting the shepherds and their families ensuring the continuation of this tradition.
A portion of every purchase goes directly to the funding of a centre in the remote area of Munani in the region of Puno.

Here is a textured almost three dimensional cushion – so dotty. This cushion is now en route to San Francisco. The pattern for the cushion or pillow cover is available here in my Etsy store.


This beautiful piece has been a long time favorite. It's a traditional style with contemporary color shades that work in many home decorating schemes.
Throw measures 57" x 73"

This modern, two-color approach to the floral granny square throw is perfect for all styles of home décor. Choose any neutral color and accent it with a vibrant color that makes you feel good!
Source - redheart.com - download pattern here.
Throw measures 45” wide x 55” long (114.5 x 139.5 cm)
Special St picot = ch 2, slip st in 2nd ch from hook. reverse sc (reverse single crochet) = Work single crochet in opposite direction from which you would usually work (left to right if you are right-handed and right to left if you are left-handed). This st is also known as crab st. It creates a rope-like twisted single crochet edging.
Notes
1. Throw is made from 20 square motifs worked in joined rounds with right facing throughout.
2. Raised flowers are formed by working twice in the same round: first into front loops to create petals, then in unworked loops to make the center.
3. Motifs are joined to neighboring motifs using a “join-as-you-go” technique as the last round is worked. Hold the motifs with wrong sides together and stitches matching.
4. Join motifs to neighboring motifs according to Assembly Diagram and instructions.
5. To change color, work last st of old color to last yarn over. Yarn over with new color and draw through all loops on hook to complete st. Proceed with new color. Cut old color.
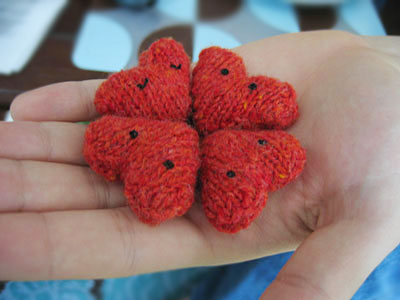
As we approach Valentines day I thought I would post a few links to interesting patterns for both Knitters and Crocheter’s alike. I hope they will inspire you to pick up your hooks or needles.

Knit a Heart in 15 Mins for Valentines Day

Hearts on Knitting Pattern Central

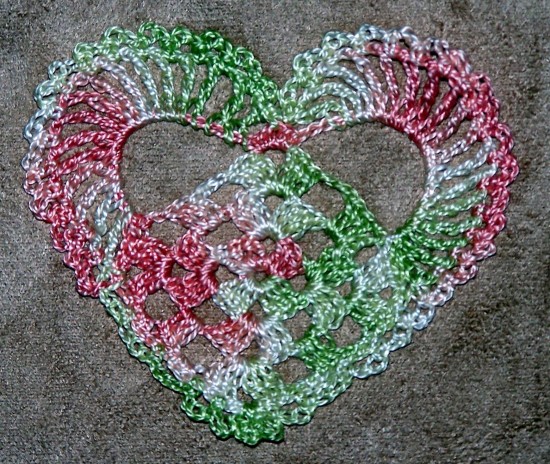

Bella Dia Sweet Heart Crochet Pattern


Source - Lionbrand.com click here.
Small Square Motif = about 7 in. (18 cm) across
When you match the gauge in a pattern, your project will be the size specified in the pattern and the materials specified in the pattern will be sufficient. The needle or hook size called for in the pattern is based on what the designer used, but it is not unusual for gauge to vary from person to person. If it takes you fewer stitches and rows to make your swatch, try using a smaller size hook or needles; if more stitches and rows, try a larger size hook or needles.
Making a Gauge Swatch
1. Motifs in assorted shapes and sizes are worked individually, then sewn together into strips. The strips are sewn together to make the Skirt.
2. The Skirt was designed to be very long! If you'd like a shorter Skirt, about 27 1/2 in. (70 cm), simply omit Strip 1. For this option, you'll need only 11 balls of color #202.
3. Small, Medium, and Large Square Motifs are worked in rounds. All other Motifs are worked back and forth in rows.
4. The motifs are worked in easy, basic crochet sts. You should be comfortable with sewing all the motifs together and with sewing in a zipper. Detailed instructions for sewing in the zipper are given under FINISHING.
5 A simple dc edging is worked along the top edge of each Strip and around the lower edge of Skirt.
6. To change color, work last st of old color to last yarn over. Yarn over with new color and draw through all loops to complete the st.

SMALL SQUARE MOTIFS (make 2)
With A, ch 4.
Join with sl st in first ch to form a ring.
Rnd 1 (RS): Ch 3 (counts as first dc on this rnd and on all following rnds of this Motif), 2 dc in ring, ch 2, (3 dc in ring, ch 2) 3 times; join with sl st in top of beg ch – you will have 12 dc and 4 ch-2 sps at the end of Rnd 1.
Rnd 2: Sl st in next 2 dc, (sl st, ch 3, 2 dc, ch 2, 3 dc) in next ch-2 sp (corner made), *ch 1, (3 dc, ch 2, 3 dc) in next ch-2 sp (corner made); rep from * twice more, ch 1; join with sl st in top of beg ch – 24 dc.
Rnd 3: Sl st in next 2 dc, (sl st, ch 3, 2 dc, ch 2, 3 dc) in next corner ch-2 sp, *ch 1, 3 dc in next ch-1 sp, ch1, (3 dc, ch 2, 3 dc) in next corner ch-2 sp; rep from * twice more, ch 1, 3 dc in next ch-1 sp, ch 1; join with sl st in top of beg ch – 36 dc.
Rnd 4: Sl st in next 2 dc, (sl st, ch 3, 2 dc, ch 2, 3 dc) in next corner ch-2 sp, *(ch 1, 3 dc) in each ch-1 sp to next corner ch-2 sp, ch 1, (3 dc, ch 2, 3 dc) in corner ch-2 sp; rep from * twice more, (ch 1, 3 dc) in each ch-1 sp to end of rnd; join with sl st in top of beg ch – 48 dc.
Rnds 5-9: Rep Rnd 4 – 108 dc at the end of Rnd 9.
Fasten off.
MEDIUM SQUARE MOTIFS (make 4)
Work same as Small Square Motif, then rep Rnd 4 once more – 120 dc.
Fasten off.
LARGE SQUARE MOTIFS (make 4)
Work same as Small Square Motif, then rep Rnd 4 twice more – 132 dc.
Fasten off.
SMALL TRIANGLE MOTIFS (make 4)
With A, ch 6.
Row 1 (RS): Sk 4 ch (skipped chs count as 1 dc + 1 ch), 3 dc in 5th ch from hook, ch 2, (3 dc, ch 1, dc) in last ch – you will have 8 dc at the end of this row.
Row 2: Ch 4 (counts as 1 dc + 1 ch on this row and on all following rows of this Motif), turn, 3 dc in first ch-1 sp, ch 1, (3 dc, ch 2, 3 dc) in next ch-2 sp (corner made), ch 1, (3 dc, ch 1, dc) in last sp – 14 dc.
Row 3: Ch 4, turn, (3 dc, ch 1) in each ch-1 sp to corner ch-2 sp, (3 dc, ch 2, 3 dc) in corner ch-2 sp, (ch 1, 3 dc) in each ch-1 sp to last sp, ch 1, (3 dc, ch 1, dc) in last sp – 20 dc.
Rows 4-9: Rep Row 3 – 56 dc at the end of Row 9.
Fasten off.
MEDIUM TRIANGLE MOTIFS (make 8)
Work same as Small Triangle Motif, then rep Row 3 once more – 62 dc.
Fasten off.
LARGE TRIANGLE MOTIFS (make 8)
Work same as Small Triangle Motif, then rep Row 3 twice more – 68 dc.
Fasten off.
ADDITIONAL MOTIFS
#1 MOTIFS (make 4)
With A, ch 6.
Row 1: Sk 4 ch (skipped 4 chs count as 1 dc + 1 ch), 3 dc in 5th ch from hook, ch 2, (3 dc, ch 1, dc) in last ch – you will have 8 dc at the end of this row.
Row 2: Ch 4 (counts as 1 dc + 1 ch on this row and on all following rows of this Motif), turn, 3 dc in first ch-1 sp, ch 1, (3 dc, ch 2, 3 dc) in next ch-2 sp (corner made), ch 1, (3 dc, ch 1, dc) in last sp – 14 dc.
Row 3: Ch 4, turn, (3 dc, ch 1) in each ch-1 sp to corner ch-2 sp, (3 dc, ch 2, 3 dc) in corner ch-2 sp, (ch 1, 3 dc) in each ch-1 sp to last sp, ch 1, (3 dc, ch 1, dc) in last sp – 20 dc.
Rows 4 and 5: Rep Row 3 – 32 dc at the end of Row 5.
Row 6: Ch 4, turn, (3 dc, ch 1) in each ch-1 sp to corner ch-2 sp, (3 dc, ch 2, 3 dc) in corner ch-2 sp, (ch 1, 3 dc) in each ch-1 sp to last sp, dc in last sp – 35 dc.
Row 7: Ch 4, turn, sk first 4 dc, (3 dc, ch 1) in each ch-1 sp to corner ch-2 sp, (3 dc, ch 2, 3 dc) in corner ch-2 sp, (ch 1, 3 dc) in each ch-1 sp to last sp, ch 1, (3 dc, ch 1, dc) in last sp – 38 dc.
Row 8: Ch 4, turn, (3 dc, ch 1) in each ch-1 sp to corner ch-2 sp, (3 dc, ch 2, 3 dc) in corner ch-2 sp, (ch 1, 3 dc) in each ch-1 sp to last sp, ch 1, 3 dc in last sp – 43 dc.
Row 9: Ch 4, turn, sk first 3 dc, (3 dc, ch 1) in each ch-1 sp to corner ch-2 sp, (3 dc, ch 2, 3 dc) in corner ch-2 sp, (ch 1, 3 dc) in each ch-1 sp to last sp, ch 1, (3 dc, ch 1, dc) in last sp – 47 dc.
Fasten off.
#2 MOTIFS (make 4)
With A, ch 4.
Row 1: Sk 1 ch, sc in next ch and in each ch to end – 3 sc.
Row 2: Ch 4 (counts as 1 dc + 1 ch on this row and on all rows of this Motif), (3 dc, ch 2, 3 dc) in first sc (corner made), ch 1, sk next sc, (3 dc, ch 1, dc) in last sc – 11 dc.
Row 3: Ch 4, turn, (3 dc, ch 1) in each ch-1 sp to corner ch-2 sp, (3 dc, ch 2, 3 dc) in corner ch-2 sp, ch 1, (3 dc, ch 1, dc) in last sp – 17 dc.
Row 4: Ch 4, turn, (3 dc, ch 1) in each ch-1 sp to corner ch-2 sp, (3 dc, ch 2, 3 dc) in corner ch-2 sp, (ch 1, 3 dc) in each ch-1 sp to last sp, ch 1, (3 dc, ch 1, dc) in last sp – 23 dc.
Row 5: Ch 4, turn, (3 dc, ch 1) in each ch-1 sp to corner ch-2 sp, (3 dc, ch 2, 3 dc) in corner ch-2 sp, (ch 1, 3 dc) in each ch-1 sp to last 4 dc, ch 1, sk next dc, 3 dc in next dc, ch 1, sk next dc (3 dc, ch 1, dc) in last sp – 32 dc.
Row 6: Rep Row 4 – 38 dc.
Row 7: Ch 4, turn, (3 dc, ch 1) in each ch-1 sp to corner ch-2 sp, (3 dc, ch 2, 3 dc) in corner ch-2 sp, (ch 1, 3 dc) in each ch-1 sp to last sp, ch 1, dc in last sp – 41 dc.
Row 8: Rep Row 4 – 47 dc.
Fasten off.
STRIP 1
Following diagram, sew together 4 Large Square Motifs and 8 Large Triangle Motifs to make a long strip. Sew ends of strip for side seam.
Click for pdf of diagram.
Top Edging
Note: This edging is worked in rnds.
Choose either long edge to be the top edge of Strip 3.
From RS, join C with a sl st at side seam.
Rnd 1 (RS): Ch 3 (counts as first dc), work dc evenly spaced around top edge; join with sl st in top of beg ch, changing to D in last st.
Rnd 2: With D, ch 3 (counts as first dc), dc in each st around; join with sl st in top of beg ch, changing to E in last st.
Rnd 3: With E, rep Rnd 2.
Fasten off.
STRIP 2
Following diagram, sew together 4 Medium Square Motifs and 8 Medium Triangle Motifs to make a long strip. Sew ends of strip for side seam.
Click for pdf of diagram.
Top Edging
Note: This edging is worked in rnds.
Choose either edge to be the top edge of Strip 2.
From RS, join E with a sl st at side seam.
Rnd 1 (RS): Ch 3 (counts as first dc), work dc evenly spaced around top edge; join with sl st in top of beg ch, changing to B in last st.
Rnd 2: With B, ch 3 (counts as first dc), dc in each st around; join with sl st in top of beg ch, changing to D in last st.
Rnd 3: With D, rep Rnd 2.
Fasten off.
STRIP 3
Following diagram, sew together 2 Small Square Motifs, 4 Small Triangle Motifs, 4 of #1 Motifs, and 4 of #2 Motifs to make a long strip. Do NOT sew ends of strip for side seam.
Click for pdf of diagram.
Top Edging
Note: This edging is worked back and forth in rows.
The edge with #1 Motifs is the top edge of Strip 1.
From RS, join C with a sl st at right corner of top edge.
Row 1 (RS): Ch 3 (counts as first dc), work dc evenly spaced across top edge, changing to E in last st.
Row 2: With E, ch 3 (counts as first dc), turn, dc in each dc across, changing to B in last st.
Row 3: With B, rep Row 2, changing to C in last st.
Row 4: With C, rep Row 2.
Fasten off.
FINISHING
Note: The pattern will tell you which strips need to be eased as they are sewn together. Easing is simply making 2 strips fit together when one strip is slightly longer than the other. An easy way to do this is as follows: first, place a marker or safety pin on the edge of one strip opposite the side seam. This divides the edge in half. Now, fold the skirt, matching the marker or pin to the side seam, and place a marker or pin at each of the folds, dividing the edge into quarters. Do the same of the edge of the strip you'll be joining.
Now, pin the strips together, matching each of the marked points. You'll see that the edge of one strip is slightly longer than the edge of the other strip. Sew the strips together, stretching the shorter edge a bit as you sew so that the longer edge fits.
This easing creates the A-line shape of the Skirt.
Following the instructions above for easing, sew the lower edge of Strip 3 to the top edge of Strip 2, easing Strip 2 as you go.
In the same way, sew the lower edge of Strip 2 to the upper edge of Strip 1.
Insert Zipper
With top edge of zipper even with top edge of Skirt, pin zipper into open side edge of Strip 3. With sewing needle and thread, baste each zipper tape to WS of Skirt.
With sewing needle and thread, sew small backstitches through each zipper tape and through Skirt, then remove basting sts.
Lower Edging
Note: This edging is worked in rnds.
From RS, join E with a sl st on lower edge of Skirt at side seam.
Rnd 1 (RS): Ch 3 (counts as first dc), dc evenly spaced around bottom edge; join with sl st in top of beg ch, changing to C in last st.
Rnd 2: With C, ch 3 (counts as first dc), dc in each st around; join with sl st in top of beg ch, changing to B in last st.
Rnd 3: With B, rep Rnd 2.
Fasten off.
Weave in ends.


Skill Level: Easy
Materials: 5.5mm hook, tapestry needle, 200g assorted DK yarn – black, green, pink, orange, purple & blue
Notes: Bi sided cushion cover for a 16” square cushion insert.
Measurements: 17” x 17”
Using black yarn, ch 4 join with a slip st to form ring.
Rnd 1: ch 2 work 11 dc into centre ring, join with sl st and fasten off yarn.
Rnd 2: Join orange yarn in sp between the dc’s, ch 2, work 1 dc into same sp, work 2 dc into each space to end, join with sl st and fasten off yarn.
Rnd 3: Join green yarn in any space between the double dc’s, ch 2 work 2 dc into same space, work 3 dc into each sp around the circle and join with a slip st, fasten off yarn.
Rnd 4: Join pink yarn in any space between the double dc’s, ch 2 work 3 dc into same space, work 4 dc into each sp around the circle and join with a slip st, fasten off yarn.
Rnd 5: Join purple yarn in any space between the quadruple dc’s, in any space between the double dc’s, ch 2 work 4 dc into same space, work 5 dc into each sp around the circle and join with a sl st, fasten off yarn.
Rnd 6: Join black yarn in any space between the 5dc clusters, ch 2, work 2 dc into same sp, *work 3 dc into centre dc in cluster, work 3 dc into next space between 5 dc’s*, repeat a further two times, ch 3 and work another triple dc into same space (to create corner). *Work 7 triple dc’s along next edge to next corner, ch 3 and work another triple dc into same space*, **rep to end until a full round has been completed, join with a sl st, fasten off yarn.
Rnd 7: work as rnd 6 in purple, increasing 1 triple dc cluster each side of the square.
Rnd 8: work as rnd 6 in black, increasing 1 triple dc cluster each side of the square.
Rnd 9: work as rnd 6 in pink, increasing 1 triple dc cluster each side of the square.
Rnd 10: work as rnd 6 in black, increasing 1 triple dc cluster each side of the square.
Rnd 11: work as rnd 6 in green, increasing 1 triple dc cluster each side of the square.
Rnd 12: work as rnd 6 in black, increasing 1 triple dc cluster each side of the square.
Rnd 13: work as rnd 6 in orange, increasing 1 triple dc cluster each side of the square.
Rnd 14: work as rnd 6 in black, increasing 1 triple dc cluster each side of the square.
Ch 50
work 43 rows of HDC in following colour sequence.
Blue x 2, Pink x 3, Orange x1, Purple x1, green x3, Pink x 1, Blue x3, Pink x2, Green x1, Orange x1, Green x1, Pink x2, Purple x2, Green x2, Blue x2, Pink x1, Orange x1, Purple x1, Green x1, Blue x1, Orange x2, Pinkx3, purple x2, pink x1, orange x1, green x2.
To Finish:
Darn all ends in. Sew or crochet (sc) front and back together on 3 sides. Insert cushion and make ties to shut to 4th edge.
This pattern is offered and made available for personal use only. If you wish to reproduce this in any way please contact me or make sure that reference is made to the original author’s blog http://www.goodtimesithinkso.blogspot.com/


