googleads

Sunday 31 August 2014

Crochet Pouf with Stripes Crochet Pattern

Crochet DROPS pouf with stripes in 2 threads ”Eskimo”. ~ DROPS Design

"Perfect for children’s room, or as present?"

Crochet DROPS pouf with stripes in 2 threads ”Eskimo”.

This pattern has been carefully reviewed, but should you have any comments/questions please contact usa@garnstudio.com

DROPS Design: Pattern no ee-427
Yarn group E + E
-----------------------------------------------------------
Measure:
Circumference: approx 160 cm (incl filling)
Diameter: approx 50 cm
Height: approx 20 cm
Materials:
DROPS ESKIMO from Garnstudio
300 g colour no 26, hot pink
250 g colour no 21, blue/violet
200 g colour no 10, bordeaux
200 g colour no 15, dark blue
200 g colour no 23, tan
150 g colour no 07, orange
DROPS CROCHET HOOK SIZE 8 mm – or size needed to get 8 dc in width and 8 rows in height with 2 threads Eskimo on 10 x 10 cm.
ACCESSORIES:
1-2 down duvets for filling (it is important to use down as this is the best to shape the form). A cheap duvet is perfectly fine – we have used summer down duvets that weigh approx. 1400 g).

For free pattern visit Garnstudio.com by clicking here

CROCHET INFO:
Replace first dc at beg of every round with 1 ch. Finish round with 1 sl st in ch from beg of round.

STRIPES:
See chart A.1 – 1 row in chart = 1 round dc.

CROCHET TIPS:
If the crochet gauge is not correct in height you can adjust by adding or deduct 1 round of the stripes.

COLOUR CHANGE-TIPS:
To get the prettiest colour change work last dc on round like this: put hook through last stitch, get the thread, make a yo with the new colour and pull through all sts on hook. Continue next round with the new colour.
----------------------------------------------------------
POUF:
Work in 2 parts, fill it and work the 2 parts tog.
PART 1:
With hot pink crochet 4 ch on hook size 8 mm with 2 threads and form a ring with 1 sl st in first ch.
Then work dc in the round at the same time work stripes - see explanation above!
ROUND 1: READ CROCHET INFO, CROCHET TIPS AND COLOUR CHANGE -TIPS! Work 6 dc in ch-ring.
ROUND 2: Work 2 dc in every dc = 12 dc.
ROUND 3: * Work 1 dc in first dc, 2 dc in next dc *, repeat from *-* the entire round = 18 dc.
ROUND 4: * Work 1 dc in each of the first 2 dc, 2 dc in next dc *, repeat from *-* the entire round = 24 dc.
Continue inc like this (i.e. on every round, work 1 dc more between every time 2 dc are worked in same st) until row marked with arrow in chart has been worked (i.e. last round is a round with pink). There are now 114 dc on round and piece measure approx 50 cm in diameter.
Continue working 1 dc in each dc (stripes continues as before), until A.1 is finished (i.e. last round is a round with pink). Cut the thread.
PART 2:
Beg as on first part and work the same way until row with arrow in chart is worked and there are 114 dc on round (i.e. last round is a round with pink).
Fill the pouf as follows: Place the 2 duvets tog as one thick duvet and pull a jersey sheet over one side of the duvet. Push the duvet in to the largest part of pouf (make sure that the jersey sheet is at the edge). Place the second part of pouf on the top and work tog with 2 threads pink as follows: 1 sl st in first dc on one part, 1 sl st in first dc on the other part, * 1 sl st in next dc on the first part, 1 sl st in next dc on the other part *, repeat from *-* the entire round and finish with 1 sl st in first sl st from beg of round. Cut and fasten the threads.


Diagram


=
hot pink


=
bordeaux


=
orange


=
tan


=
dark blue


=
blue/violet


Friday 29 August 2014

Woodsy Chic Crochet Afghan Blanket Pattern

Woodsy Chic Triangle Lapghan

Crochet Hook: J/10 or 6 mm hook

Yarn Weight: (4) Medium Weight/Worsted Weight and Aran (16-20 stitches to 4 inches)

Materials:

  • RED HEART® Boutique Treasure™: 4 balls each 1918 Abstract A, and 1907 Portrait B
  • Crochet hook: 6mm [US J-10]
  • Yarn needle

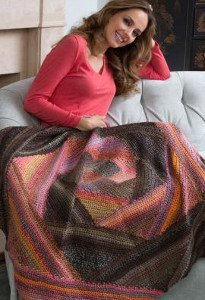
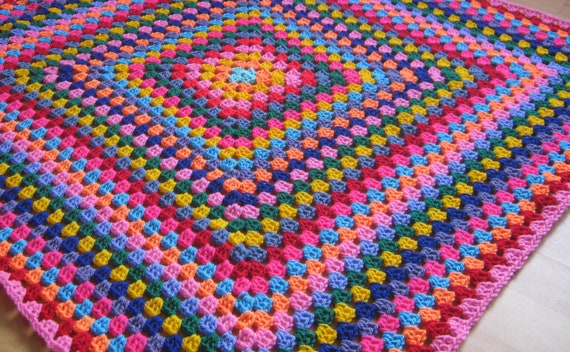
Size: Lapghan measures 40” (101.5 cm) square

Gauge: 12 sts = 4” (10 cm); 12 rows = 4” (10 cm) over Center Squares in single crochet, after blocking. CHECK YOUR GAUGE. Use any size hook to obtain the gauge.

Abbreviations: A and B = Color A and Color B; sc = single crochet; st(s) = stitch (es); yo = yarn over; [ ] = work directions in brackets the number of times specified.

Special Stitches: Fsc (foundation single crochet) = First st: Ch 2, insert hook under top 2 strands of first ch, yo, draw up a loop, yo, draw through 1 loop, yo, draw through both loops (first Fsc complete). Remaining sts: Insert hook under both loops of previous st, yo, draw up a loop, yo, draw through 1 loop, yo, draw through both loops. sc2tog = [Insert hook in next stitch, yarn over and pull up a loop] twice, yarn over and draw through all 3 loops on hook. sc3tog = [Insert hook in next stitch, yarn over and pull up a loop] 3 times, yarn over and draw through all 4 loops on hook.

Notes:

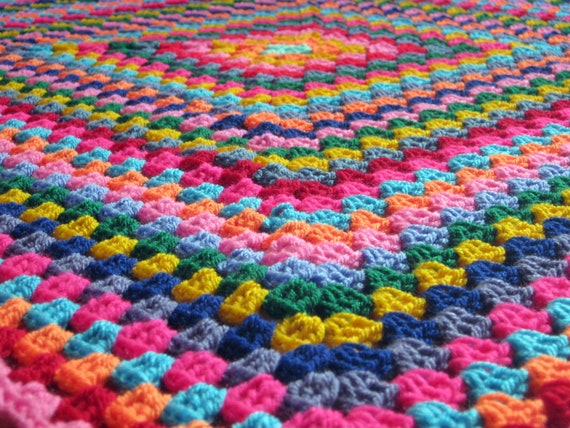
  1. Lapghan is worked from the center outwards, beginning with the Center Squares.
  2. A large center square is worked, changing color to give the appearance of four squares.
  3. Rounds of Triangles are then worked around the Center Squares.
  4. T o change color, work last stitch of old color to last yarn over. Yarn over with new color and draw through all loops on hook to complete stitch. Proceed with new color.

INSTRUCTIONS:

Center Squares:

Row 1 (right side): With A , Fsc 10; with B , Fsc 10—20 sts, turn. Row 2: With B , ch 1, sc in first 10 sts; with A , sc in last 10 sts, turn. Row 3: With A , ch 1, sc in first 10 sts; with B , sc in last 10 sts, turn. Row 4: Repeat Row 2. Rows 5–10: Repeat last 2 rows 3 more times. Fasten off both yarns. Row 11: With right side facing, join B with sc in first st of last row, sc in next 9 sts; with A , sc in last 10 sts. Row 12: Repeat Row 3. Row 13: Repeat Row 2. Rows 14-19: Repeat last 2 rows 3 more times. Row 20: Repeat Row 3. Fasten off A . Do not fasten off B .

FIRST ROUND OF TRIANGLES:

Note: Each Triangle of the First Round is worked beginning across one side edge of each of the Center Squares.

First Triangle

Row 1 (right side): With B , sc in each st across, turn—20 sts.

Rows 2–10: Ch 1, sc2tog, sc in each st to last 2 sts, sc2tog, turn—2 sts.

Row 11: Ch 1, sc2tog—1 st. Fasten off.

Second Triangle

Row 1 (right side): With right side facing and A , work 20 sc evenly spaced across next edge of Center Squares (to the left of the First Triangle)—20 sts.

Rows 2–11: Work same as Rows 2–11 of First Triangle. Fasten off.

Third Triangle

Row 1 (right side): With right side facing and B , work 20 sc evenly spaced across next edge of Center Squares (to the left of the Second Triangle)—20 sts.

Rows 2–11: Work same as Rows 2–11 of First Triangle. Fasten off.

Fourth Triangle

Work same as Second Triangle across remaining edge of Center Squares. Do not fasten off.

SECOND ROUND OF TRIANGLES:

Note: Each Triangle of the Second Round is worked beginning across one side edge of each of two Triangles of the First Round.

First Triangle

Row 1 (right side): With A , ch 1, work 15 sc evenly spaced across side edge of Fourth Triangle, sc in space between Fourth and First Triangle, work 15 sc evenly spaced across side edge of First Triangle, turn—31 sts.

Rows 2–15: Ch 1, sc2tog, sc in each st to last 2 sts, sc2tog, turn—3 sts.

Row 16: Ch 1, sc3tog—1 st. Fasten off.

Second Triangle

Row 1 (right side): With right side facing and B , ch 1, work 15 sc evenly spaced across next side edge of First Triangle, sc in space between First and Second Triangles, work 15 sc evenly spaced across side edge of Second Triangle—31 sts.

Rows 2–16: Work same as Rows 2–16 of First Triangle. Fasten off.

Third Triangle

Row 1 (right side): With right side facing and A , ch 1, work 15 sc evenly spaced across next side edge of Second Triangle, sc in space between Second and Third Triangles, work 15 sc evenly spaced across side edge of Third Triangle—31 sts.

Rows 2–16: Work same as Rows 2–16 of First Triangle. Fasten off.

Fourth Triangle

Row 1 (right side): With right side facing and B , ch 1, work 15 sc evenly spaced across next side edge of Third Triangle, sc in space between Third and Fourth Triangles, work 15 sc evenly spaced across remaining side edge of Fourth Triangle—31 sts.

Rows 2–16: Work same as Rows 2–16 of First Triangle. Do not fasten off.

Woodsy Chic Triangle Lapghan

THIRD ROUND OF TRIANGLES

Note: Each Triangle of the Third Round is worked beginning across one side edge of each of two Triangles of the Second Round.

First Triangle

Row 1 (right side): With B , ch 1, work 20 sc evenly spaced across side edge of Fourth Triangle, sc in space between Fourth and First Triangle, work 20 sc evenly spaced across side edge of First Triangle, turn—41 sts.

Rows 2–20: Ch 1, sc2tog, sc in each st to last 2 sts, sc2tog, turn—3 sts.

Row 21: Ch 1, sc3tog—1 st. Fasten off.

Second Triangle

Row 1 (right side): With right side facing and A , ch 1, work 20 sc evenly spaced across next side edge of First Triangle, sc in space between First and Second Triangles, work 20 sc evenly spaced across side edge of Second Triangle—41 sts.

Rows 2–21: Work same as Rows 2–21 of First Triangle. Fasten off.

Third Triangle

Row 1 (right side): With right side facing and B , ch 1, work 20 sc evenly spaced across next side edge of Second Triangle, sc in space between Second and Third Triangles, work 20 sc evenly spaced across side edge of Third Triangle—41 sts.

Rows 2–21: Work same as Rows 2–21 of First Triangle. Fasten off.

Fourth Triangle

Row 1 (right side): With right side facing and A , ch 1, work 20 sc evenly spaced across next side edge of Third Triangle, sc in space between Third and Fourth Triangles, work 20 sc evenly spaced across remaining side edge of Fourth Triangle—41 sts.

Rows 2–21: Work same as Rows 2–21 of First Triangle. Do not fasten off.

FOURTH ROUND OF TRIANGLES:

Note: Each Triangle of the Fourth Round is worked beginning across one side edge of each of two Triangles of the Third Round.

First Triangle

Row 1 (right side): With A , ch 1, work 25 sc evenly spaced across side edge of Fourth Triangle, sc in space between Fourth and First Triangle, work 25 sc evenly spaced across side edge of First Triangle, turn—51 sts.

Rows 2–25: Ch 1, sc2tog, sc in each st to last 2 sts, sc2tog, turn—3 sts.

Row 26: Ch 1, sc3tog—1 st. Fasten off.

Second Triangle

Row 1 (right side): With right side facing and B , ch 1, work 25 sc evenly spaced across next side edge of First Triangle, sc in space between First and Second Triangles, work 25 sc evenly spaced across side edge of Second Triangle—51 sts.

Rows 2–26: Work same as Rows 2–26 of First Triangle. Fasten off.

Third Triangle

Row 1 (right side): With right side facing and A , ch 1, work 25 sc evenly spaced across next side edge of Second Triangle, sc in space between Second and Third Triangles, work 25 sc evenly spaced across side edge of Third Triangle—51 sts.

Rows 2–26: Work same as Rows 2–26 of First Triangle. Fasten off.

Fourth Triangle

Row 1 (right side): With right side facing and B , ch 1, work 25 sc evenly spaced across next side edge of Third Triangle, sc in space between Third and Fourth Triangles, work 25 sc evenly spaced across remaining side edge of Fourth Triangle—51 sts.

Rows 2–26: Work same as Rows 2–26 of First Triangle. Do not fasten off.

FIFTH ROUND OF TRIANGLES:

Note: Each Triangle of the Fifth Round is worked beginning across one side edge of each of two Triangles of the Fourth Round.

First Triangle

Row 1 (right side): With B , ch 1, work 30 sc evenly spaced across side edge of Fourth Triangle, sc in space between Fourth and First Triangle, work 30 sc evenly spaced across side edge of First Triangle, turn—61 sts.

Rows 2–30: Ch 1, sc2tog, sc in each st to last 2 sts, sc2tog, turn—3 sts.

Row 31: Ch 1, sc3tog—1 st. Fasten off.

Second Triangle

Row 1 (right side): With right side facing and A , ch 1, work 30 sc evenly spaced across next side edge of First Triangle, sc in space between First and Second Triangles, work 30 sc evenly spaced across side edge of Second Triangle—61 sts.

Rows 2–31: Work same as Rows 2–31 of First Triangle. Fasten off.

Third Triangle

Row 1 (right side): With right side facing and B , ch 1, work 30 sc evenly spaced across next side edge of Second Triangle, sc in space between Second and Third Triangles, work 30 sc evenly spaced across side edge of Third Triangle—61 sts.

Rows 2–31: Work same as Rows 2–31 of First Triangle. Fasten off.

Fourth Triangle

Row 1 (right side): With right side facing and A , ch 1, work 30 sc evenly spaced across next side edge of Third Triangle, sc in space between Third and Fourth Triangles, work 30 sc evenly spaced across remaining side edge of Fourth Triangle—61 sts.

Rows 2–31: Work same as Rows 2–31 of First Triangle. Do not fasten off.

SIXTH ROUND OF TRIANGLES:

Note: Each Triangle of the Sixth Round is worked beginning across one side edge of each of two Triangles of the Fifth Round.

First Triangle

Row 1 (right side): With A , ch 1, work 35 sc evenly spaced across side edge of Fourth Triangle, sc in space between Fourth and First Triangle, work 35 sc evenly spaced across side edge of First Triangle, turn—71 sts.

Rows 2–35: Ch 1, sc2tog, sc in each st to last 2 sts, sc2tog, turn—3 sts. Row 36: Ch 1, sc3tog—1 st. Fasten off.

Second Triangle

Row 1 (right side): With right side facing and B , ch 1, work 35 sc evenly spaced across next side edge of First Triangle, sc in space between First and Second Triangles, work 35 sc evenly spaced across side edge of Second Triangle—71 sts.

Rows 2–36: Work same as Rows 2–36 of First Triangle. Fasten off.

Third Triangle

Row 1 (right side): With right side facing and A , ch 1, work 35 sc evenly spaced across next side edge of Second Triangle, sc in space between Second and Third Triangles, work 35 sc evenly spaced across side edge of Third Triangle—71 sts.

Rows 2–36: Work same as Rows 2–36 of First Triangle. Fasten off.

Fourth Triangle

Row 1 (right side): With right side facing and B , ch 1, work 35 sc evenly spaced across next side edge of Third Triangle, sc in space between Third and Fourth Triangles, work 35 sc evenly spaced across remaining side edge of Fourth Triangle—71 sts.

Rows 2–36: Work same as Rows 2–36 of First Triangle. Fasten off.

FINISHING: Weave in ends.

Thursday 28 August 2014

Stripe & Flowers Crochet Throw Pattern


Stripes & Flowers Throw

Your little miss will feel very special having this colorful throw! Crocheted in an awesome rainbow of colors and sprinkled with blossoms, it is sure to please.

Download the pattern at Redheart.com click here.

Monday 25 August 2014

Thursday 21 August 2014

Wednesday 20 August 2014

Diagonal Stripe Crochet Blanket Afghan Pattern.

Diagonal Hues

Designed by Diana Lynn Sippel

This afghan is easier than it looks! To get the dramatic diagonal rows, you simply start at one corner, increase stitches and change color each row until you reach the middle and then decrease each row until you reach the last corner.

Finished Size
About 43" x 46"

Materials

  • Worsted weight yarn, 14 oz (980 yds, 420 gms) black; 8 oz (560 yds, 240 gms) each, dk green, med green, lt green, rose, dk rose, and burgundy
    Note: Our photographed afghan was made with Red Heart® Super Saver, Black #312, Hunter Green #389, Paddy Green #368, Grass Green #687, Claret #378, Rasberry #375, and Lt. Rasberry #744.
  • Size H (5mm) crochet hook, or size required for gauge
  • Size 16 tapestry needle

Gauge
4 sc = 1"

Instructions
Note: To change color, work until 2 lps of last st remain on hook. With new color, YO and draw through 2 lps on hook. Cut old color.

With black, ch 4.
Row 1 (right side): 3 dc in 4th ch from hook, changing to dk green in last dc {beg 3 skipped chs count as a dc on this and following rows}. Ch 4, turn.
Row 2: 3 dc in 4th ch from hook -- beg block made, in sp formed by beg 3 skipped chs work {sc, ch 3, 3 dc} changing to med green in last dc -- block made -- 2 blocks. Ch 4, turn.
Row 3: 3 dc in 4th ch from hook -- beg block made; in next ch-3 sp work {sc, ch 3, 3 dc} -- block made; in sp formed by beg
3 skipped chs work block, changing to lt green in last dc -- 3 blocks. Ch 4, turn.
Row 4: Beg block in 4th ch from hook, block in each ch-3 sp and in sp formed by beg 3 skipped chs, changing to black in last dc -- 4 blocks. Ch 4, turn.
Rows 5 through 48: Rep Row 4 in following color sequence, working 1 row of each color and having one additional block in each row until you have 48 blocks.
black
burgundy
rose
pink
black
dk green
med green
lt green
Row 49: In each of next 47 ch-3 sps work block; sc in sp formed by beg 3 skipped chs, changing to dk green -- 47 blocks. Ch 3, turn.
Row 50: In each of next 46 ch-3 sps work block; sc in sp formed by beg 3 skipped chs, changing to med green -- 46 blocks. Ch 3, turn.
Row 51: In each of next 45 ch-3 sps work block; sc in sp formed by beg 3 skipped chs, changing to lt green -- 45 blocks. Ch 3, turn.
Row 52: In each of next 44 ch-3 sps work block; sc in sp formed by beg 3 skipped chs, changing to black -- 44 blocks. Ch 3, turn.
Rows 53 through 95: Work in pattern in following color sequence, working one row of each color and having one less block on each row until one block remains.
black
burgundy
rose
pink
black
dk green
med green
lt green
At end of last row, do not ch 3.
Finish off and weave in all ends.

Border
Hold afghan with right side facing you and first block made in upper right-hand corner; join black in unused lp of beg ch of first block.
Rnd 1: Ch 1, 3 sc in same lp -- corner made; working across side of blocks, 3 sc in side of each color block of first 48 rows; on Row 48, 3 sc in 3rd ch of turning ch -- corner made; working across next side, 3 sc in side of each color block through Row 95; 3 sc in 3rd ch of turning ch-3 -- corner made; 3 sc in side of each color block through Row 48;
3 sc in 3rd dc of block -- corner made; 3 sc in side of each color block through first block; join in first sc.
Rnd 2: Ch 1, sc in same sc; 3 sc in next sc -- corner made; * sc in each sc to 2nd sc of next corner, 3 sc in 2nd sc -- corner made; rep from * twice more; sc in each sc to first sc; join in first sc. Finish off.
Rnd 3: With burgundy make slip knot on hook and join with an sc in first sc of any corner; ch 1, sc in next sc, ch 1, sc in next sc, ch 1, sk next sc; * † sc in next sc, ch 1, sk next sc †; rep from † to † to first sc of next corner; sc in next sc, ch 1, sc in next sc, ch 1, sc in next sc, ch 1, sk next sc; rep from * twice more, then rep from † to † to joining sc; join in joining sc. Finish off.
Rnd 4: With black make slip knot on hook and join with an sc in any ch-1 sp; ch 3; * sc in next ch-1 sp, ch 3; rep from * around; join in joining sc.
Finish off and weave in all ends.

Source - Talking Crochet Newsletter Click Here.

Monday 18 August 2014

Petite Peonies Crochet Afghan Blanket

peony2

Buy the blanket here or get the instant download pattern here.

peony3

peony4

il_570xN.253823359

Friday 15 August 2014

Wednesday 13 August 2014

Crochet Afghan Blanket Handmade Patchwork Granny Squares

I’ve just completed this blanket for a customer and thought I would show some photographs here.

IMG_2733

IMG_2728

IMG_2731

I also made a smaller blanket for the same customer last week and here are a couple of photograph’s of that one.

IMG_2714

IMG_2713

Tuesday 12 August 2014

Lacy Square Blanket Afghan Free Crochet Pattern

Lacy Square Blanket

Curl up under this lacy blanket. You crochet the motifs together as you go, so no sewing required!

Source Redheart.co.uk

RED HEART® Soft Classic™:

2 skeins each 00005 Grape A, 00012 Grey B and 0009 Turquoise C

Crochet Hook: 5.5mm [US I-9]

Size:

Blanket measures 106 cm [42”] x 137 cm [54”]

Gauge/Tension:

TENSION/GAUGE: Square = 15cm [6”]. CHECK YOUR TENSION/ GAUGE. Use any size hook to obtain the tension/gauge.

Click here to download the printable instructions from Redheart.

Monday 11 August 2014

Peppermint Throw & Pillow Free Crochet Pattern

Peppermint Throw and Pillow

What a delicious way to dress up your home for the holidays! The peppermint motif is very cleverly designed with a smaller filler motif. To complete the look we’ve included a peppermint pillow.

Download the pattern at redheart.com click here.

RED HEART® Soft®: 15 balls 00001 White A and 9 balls 09925 Really Red B

Crochet Hook: 5.5mm [US I-9]

Yarn needle, 40.5 cm [16”] diameter round pillow form, locking stitch marker (optional)

Size:

Throw measures 119.5 cm [47”] wide x 139.5 cm [55”] long.

Pillow measures 40.5 cm [16”] diameter.

Gauge/Tension:

TENSION/GAUGE: 1 small motif = 9 cm [3½”]; 1 large motif = 19.5 cm [7¾”]. CHECK YOUR TENSION/ GAUGE. Use any size hook to obtain the tension/gauge.

Thursday 7 August 2014

Mika – Granny Square Bag Free Crochet Pattern


Mika is a crocheted granny square shoulder bag.

Source: Berroco.com

SIZE

Approximately 14” wide x 14” high (Not including handles)

MATERIALS

2 Balls each BERROCO ZEN (50 grs), #8256 Dragonfly (A) and 3 balls #8253 Obi Black (B)

4 Balls each BERROCO MOSAIC FX (25 grs), #4605 Jules and Jim (C) and 4627 Blow Up (D)

Crochet hook, size 6.50 mm (K) OR SIZE TO OBTAIN GAUGE

GAUGE

Finished square = 7” x 7”

TO SAVE TIME, TAKE TIME TO CHECK GAUGE

SQUARE 1 (Make 5)

With crochet hook, using 2 strands of A held tog, ch 4, join with a sl st to form a ring.

Rnd 1:  Ch 5 (counts as 1 dc and ch-2), (3 dc in ring, ch 2) 3 times, 2 dc in ring, join with a sl st in 3rd ch of ch-5.  Fasten off.

Rnd 2:  Join 2 strands of D held tog in any ch-2 sp, ch 5 (counts as 1 dc and ch-2), 3 dc in same sp, * (3 dc, ch 2, 3 dc) all in next ch-2 sp (Corner made), rep from * around, end 2 dc in beg ch-2 sp, join with a sl st in 3rd ch of ch-5.  Fasten off.

Rnd 3:  Join 2 strands of B held tog in any ch-2 Corner sp, ch 5 (counts as 1 dc and ch-2), 3 dc in same sp, * dc in sp between 3-dc groups, work tr around post of middle dc of 3-dc group of Rnd 1 directly below, dc in same sp, ** work Corner in next ch-2 sp, rep from * around, end at **, 2 dc in beg ch-2 sp, join with a sl st in 3rd ch of ch-5.  Fasten off.

Rnd 4:  Join one strand each of C and D held tog in any ch-2 Corner sp, ch 5 (counts as 1 dc and ch-2), 3 dc in same sp, (3 dc in sp between 3-dc groups) twice, * work Corner in next ch-2 sp, (3 dc in sp between 3-dc groups) twice, rep from * around, 2 dc in beg ch-2 sp, join with a sl st in 3rd ch of ch-5.  Fasten off.

SQUARE 2 (Make 8)

With crochet hook, using 2 strands of C held tog, ch 4, join with a sl st to form a ring.  Complete same as for Square 1, using 2 strands of C held tog for Rnd 1, 2 strands of A held tog for Rnd 2, 2 strands of B held tog for Rnd 3 and 1 strand each of C and D held tog for Rnd 4.

FINISHING

Using a single strand of C, sew squares tog as shown on diagramNote:  Dotted lines ondiagram indicate squares which are folded so that half is on the front and half on the back.  All other squares are the same on front and back.

Handle:  With crochet hook, using B, ch 6, sc in 2nd ch from hook and in each ch across, turn – 5 sc.

Row 1:  Ch 1, sc in each sc across.  Rep Row 1 until handle measures 25” when slightly stretched.  Fasten off.  Sew one end of handle to each high point on sides of bag.

Edging:  With crochet hook, join 1 strand each of C and D held tog at end of handle, ch 1, work in sc along side of handle, sc in each dc and ch-2 sp along edge of bag, join with a sl st in ch-1.  Repeat on the other side of handle and edge of bag.

Button:  With crochet hook, using 1 strand of B, ch 3, join with a sl st to form a ring.

Rnd 1:  Ch 1, work 10 sc in ring.  Continue to work 1 sc in each sc until 20 sc have been worked.  Fasten off and cut yarn leaving a long end.  Gather last 10 sc with long end and fasten securely.  Sew to center front of bag just below top edge (See photo).

Buttonloop:  With crochet hook, using 1 strand each of C and D held tog, ch 20, sl st in 2nd ch from hook and in each ch across.  Fasten off.  Fold in half and sew ends to center back of bag just below top edge.  Loop over button.